Document Overview
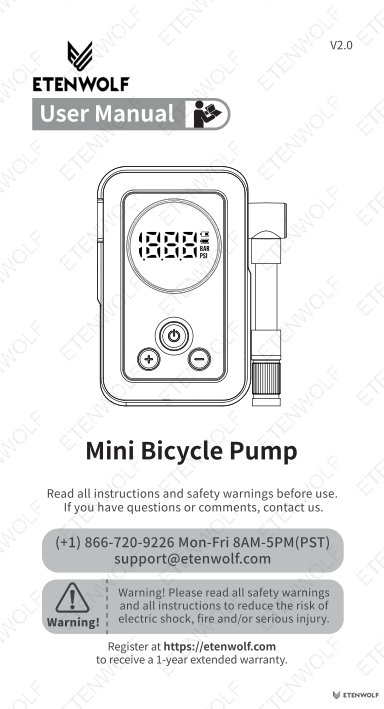
Document Overview This page presents the official user manual for the ETENWOLF S0 Mini Bicycle Pump, document version V2.0, filename S0_manual_EN_20250913.pdf, issued by ETENWOLF. The manual covers all aspects of product operation including quick-start procedures, button controls, battery management, pressure calibration, error code reference, technical…
- Document type
- User Manual
- Prepared by
- Daniel Wright
- Published
- Last reviewed
- Topics
- User Manual
Document Overview
This page presents the official user manual for the ETENWOLF S0 Mini Bicycle Pump, document version V2.0, filename S0_manual_EN_20250913.pdf, issued by ETENWOLF. The manual covers all aspects of product operation including quick-start procedures, button controls, battery management, pressure calibration, error code reference, technical specifications, and safety guidelines. It is intended for end users aged 16 and above. The document is written in English and is applicable globally.
Product Information
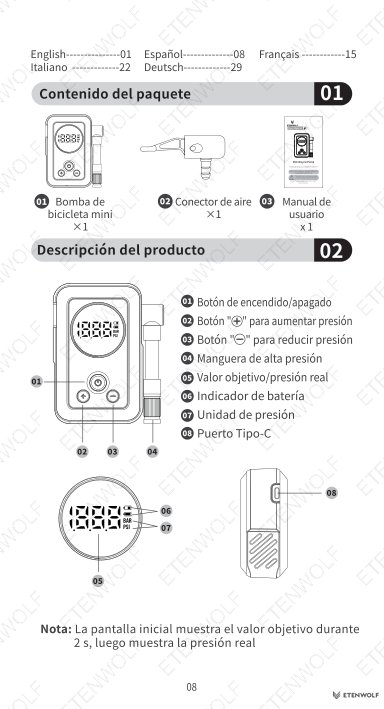
The ETENWOLF S0 is a compact, rechargeable mini bicycle pump designed for portable tire inflation. It features a digital pressure display, preset pressure memory, and automatic shut-off when the target pressure is reached.
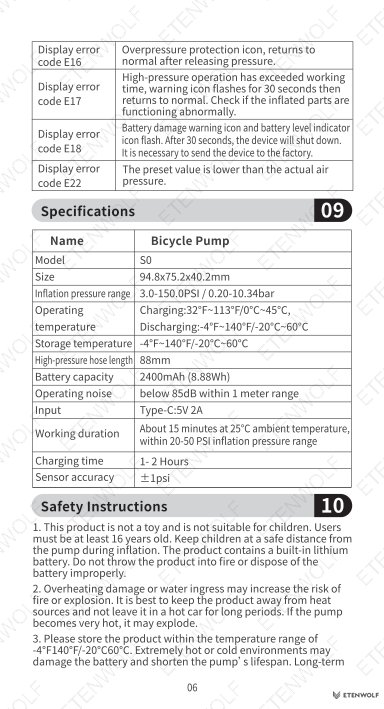
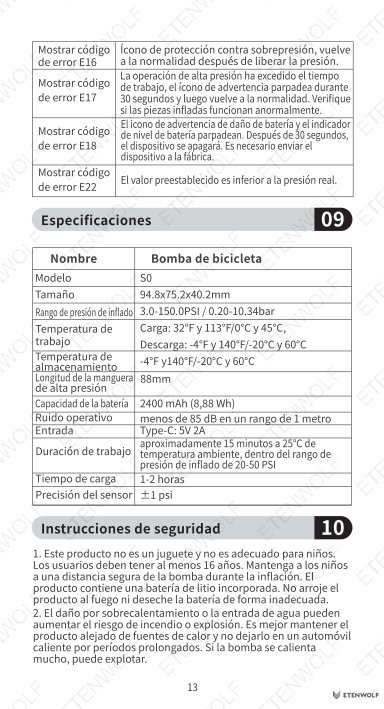
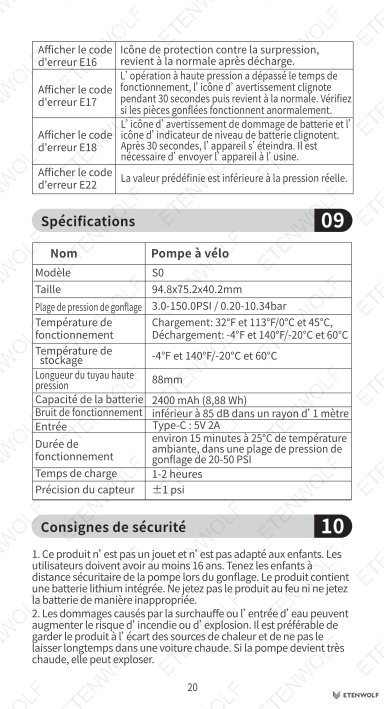
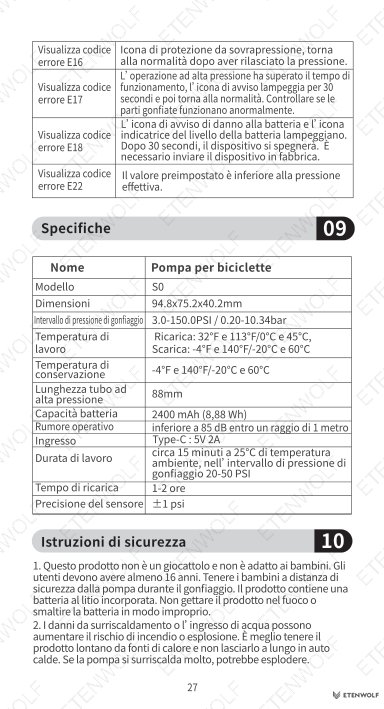
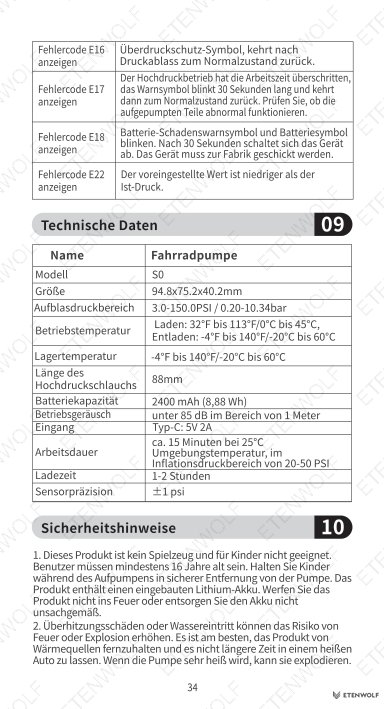
| Attribute | Detail |
|---|---|
| Product Name | Mini Bicycle Pump |
| Model | S0 |
| Dimensions | 94.8 × 75.2 × 40.2 mm |
| Inflation Pressure Range | 3.0 – 150.0 PSI / 0.20 – 10.34 bar |
| Battery Capacity | 2400 mAh (8.88 Wh) |
| Input | Type-C: 5V 2A |
| Charging Time | 1 – 2 hours |
| Working Duration | Approx. 15 minutes at 25°C ambient, within 20 – 50 PSI range |
| Operating Noise | Below 85 dB within 1 meter |
| Sensor Accuracy | ±1 PSI |
| High-Pressure Hose Length | 88 mm |
| Operating Temperature (Charging) | 0°C – 45°C (32°F – 113°F) |
| Operating Temperature (Discharging) | -20°C – 60°C (-4°F – 140°F) |
| Storage Temperature | -20°C – 60°C (-4°F – 140°F) |
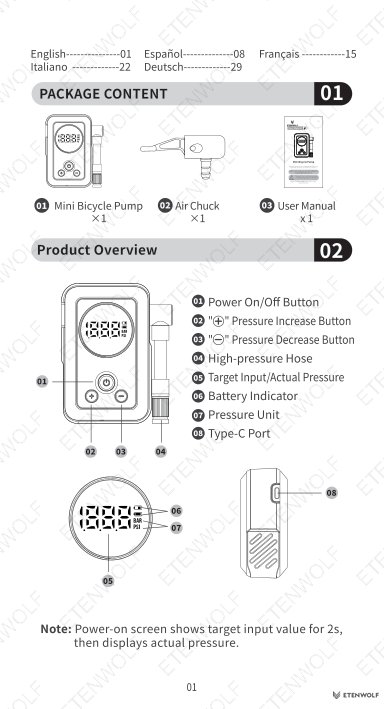
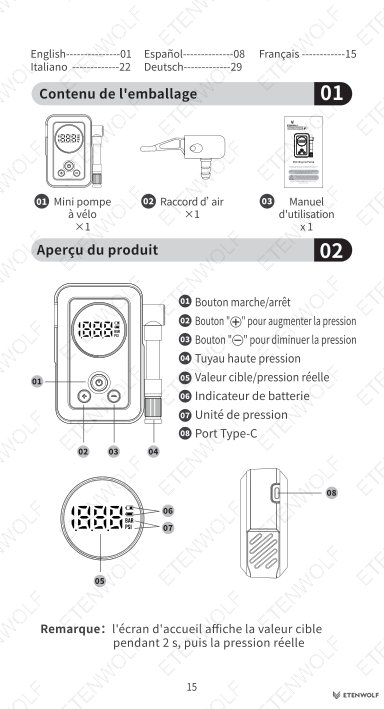
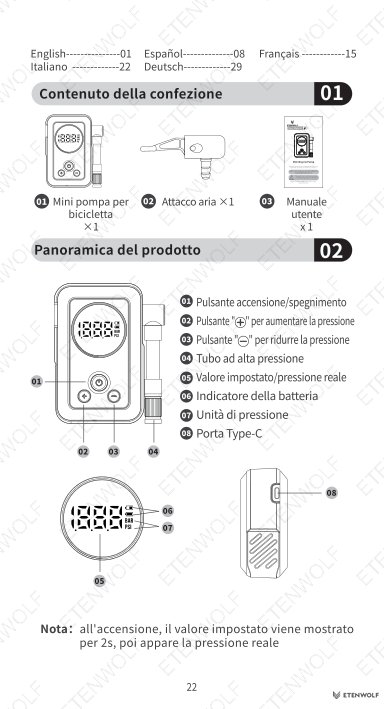
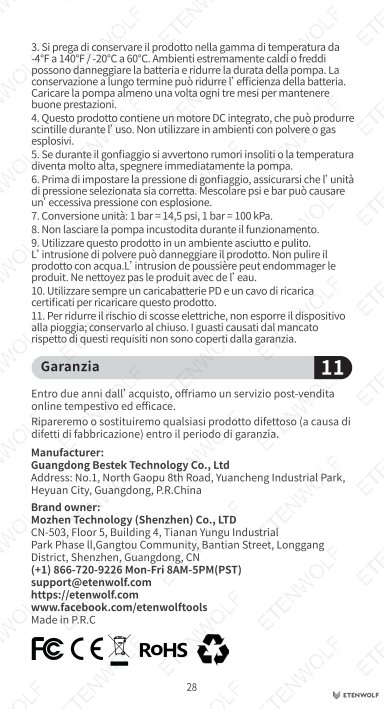
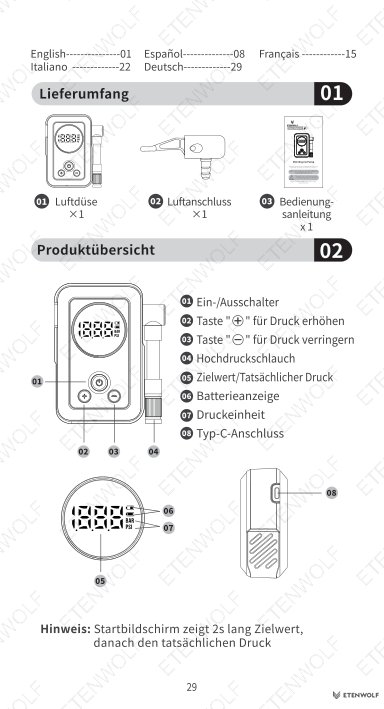
The package includes one Mini Bicycle Pump (S0), one air chuck, and one user manual.
Key Details
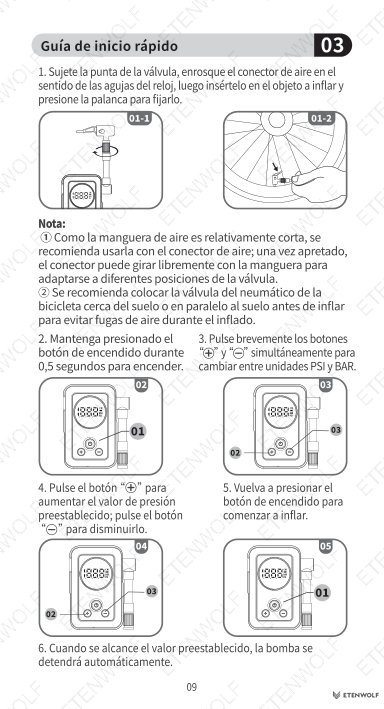
Quick Start Guide
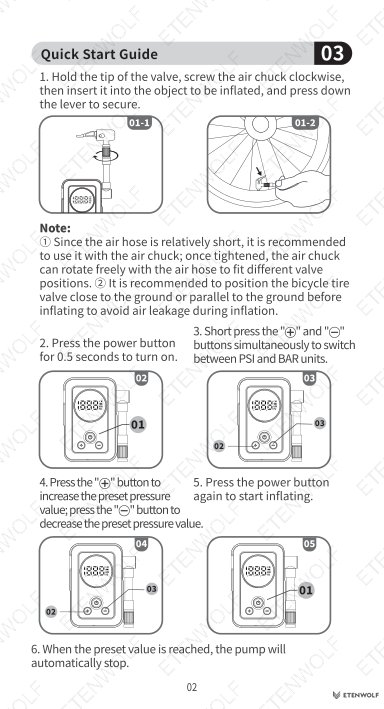
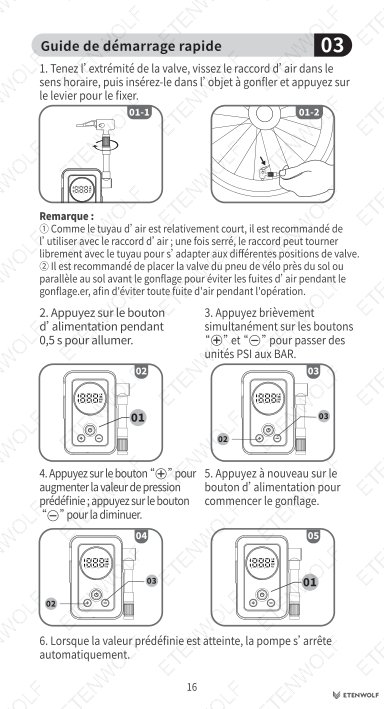
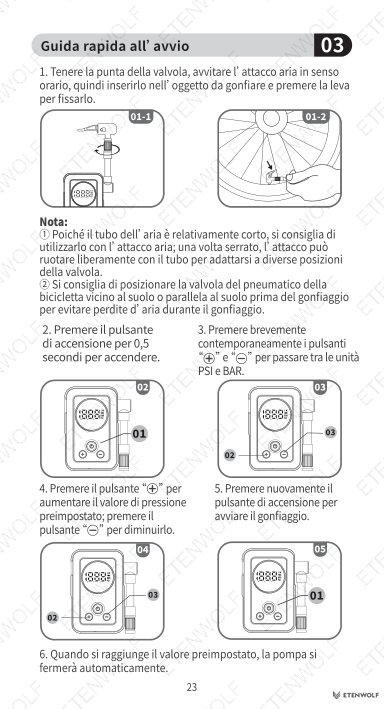
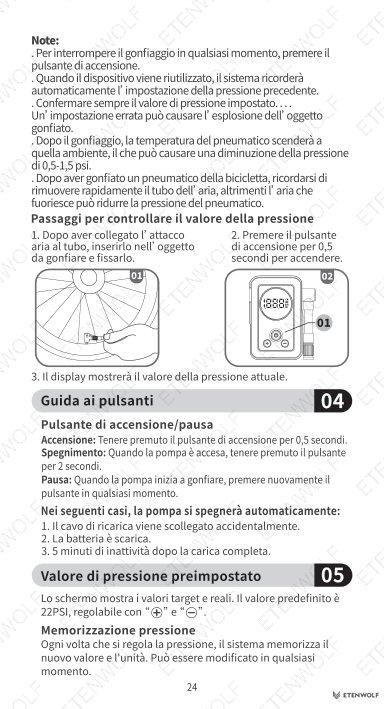
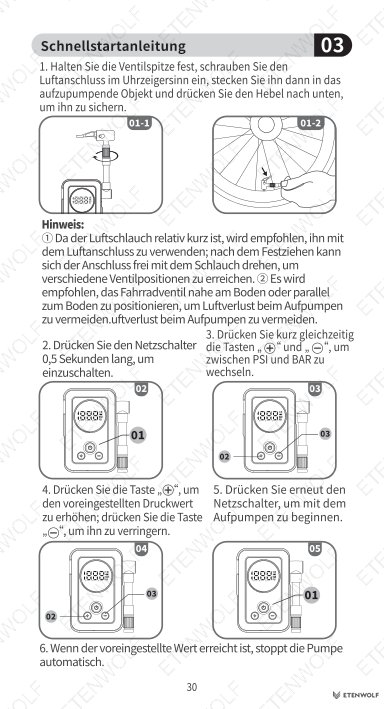
- Hold the tip of the valve, screw the air chuck clockwise, insert it into the object to be inflated, and press down the lever to secure.
- Press the power button for 0.5 seconds to turn on.
- Short-press the + and − buttons simultaneously to switch between PSI and BAR units.
- Press the + button to increase the preset pressure value; press the − button to decrease it.
- Press the power button again to start inflating.
- When the preset value is reached, the pump will automatically stop.
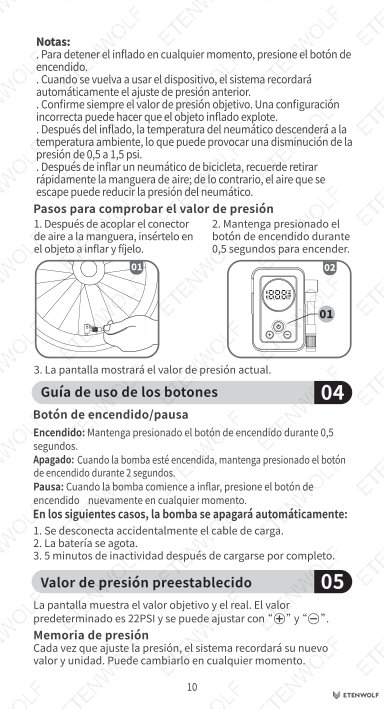
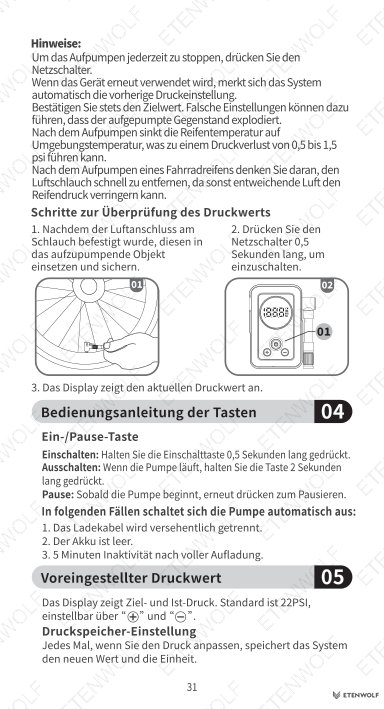
Button Operation Reference
| Action | Button Sequence |
|---|---|
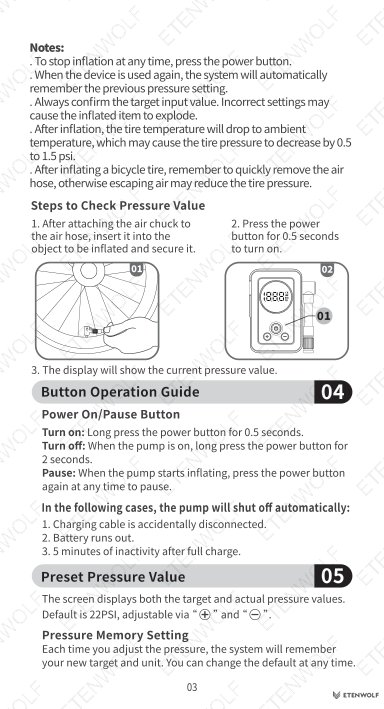
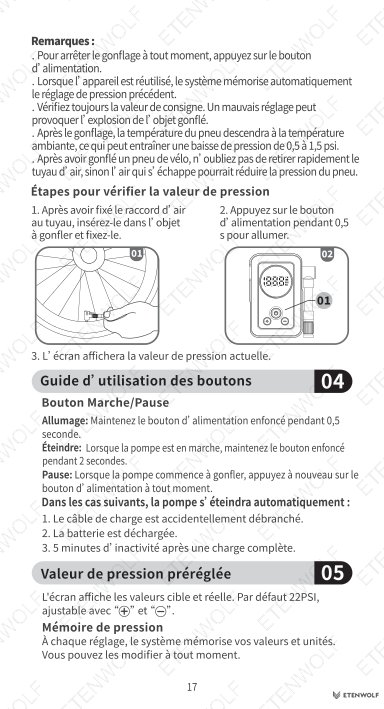
| Power On | Long press power button for 0.5 seconds |
| Power Off | Long press power button for 2 seconds while on |
| Pause Inflation | Short press power button during inflation |
| Increase Preset Pressure | Press + button |
| Decrease Preset Pressure | Press − button |
| Switch PSI / BAR | Short press + and − simultaneously |
| Pressure Calibration | Hold both + and − for 5 seconds while powered on |
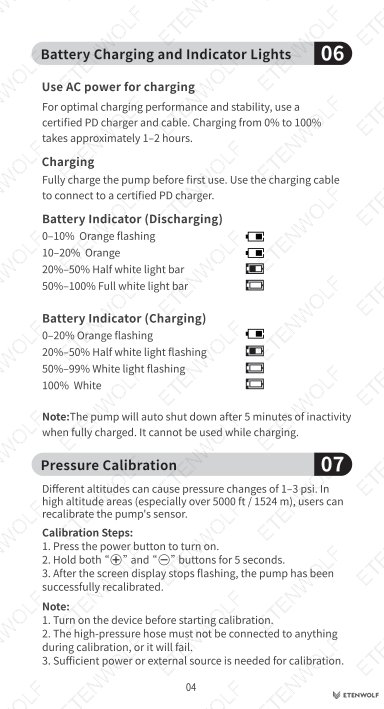
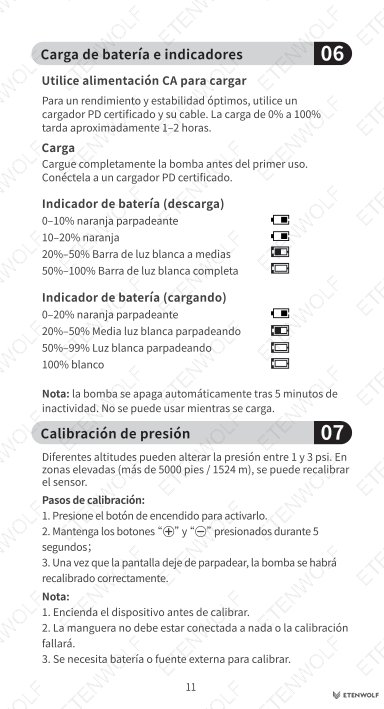
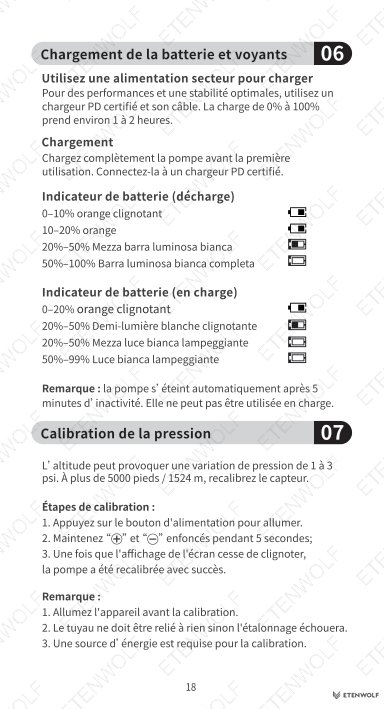
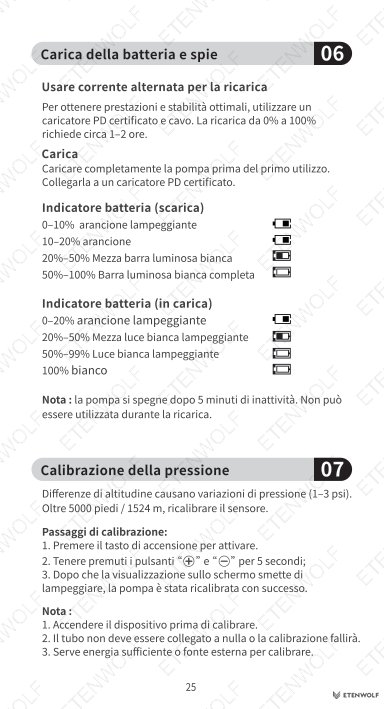
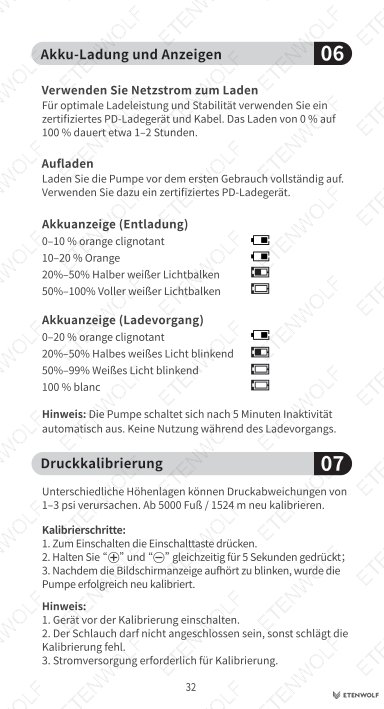
Battery Indicator – Discharging
| Battery Level | Indicator Behavior |
|---|---|
| 0 – 10% | Orange flashing |
| 10 – 20% | Orange steady |
| 20 – 50% | Half white light bar |
| 50 – 100% | Full white light bar |
Battery Indicator – Charging
| Battery Level | Indicator Behavior |
|---|---|
| 0 – 20% | Orange flashing |
| 20 – 50% | Half white light flashing |
| 50 – 99% | White light flashing |
| 100% | White steady |
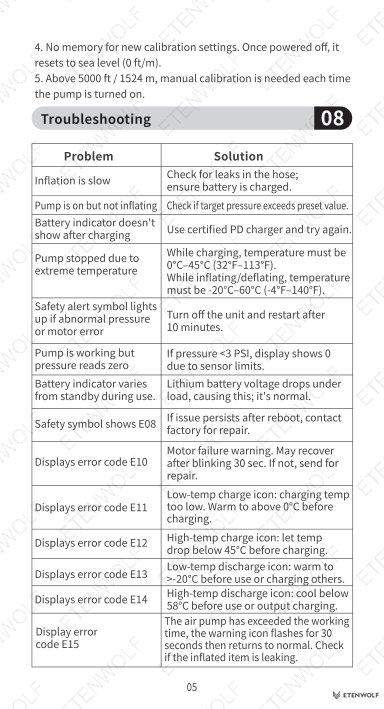
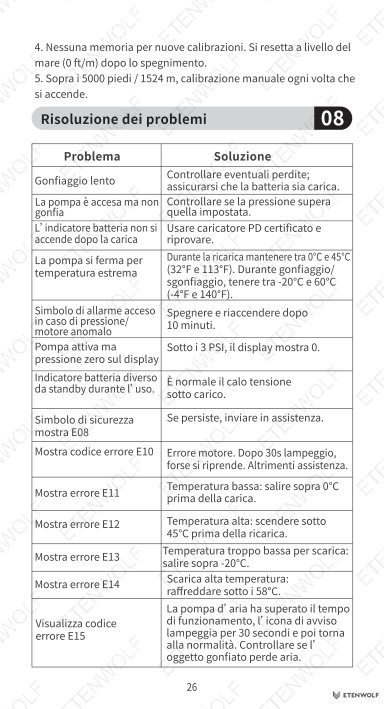
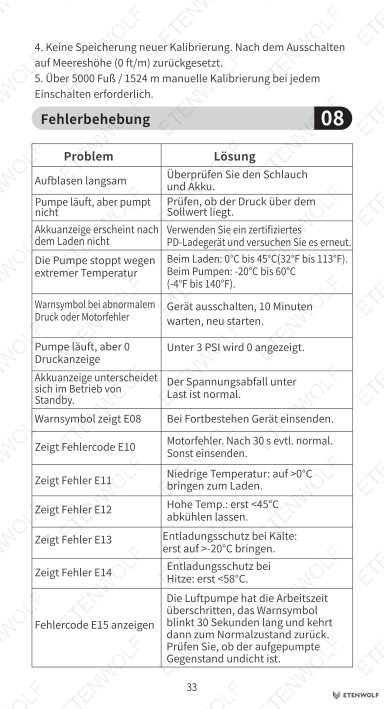
Error Code Reference
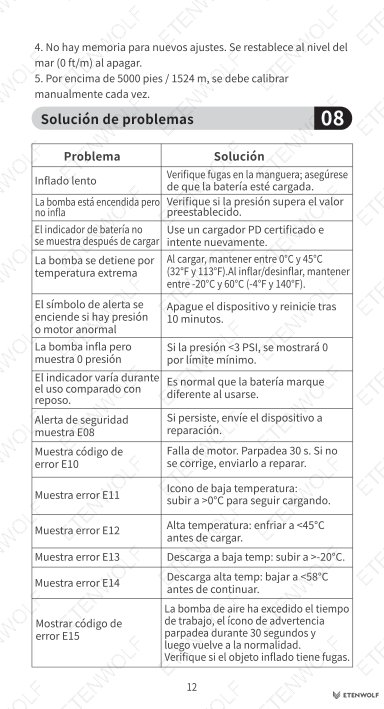
| Error Code | Meaning | Resolution |
|---|---|---|
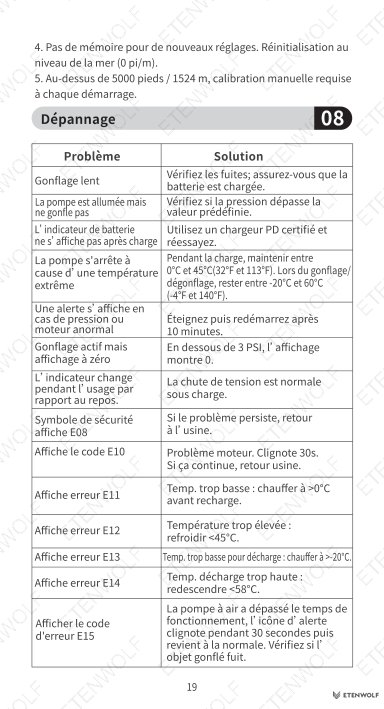
| E08 | Safety symbol / abnormal pressure or motor error | Turn off, wait 10 minutes, restart. If persists, contact factory. |
| E10 | Motor failure warning | May recover after blinking 30 seconds. If not, send for repair. |
| E11 | Low-temperature charging | Warm device to above 0°C before charging. |
| E12 | High-temperature charging | Let temperature drop below 45°C before charging. |
| E13 | Low-temperature discharge | Warm to above -20°C before use. |
| E14 | High-temperature discharge | Cool below 58°C before use. |
| E15 | Exceeded working time | Warning flashes 30 seconds then returns to normal. Check for leaks. |
| E16 | Overpressure protection | Release pressure; returns to normal automatically. |
| E17 | High-pressure operation exceeded working time | Warning flashes 30 seconds. Check inflated parts for abnormality. |
| E18 | Battery damage warning | Device shuts down after 30 seconds. Send to factory for repair. |
| E22 | Preset value lower than actual air pressure | Increase the preset value above the current actual pressure. |
Pressure Calibration
Different altitudes can cause pressure sensor variance of 1 – 3 PSI. In high-altitude areas (especially above 5,000 ft / 1,524 m), users should recalibrate the sensor using the following steps:
- Press the power button to turn on the device.
- Hold both the + and − buttons simultaneously for 5 seconds.
- When the screen display stops flashing, calibration is complete.
Important calibration notes: The high-pressure hose must not be connected to any object during calibration. Calibration requires sufficient battery power. Calibration settings are not retained after power-off; the sensor resets to sea level (0 ft/m). Above 5,000 ft / 1,524 m, manual calibration is required each time the pump is turned on.
Troubleshooting
| Problem | Solution |
|---|---|
| Inflation is slow | Check for leaks in the hose; ensure battery is sufficiently charged. |
| Pump is on but not inflating | Check if the target pressure exceeds the current actual pressure. |
| Battery indicator does not show after charging | Use a certified PD charger and try again. |
| Pump stopped due to extreme temperature | Charging: 0°C – 45°C. Inflating/discharging: -20°C – 60°C. |
| Pressure reads zero | If pressure is below 3 PSI, the display shows 0 due to sensor limits. |
| Battery indicator varies during use | Normal behavior; lithium battery voltage drops under load. |
Standards & Compliance
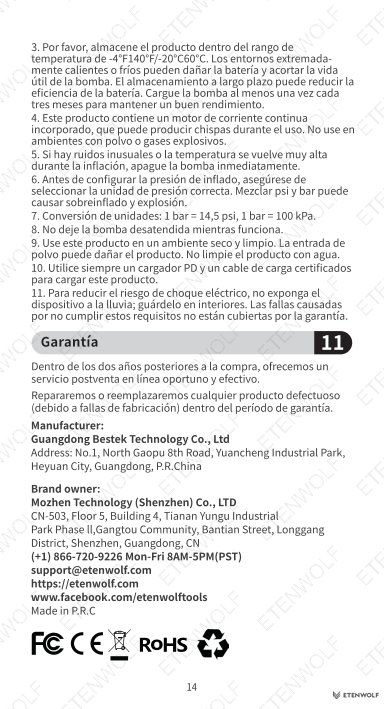
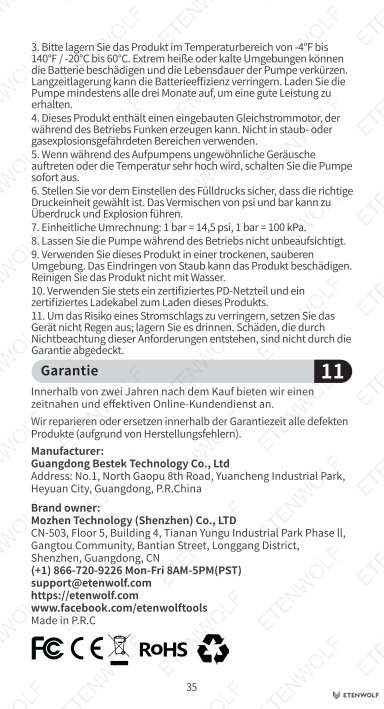
The ETENWOLF S0 is designed with built-in protections aligned with common consumer electronics safety principles, including:
- Lithium battery thermal protection covering overcharge, over-discharge, over-temperature, and short-circuit conditions (E11 – E18 error code suite).
- Overpressure protection (E16) to prevent exceeding safe inflation limits.
- Motor overload protection with automatic pause and error notification (E10, E15, E17).
- Temperature-controlled operation ranges consistent with IEC lithium battery safety standards.
- The built-in lithium battery is subject to transportation safety requirements consistent with UN 38.3 test criteria for lithium cells and batteries.
- Input charging specification (5V 2A via Type-C) is compatible with USB Power Delivery (PD) certified charger requirements.
For full regulatory certification details, refer to the relevant product certification documents. This user manual does not itself constitute a conformity declaration.
Validity & Certification Body
This user manual, version V2.0, was released under filename S0_manual_EN_20250913.pdf, with a document date of September 13, 2025. It is issued directly by ETENWOLF, the product manufacturer and brand owner.
- Document Version: V2.0
- Document Date: 2025-09-13
- Issuing Entity: ETENWOLF (etenwolfgroup.com)
- Applicable Product: S0 Mini Bicycle Pump
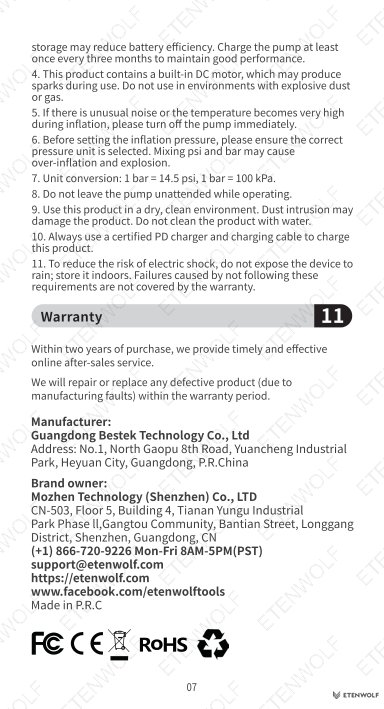
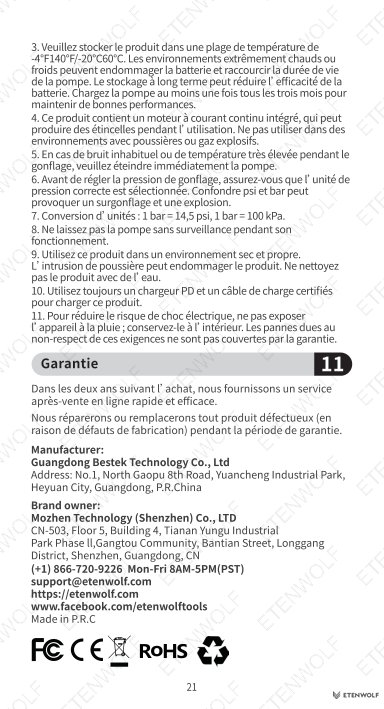
- Warranty Extension: Register at https://etenwolf.com to receive a 1-year extended warranty beyond the standard warranty period.
- Document Scope: Global (English primary edition)
This manual is valid for all S0 units shipped with firmware and hardware matching the V2.0 documentation revision. ETENWOLF reserves the right to update this document. Always verify you have the current version via the official ETENWOLF website.
Frequently Asked Questions
- Q: What is the maximum pressure the ETENWOLF S0 can inflate to?
- The ETENWOLF S0 supports an inflation pressure range of 3.0 – 150.0 PSI (0.20 – 10.34 bar), making it suitable for road bike tires, mountain bike tires, and most other bicycle tire types.
- Q: Why does the display show 0 PSI when I connect the pump?
- The sensor on the S0 has a minimum detection threshold of 3 PSI. If the actual pressure in the tire is below 3 PSI, the display will show 0. This is normal sensor behavior and not a malfunction.
- Q: Can I use the pump while it is charging?
- No. The S0 cannot be used while it is charging. Additionally, the pump will auto shut down after 5 minutes of inactivity when fully charged. Always disconnect the charging cable before inflating.
- Q: How do I recalibrate the pump at high altitude?
- Turn on the device, then hold both the + and − buttons simultaneously for 5 seconds until the screen stops flashing. Note that calibration is reset each time the device is powered off, so at altitudes above 5,000 ft (1,524 m) you will need to repeat calibration every time you turn the pump on.
Related Documents
The following document types are commonly associated with products like the ETENWOLF S0 Mini Bicycle Pump and may be available separately:
- CE Declaration of Conformity – Confirms compliance with applicable EU directives for electrical and electronic equipment sold in the European market, referencing relevant IEC and ISO standards.
- FCC Declaration of Conformity – Applicable if the product incorporates wireless or electronic components sold in the United States. Issued under FCC regulations.
- UN 38.3 Battery Test Report – Required for air transport of lithium-battery-equipped devices. Confirms the built-in 2400 mAh battery has passed the UN 38.3 test series.
- RoHS Compliance Statement – Confirms restriction of hazardous substances in accordance with RoHS Directive requirements.
- REACH Compliance Statement – Confirms materials used do not contain substances of very high concern above threshold limits as defined under REACH regulation.
- KC Certification – Required for products sold in the South Korean market under KC safety standards.
- Product Quick-Start Card – A condensed single-page reference for first-time setup, complementing this full user manual.
Document Pages