Document Overview
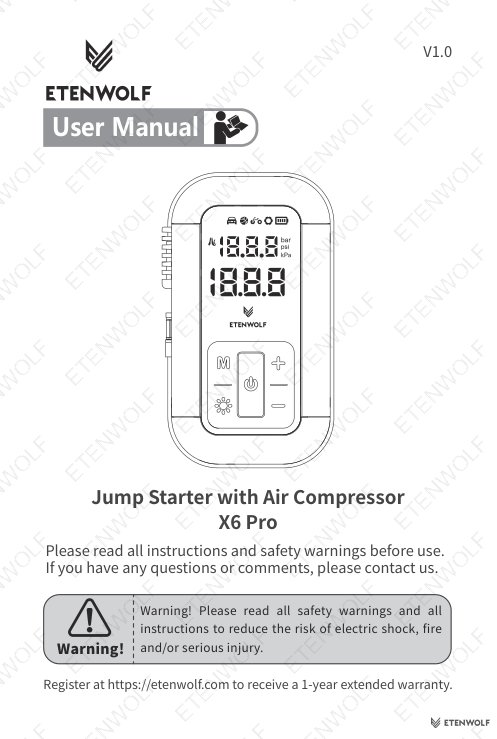
Document Overview This article is based on the official user manual for the ETENWOLF X6 Pro Jump Starter with Air Compressor, filename X6_Pro_manual_EN_20260425.pdf, version V1.0, issued by ETENWOLF (etenwolf.com). The manual covers safe operation, inflation procedures, jump-start instructions, power bank functionality, pressure calibration, battery charging,…
- Document type
- User Manual
- Prepared by
- Daniel Wright
- Published
- Last reviewed
- Topics
- User Manual
Document Overview
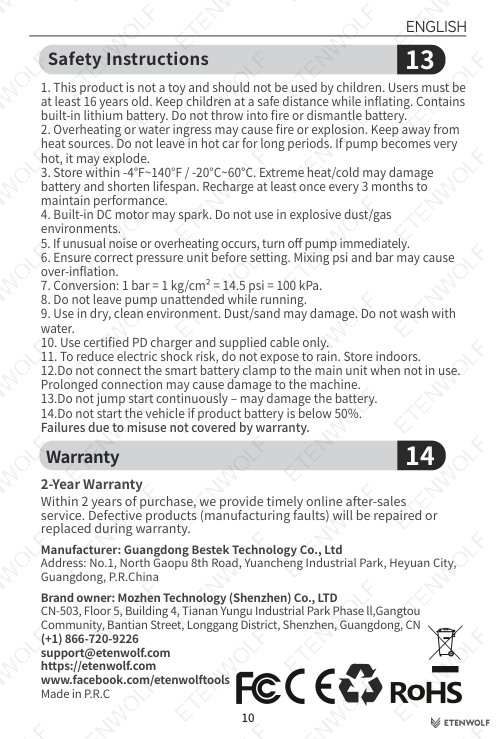
This article is based on the official user manual for the ETENWOLF X6 Pro Jump Starter with Air Compressor, filename X6_Pro_manual_EN_20260425.pdf, version V1.0, issued by ETENWOLF (etenwolf.com). The manual covers safe operation, inflation procedures, jump-start instructions, power bank functionality, pressure calibration, battery charging, and troubleshooting. It is intended for all end users of the X6 Pro and should be read in full before operating the device. Users who register at etenwolf.com are eligible for a 1-year extended warranty beyond the standard coverage period.
Product Information
The ETENWOLF X6 Pro is a multi-function portable device combining a high-pressure air compressor with a jump starter and a 30W USB-C power bank. It is designed for automotive, cycling, sports, and general inflation needs, as well as emergency vehicle starting and mobile device charging.
| Attribute | Details |
|---|---|
| Product Model | X6 Pro |
| Brand | ETENWOLF |
| Primary Function | Jump Starter + Air Compressor + Power Bank |
| Manual Version | V1.0 |
| Manual Filename | X6_Pro_manual_EN_20260425.pdf |
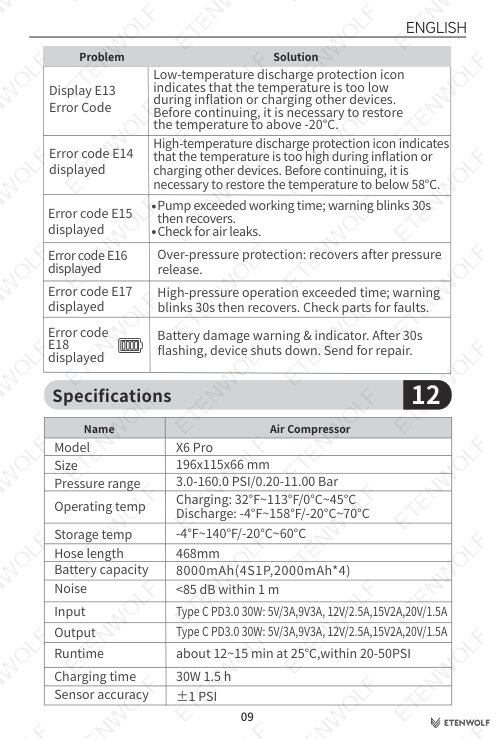
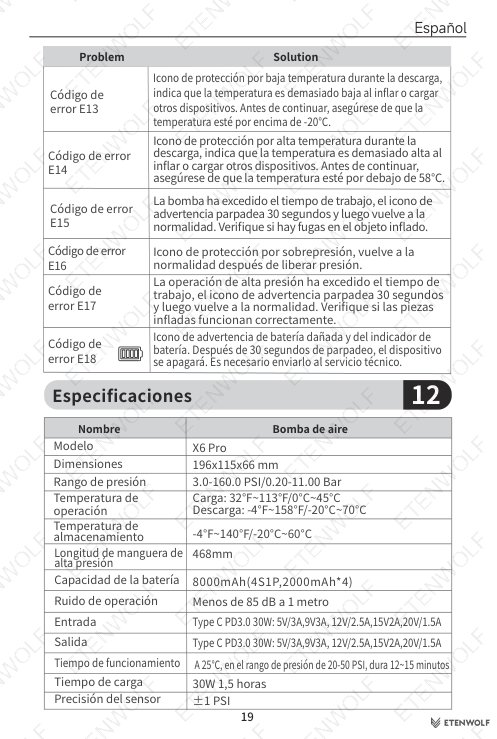
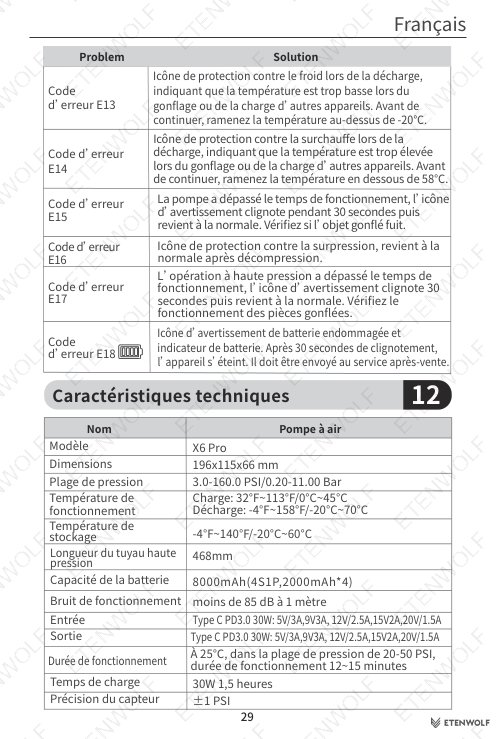
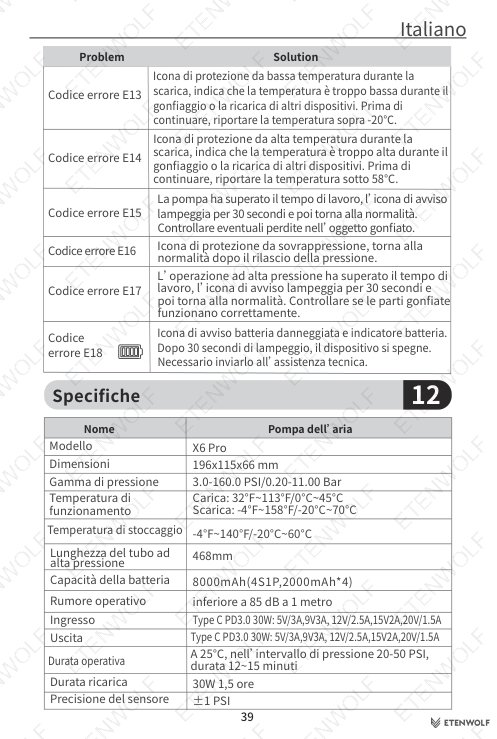
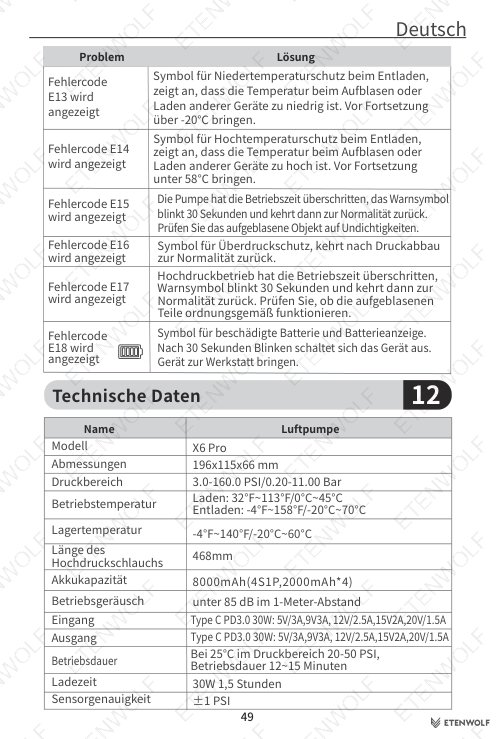
| USB-C Power Output | 30W Max — 5/9V 3A, 12V 2.5A, 15V 2A, 20V 1.5A |
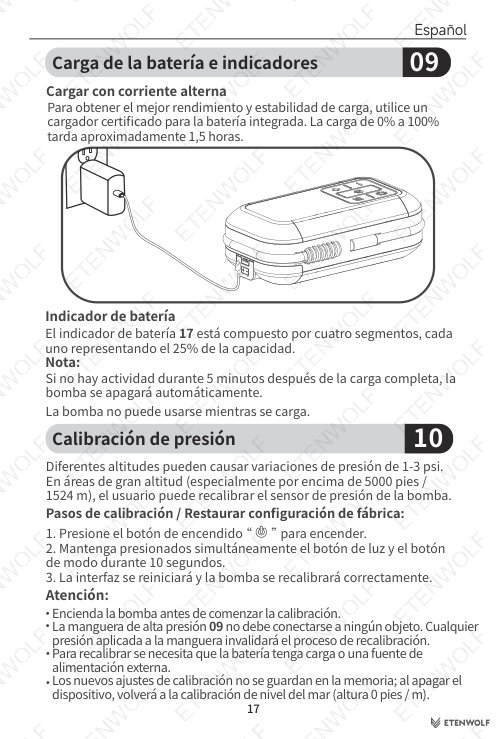
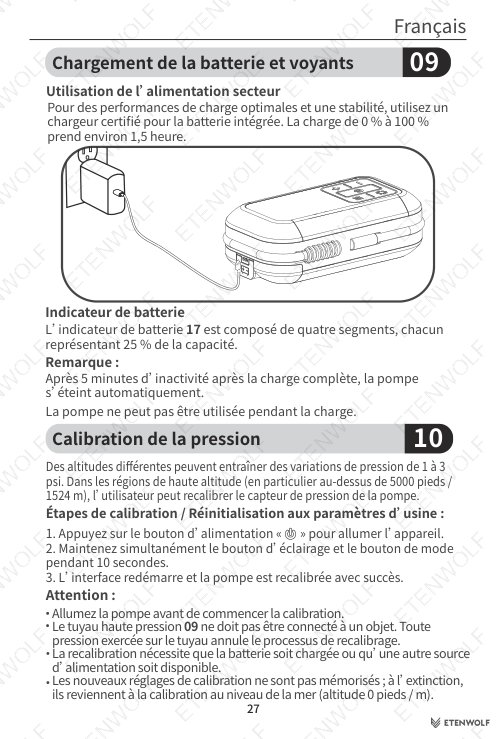
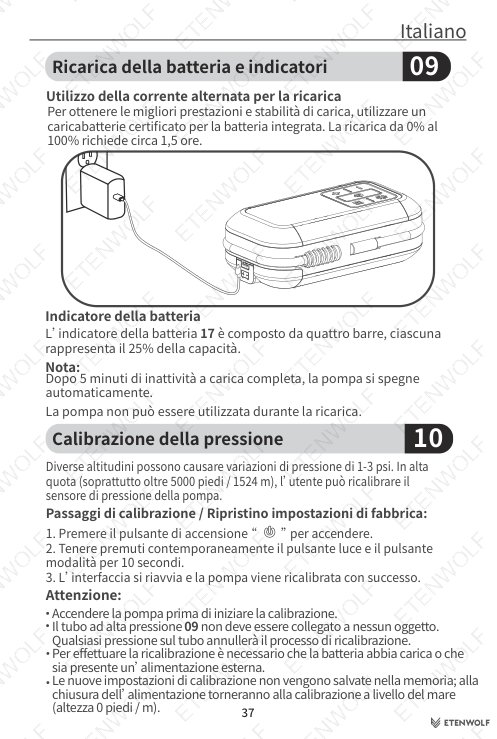
| Charge Time (0–100%) | Approximately 1.5 hours with certified charger |
| Battery Indicator | 4-bar display, each bar = 25% capacity |
| Languages Covered | English, Español, Français, Deutsch, Italiano |
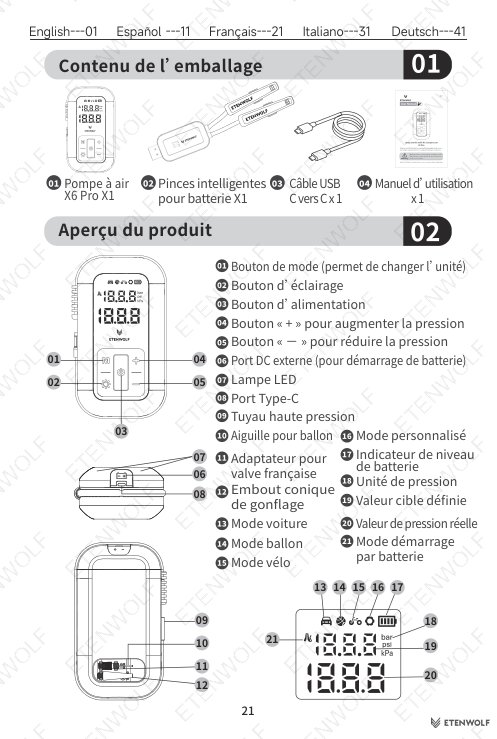
Package Contents
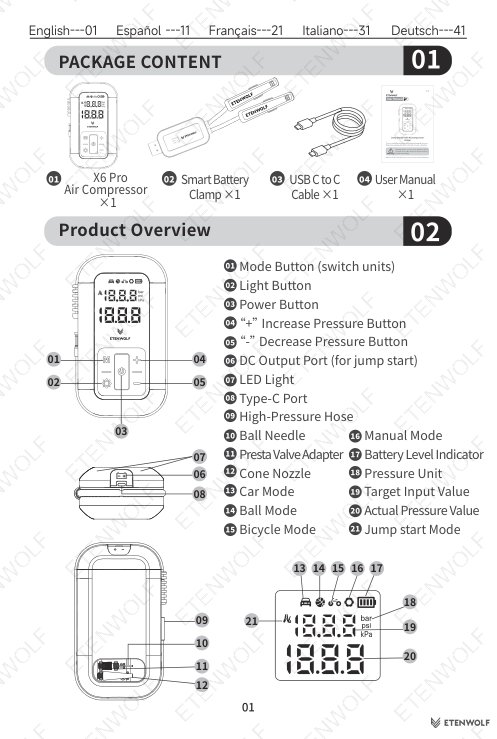
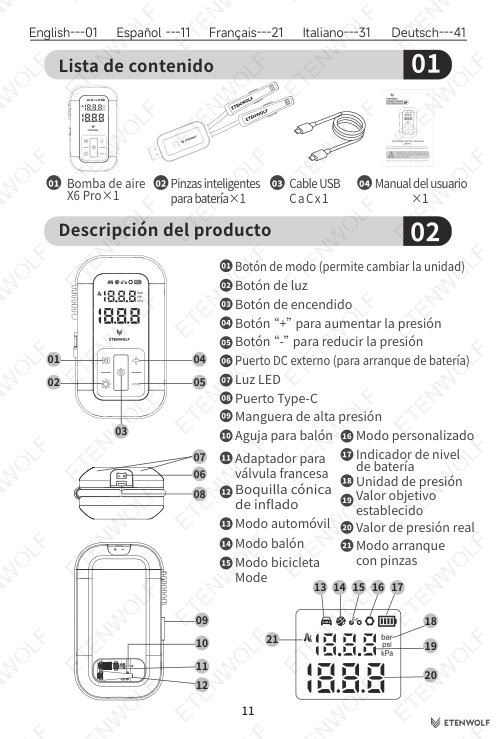
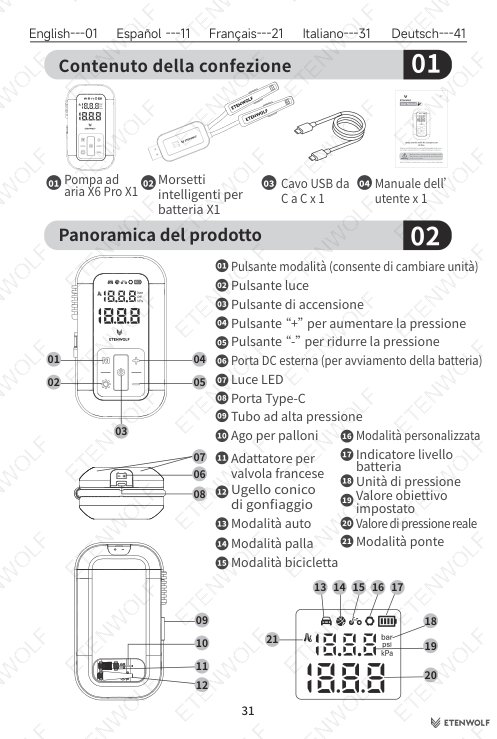
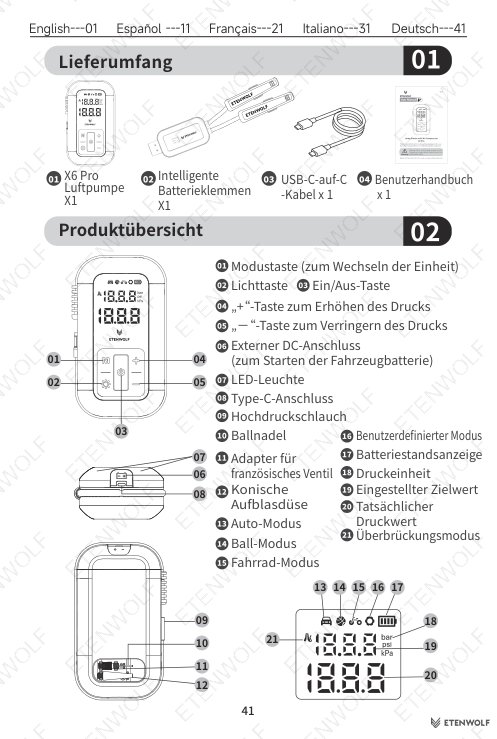
- X6 Pro Air Compressor Unit ×1
- Smart Battery Clamp ×1
- USB-C to USB-C Cable ×1
- High-Pressure Hose ×1
- Ball Needle ×1
- Presta (French) Valve Adapter ×1
- Cone Nozzle ×1
- User Manual ×1
Product Controls & Components
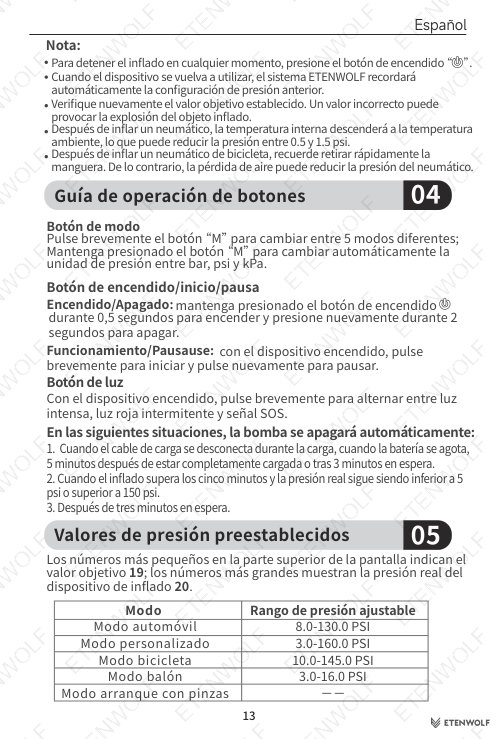
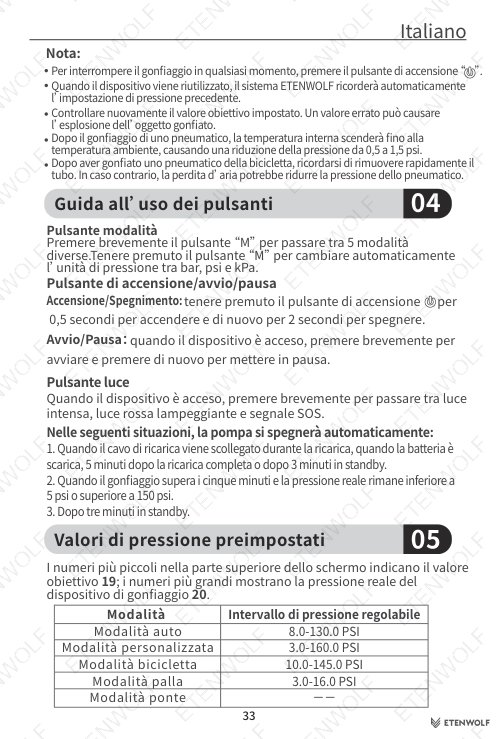
- Mode Button (M): Short press cycles through inflation modes; long press switches pressure unit (bar / psi / kPa)
- Light Button: Toggles LED light and cycles through High Brightness, Red Flashing, and SOS Signal modes
- Power Button: Hold 0.5s to power on; hold 2s to power off; short press to start or pause inflation
- + / − Buttons: Increase or decrease target pressure value
- DC Output Port: For jump-start clamp connection
- Type-C Port: For charging the unit and power bank output
- LED Light: Located on top of the unit
- Display: Shows target input value (small number, top) and actual pressure value (large number, bottom), battery level, and pressure unit
Key Details
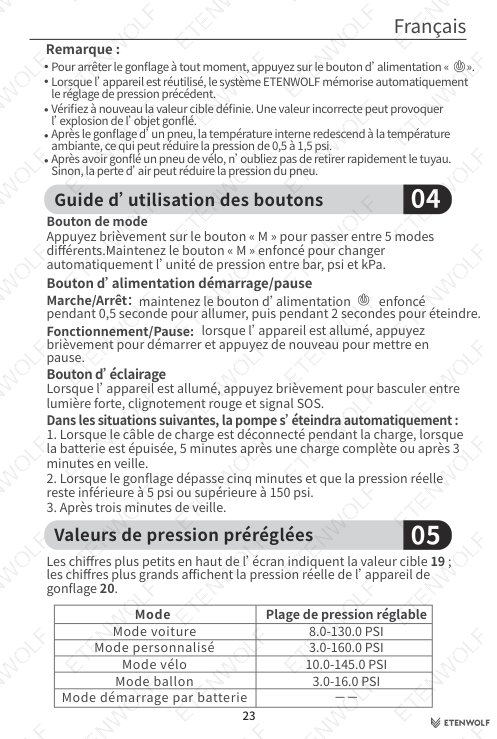
Inflation Modes and Adjustable Pressure Ranges
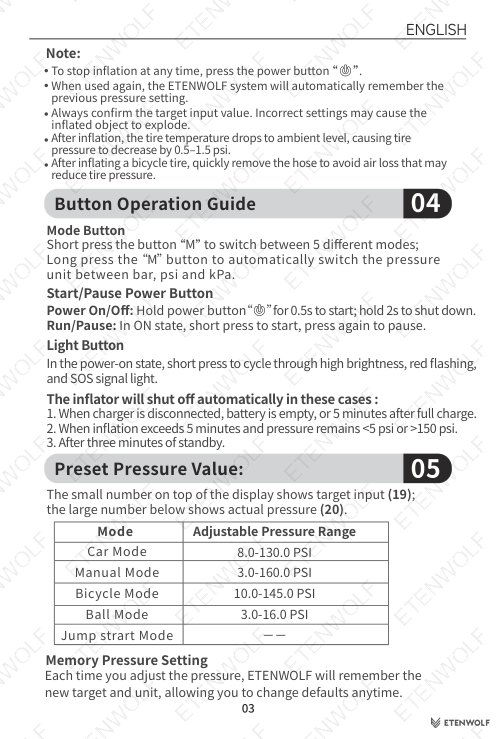
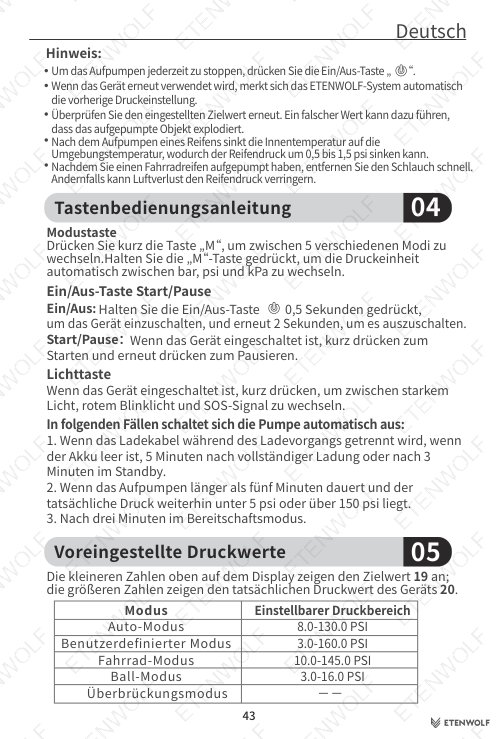
| Mode | Adjustable Pressure Range |
|---|---|
| Car Mode | 8.0 – 130.0 PSI |
| Bicycle Mode | 10.0 – 145.0 PSI |
| Ball Mode | 3.0 – 16.0 PSI |
| Manual Mode | 3.0 – 160.0 PSI |
| Jump Start Mode | N/A (no inflation) |
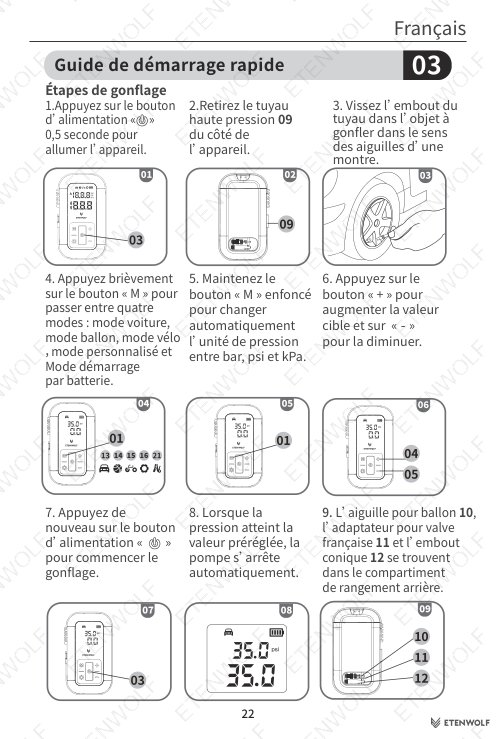
Step-by-Step Inflation Procedure
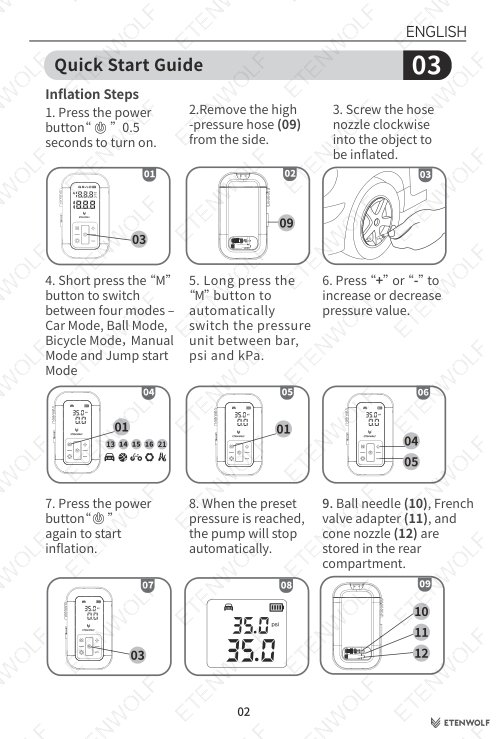
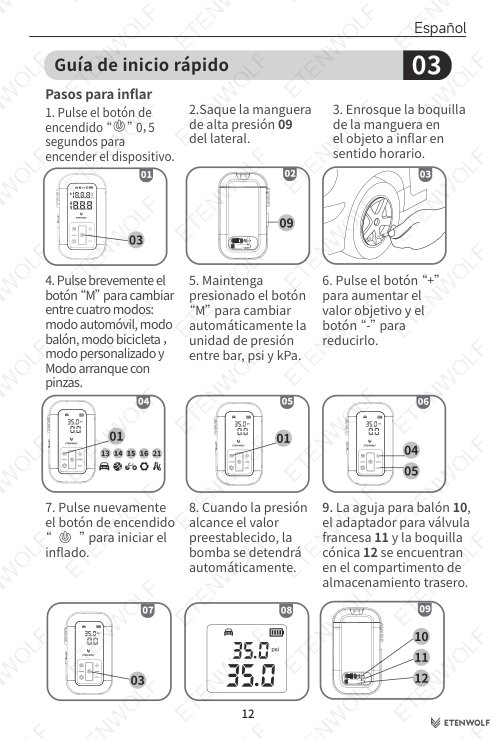
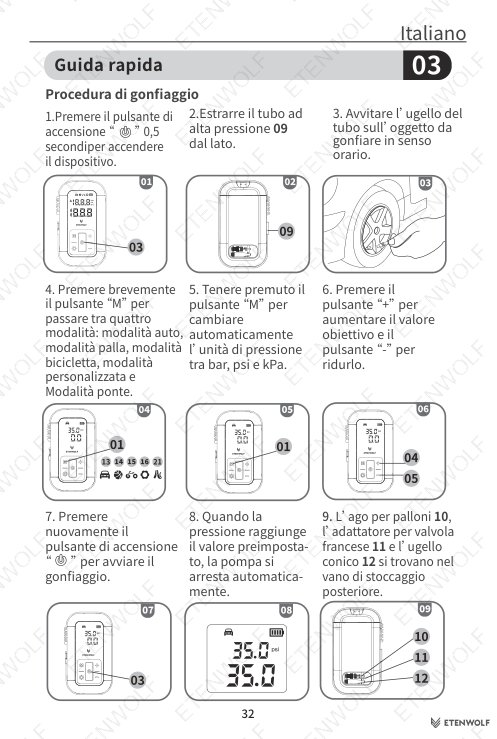
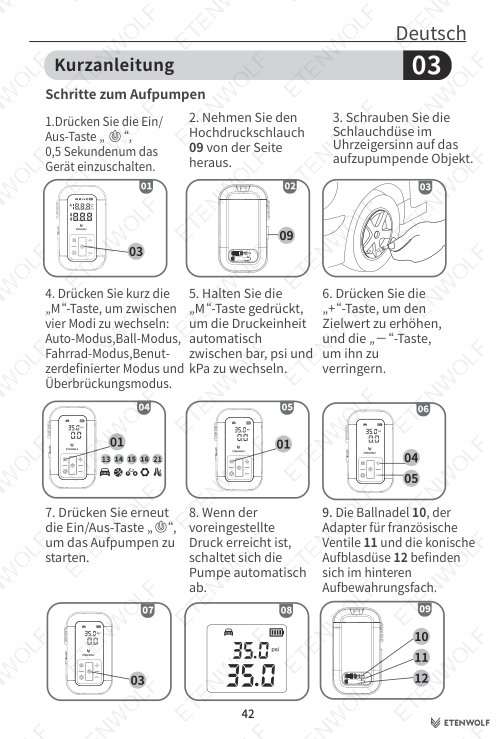
- Press and hold the power button for 0.5 seconds to turn on the device.
- Remove the high-pressure hose from the side compartment and screw the nozzle clockwise into the valve of the object to be inflated.
- Short press the Mode button to select the appropriate mode (Car, Bicycle, Ball, Manual, or Jump Start).
- Long press the Mode button to switch the pressure unit between bar, psi, and kPa.
- Press the + or − buttons to set your target pressure. The small top number shows the target; the large bottom number shows the actual live pressure.
- Short press the power button again to begin inflation.
- The pump stops automatically when the preset pressure is reached.
- To stop inflation manually at any time, press the power button once.
Important notes: Always verify the target pressure value before starting — incorrect settings may cause the inflated object to rupture. After inflating bicycle tires, remove the hose quickly to avoid air loss. Tire pressure may drop 0.5–1.5 psi after inflation as the tire cools to ambient temperature.
Jump-Start Procedure
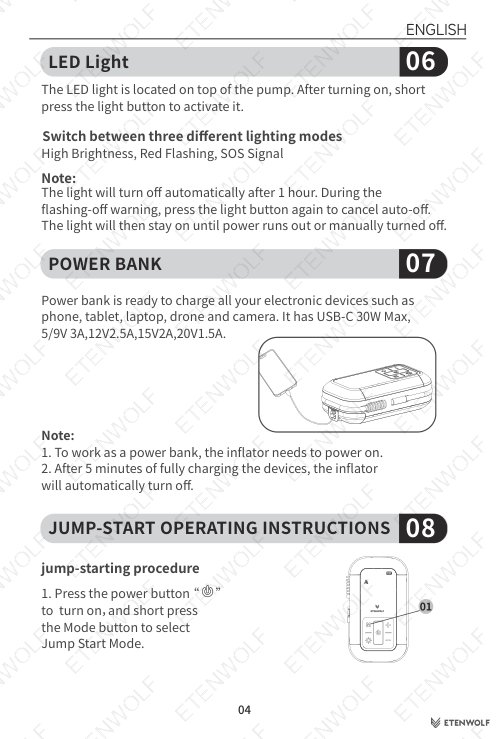
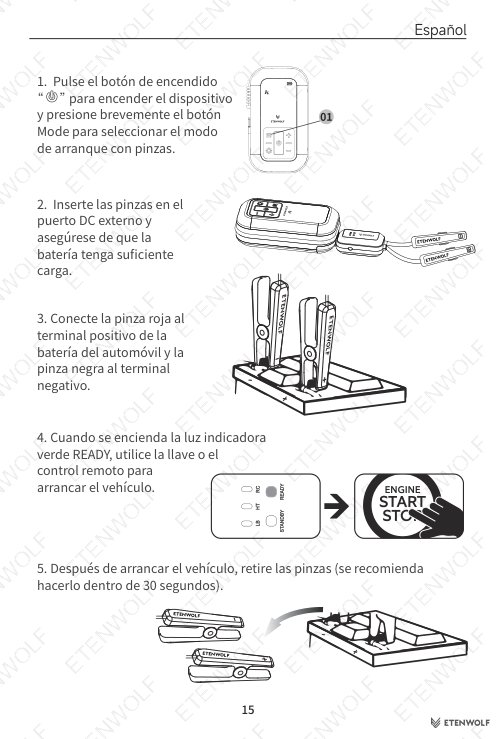
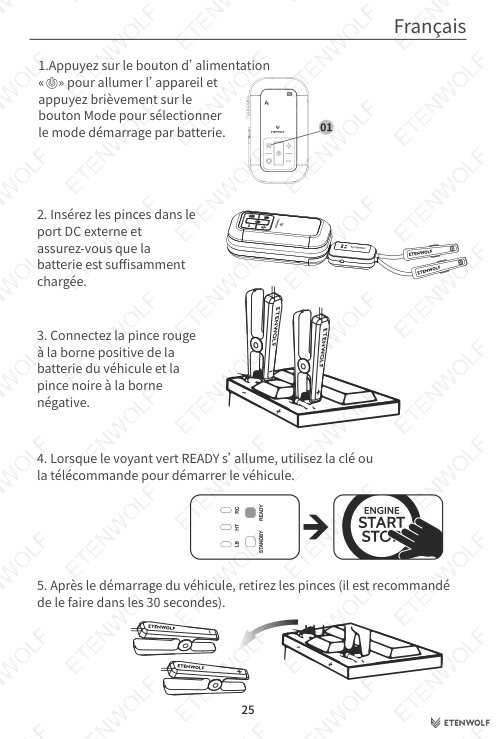
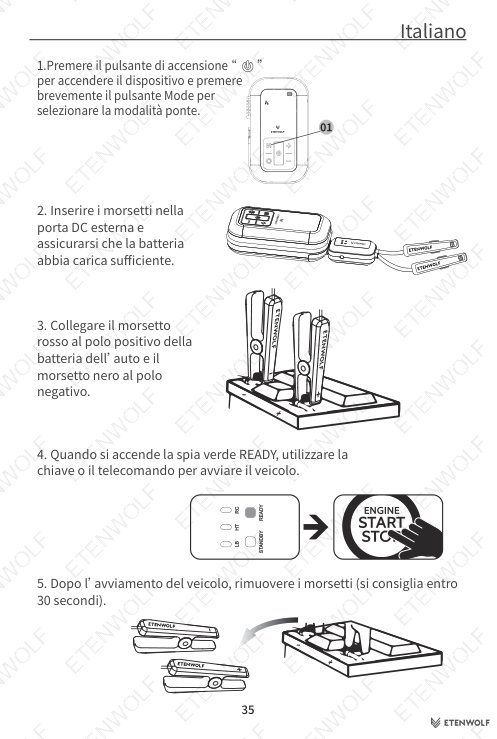
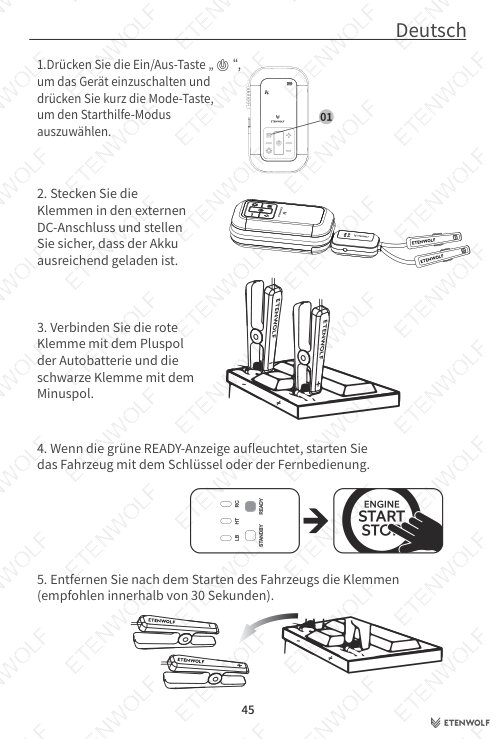
- Press the power button to turn on the device, then short press Mode to select Jump Start Mode.
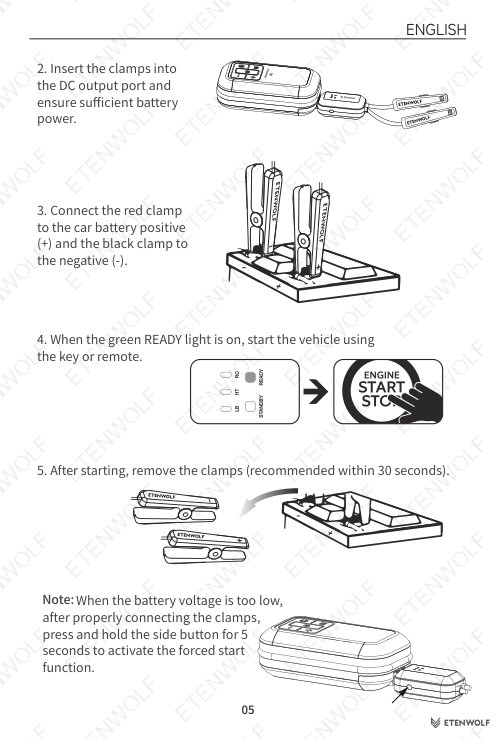
- Insert the Smart Battery Clamp into the DC Output Port and verify that the unit has sufficient battery charge.
- Connect the red clamp to the vehicle battery positive (+) terminal and the black clamp to the negative (−) terminal.
- Wait for the green READY indicator to illuminate, then start the vehicle using the key or remote.
- Remove the clamps after a successful start, ideally within 30 seconds.
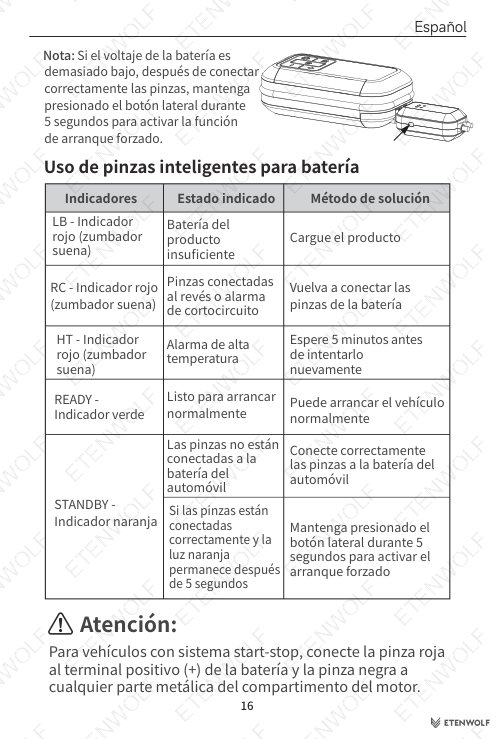
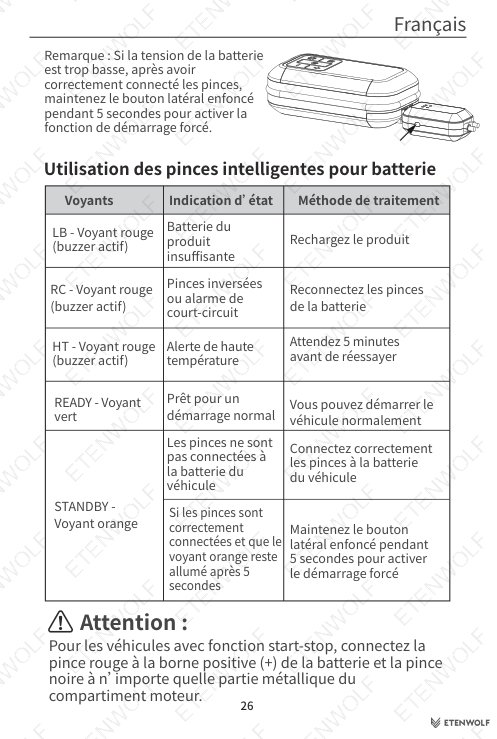
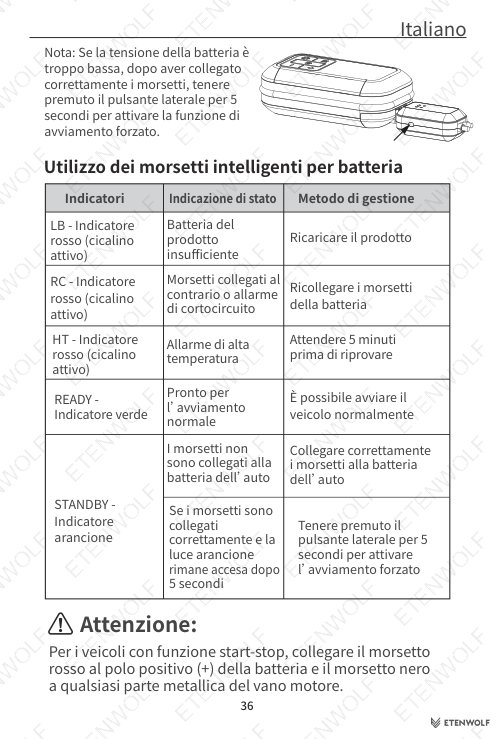
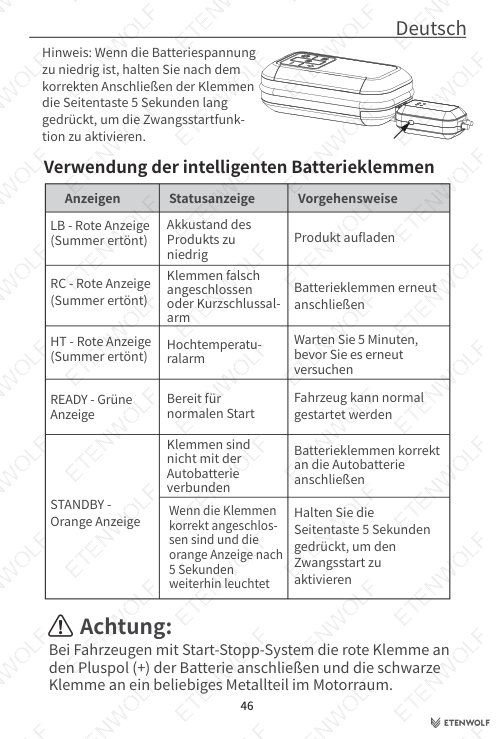
Forced Start: If the vehicle battery voltage is critically low, after connecting the clamps correctly, press and hold the side button for 5 seconds to activate the forced start function.
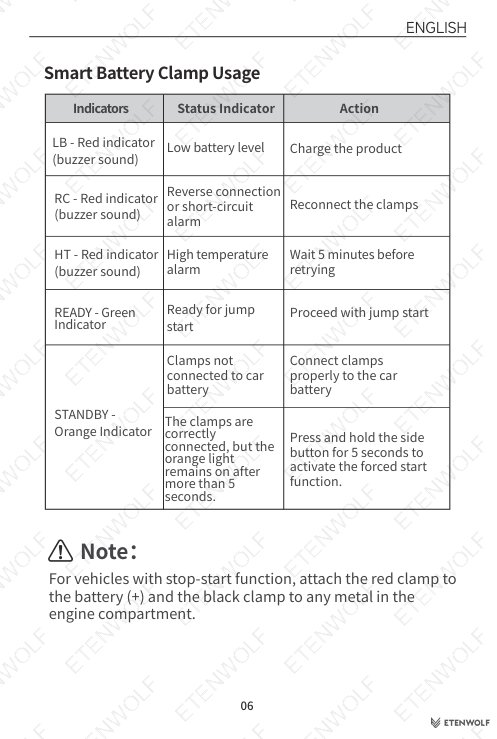
Vehicles with stop-start systems: Connect the red clamp to the battery positive (+) and the black clamp to any bare metal surface in the engine compartment.
Smart Battery Clamp Status Indicators
| Indicator | Status | Required Action |
|---|---|---|
| STANDBY – Orange | Clamps not connected to car battery | Connect clamps properly to the vehicle battery |
| STANDBY – Orange (after 5s) | Clamps connected correctly but orange light persists | Press and hold side button for 5 seconds for forced start |
| READY – Green | Ready for jump start | Proceed with jump start |
| LB – Red + Buzzer | Low battery level | Charge the product before use |
| RC – Red + Buzzer | Reverse connection or short-circuit alarm | Reconnect the clamps correctly |
| HT – Red + Buzzer | High temperature alarm | Wait 5 minutes before retrying |
Power Bank Function
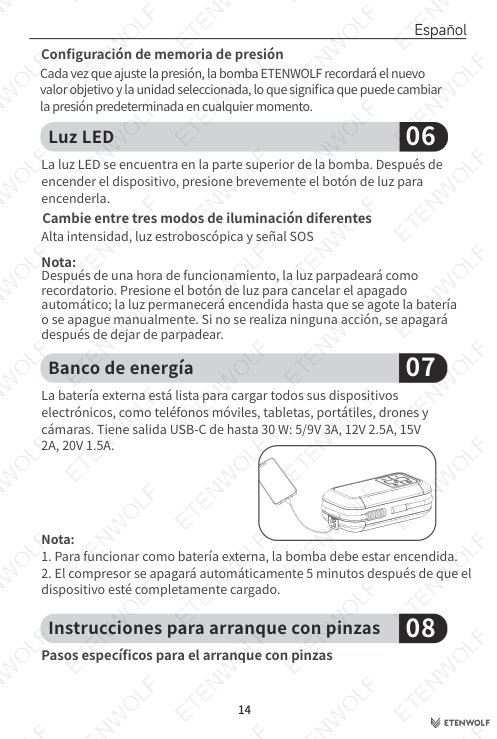
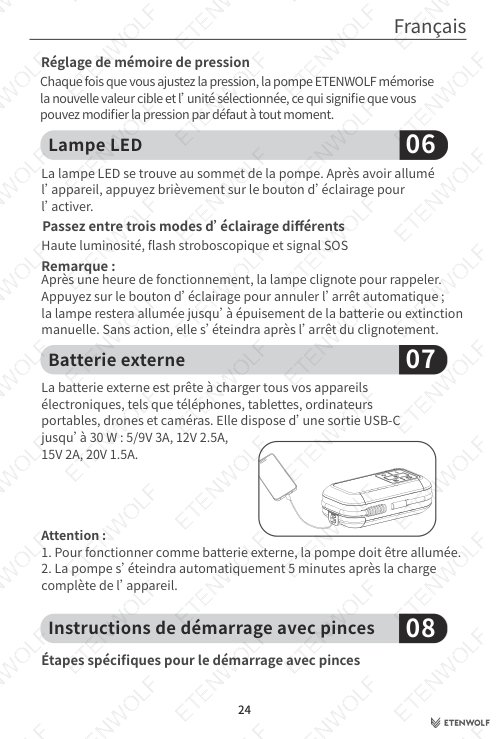
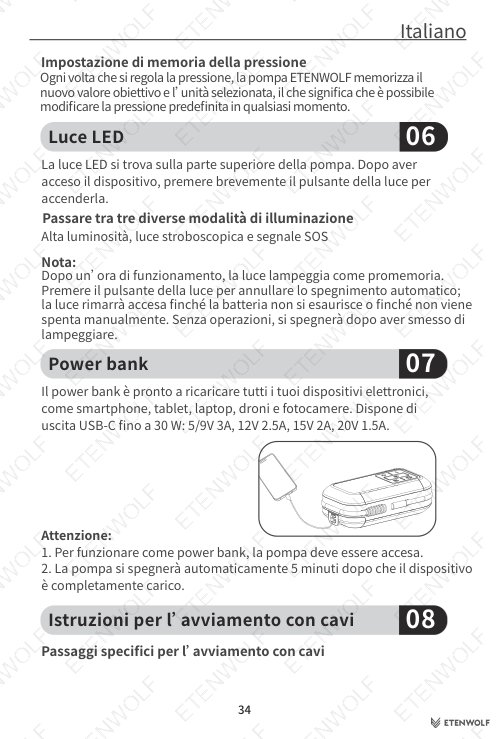
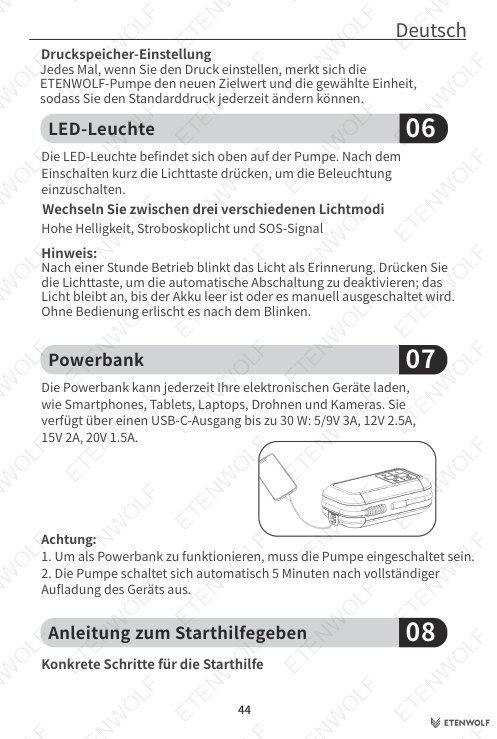
The X6 Pro can charge phones, tablets, laptops, drones, and cameras via its USB-C port at up to 30W. The device must be powered on to function as a power bank. After 5 minutes of fully charging a connected device, the X6 Pro will automatically power off.
Memory Pressure Setting
Each time you adjust the target pressure and unit, the X6 Pro stores that setting. On the next power-on, the device recalls the last used target pressure and unit automatically, so you can change defaults at any time.
Pressure Calibration (Altitude / Factory Reset)
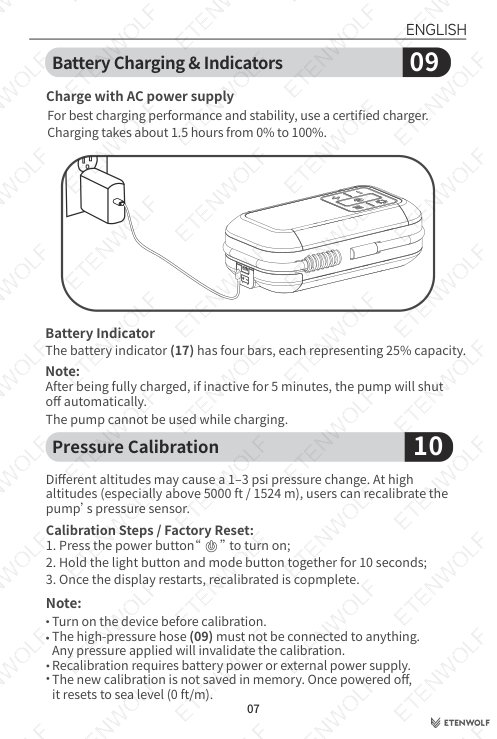
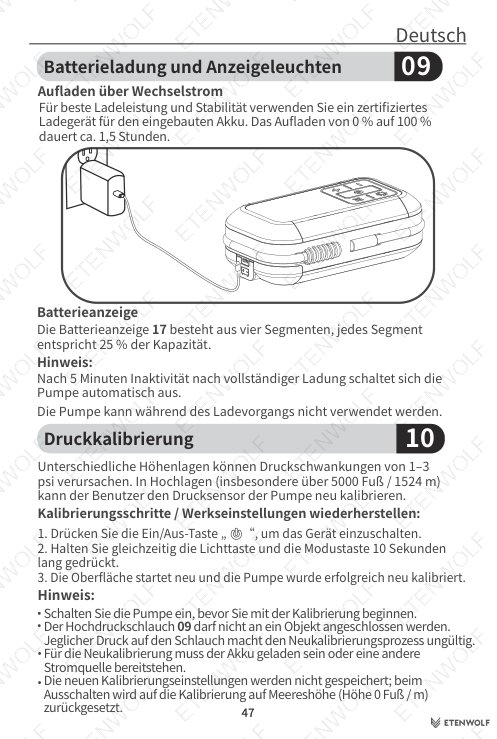
At high altitudes — particularly above 5,000 ft (1,524 m) — atmospheric pressure differences may cause a 1–3 psi reading offset. The built-in sensor can be recalibrated manually.
- Power on the device.
- Ensure the high-pressure hose is disconnected and no pressure is applied — any connected load invalidates the calibration.
- Hold the Light Button and Mode Button simultaneously for 10 seconds.
- Calibration is complete when the display restarts.
Note: The new calibration is not stored in permanent memory. Powering off the device resets it to sea-level (0 ft / 0 m) calibration.
Automatic Shutdown Conditions
- Charger is disconnected, battery is empty, or 5 minutes have elapsed after reaching full charge.
- Inflation exceeds 5 minutes and pressure remains below 5 psi or above 150 psi.
- Device enters standby and remains idle for 3 minutes.
Troubleshooting Reference
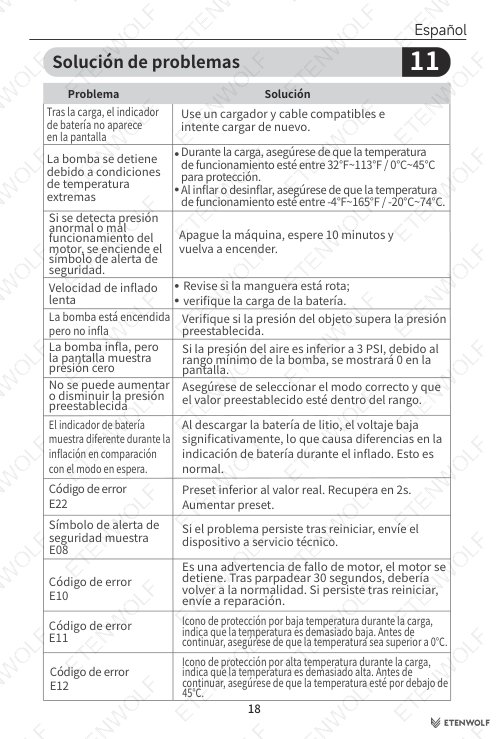
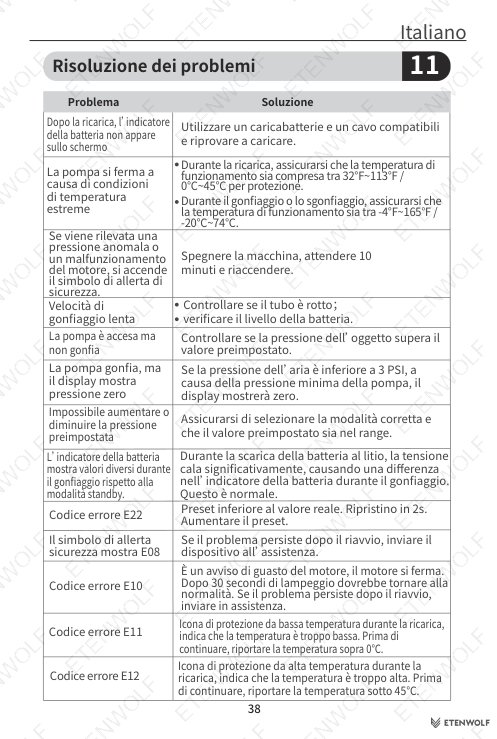
| Symptom | Likely Cause | Recommended Action |
|---|---|---|
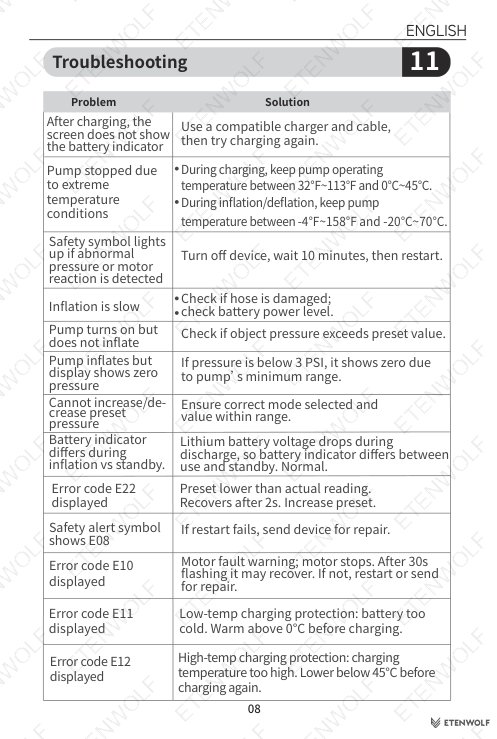
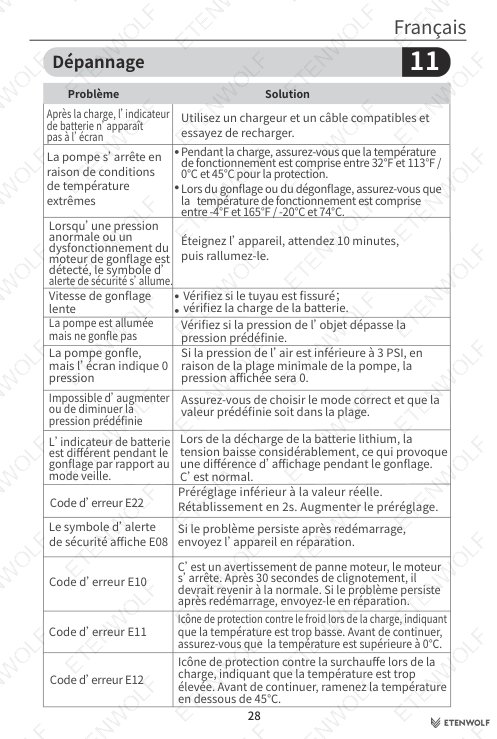
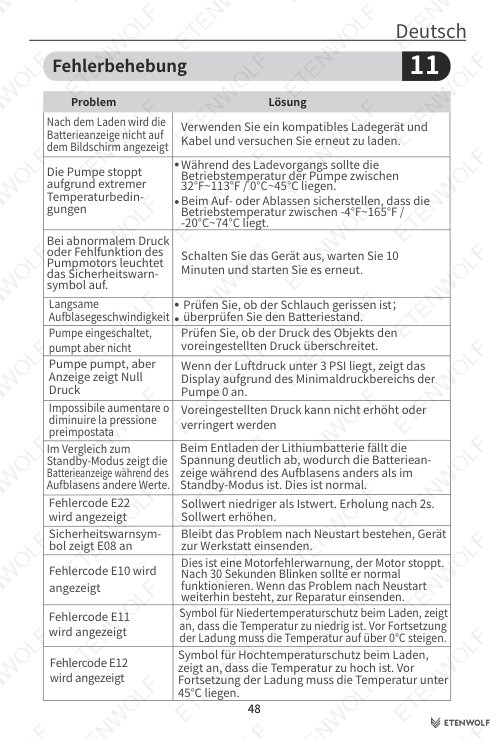
| Error code E22 displayed | Preset pressure lower than actual reading | Increase the preset target. Error clears automatically after 2 seconds. |
| Inflation is slow | Damaged hose or low battery | Check hose for damage; check battery charge level. |
| Cannot increase/decrease preset pressure | Wrong mode selected or value out of range | Ensure the correct mode is selected and the target is within valid range. |
| Battery indicator differs during inflation vs standby | Normal lithium cell voltage sag under load | No action required — this is normal behavior. |
| Screen does not show battery indicator after charging | Incompatible charger or cable | Use a compatible certified charger and cable, then retry. |
| Pump stopped due to extreme temperature | Overtemperature protection triggered | Turn off device, wait 10 minutes, then restart. |
| Safety symbol lights up | Abnormal pressure or motor reaction detected | Stop use immediately and inspect hose and connections. |
Standards & Compliance
The ETENWOLF X6 Pro is manufactured under ETENWOLF’s quality and safety guidelines. While this user manual does not list individual certification numbers, the product is designed and tested to meet applicable consumer electronics and lithium battery safety requirements. The following standards and regulatory frameworks are relevant to a device of this class:
- IEC 62133 — Safety requirements for portable sealed secondary lithium cells and batteries
- IEC 61558 — Safety of transformers, reactors, power supply units, and combinations (applicable to charging circuitry)
- ISO standards — Relevant vehicle and portable tool safety standards as applicable by region
- RoHS Directive — Restriction of hazardous substances in electrical and electronic equipment
- REACH Regulation — Registration, Evaluation, Authorisation and Restriction of Chemicals
For region-specific certifications such as CE (Europe), FCC (United States), KC (Korea), or UN38.3 (lithium battery transport), please refer to the product’s certification documents available via the ETENWOLF support portal or the product listing page.
Validity & Certification Body
This user manual (version V1.0, filename X6_Pro_manual_EN_20260425.pdf) is published and maintained directly by ETENWOLF, the product manufacturer and brand owner. The document date encoded in the filename is April 25, 2026. As an official product manual rather than a third-party test certificate, it does not carry an expiry date; however, ETENWOLF may issue updated revisions as the product is revised.
- Issuing Organization: ETENWOLF (etenwolfgroup.com)
- Document Version: V1.0
- Document Date: April 25, 2026
- Warranty Registration: etenwolf.com — register for 1-year extended warranty
- Validity: Effective from publication date; supersedes any prior version for the X6 Pro model
For the most current version of this manual or supplementary safety bulletins, visit the ETENWOLF official website or contact ETENWOLF customer support directly.
Frequently Asked Questions
- Q: What inflation modes does the X6 Pro support, and what are their pressure ranges?
- The X6 Pro supports five modes. Car Mode covers 8.0–130.0 PSI, Bicycle Mode covers 10.0–145.0 PSI, Ball Mode covers 3.0–16.0 PSI, Manual Mode covers 3.0–160.0 PSI (widest range for custom use), and Jump Start Mode is used exclusively for vehicle starting with no inflation function.
- Q: How do I jump-start a vehicle using the X6 Pro?
- Power on the device and select Jump Start Mode. Insert the Smart Battery Clamp into the DC Output Port. Connect the red clamp to the battery positive (+) terminal and the black clamp to the negative (−) terminal. Wait for the green READY light, then start the vehicle. Disconnect the clamps within 30 seconds. If the battery is critically low, hold the side button for 5 seconds after connecting the clamps to activate the forced start function.
- Q: Why does the battery indicator show a different level during inflation compared to standby?
- This is normal behavior. Lithium batteries experience a voltage drop under load (during inflation or jump starting), which causes the battery indicator to read lower than it does at rest. Once the load is removed, the indicator recovers to its accurate resting level. No action is required.
- Q: How do I recalibrate the pressure sensor at high altitude?
- Power on the device and make sure the high-pressure hose is fully disconnected with no pressure applied. Then press and hold the Light Button and Mode Button simultaneously for 10 seconds until the display restarts. Note that this calibration is not saved to permanent memory — powering off the device will reset the sensor to its default sea-level calibration.
Related Documents
For complete product compliance verification and safety assurance of the ETENWOLF X6 Pro, the following related document types are recommended:
- UN38.3 Transport Test Report — Mandatory lithium battery safety test for air and ground transport; confirms the internal battery pack meets international shipping regulations.
- CE Declaration of Conformity — Required for sale in the European Economic Area; covers EMC, Low Voltage Directive, and battery safety directives.
- FCC ID Certificate — Required for the United States market; confirms radio frequency emissions compliance for any wireless or electronic components.
- RoHS Test Report — Confirms the product is free from restricted hazardous substances including lead, mercury, cadmium, and hexavalent chromium.
- REACH SVHC Declaration — Confirms the product does not contain Substances of Very High Concern above threshold levels under EU REACH regulation.
- IEC 62133 Battery Safety Certificate — Third-party laboratory certification of the lithium battery pack’s safety under normal and abuse conditions.
- KC Certification (Korea) — Required for sale in the Republic of Korea; covers electrical safety and electromagnetic compatibility.
- Quick Start Guide (QSG) — A condensed single-page reference card covering the inflation steps and jump-start procedure for in-box use.
Document Pages