Document Overview
Document Overview This article presents the official user manual for the ETENWOLF Vortex S7 air compressor, document version V2.1, filename S7_manual_EN_20251013.pdf, issued by ETENWOLF on October 13, 2025. The manual covers the complete operating instructions, safety warnings, button operation guide, preset pressure values, LED work…
- Document type
- User Manual
- Prepared by
- Daniel Wright
- Published
- Last reviewed
- Topics
- User Manual
Document Overview
This article presents the official user manual for the ETENWOLF Vortex S7 air compressor, document version V2.1, filename S7_manual_EN_20251013.pdf, issued by ETENWOLF on October 13, 2025. The manual covers the complete operating instructions, safety warnings, button operation guide, preset pressure values, LED work light usage, power bank function, battery charging, pressure recalibration, troubleshooting, technical specifications, and warranty information. It is intended for end users operating the Vortex S7 Series air compressor for inflating tires and inflatables across a wide range of vehicle and recreational equipment types.
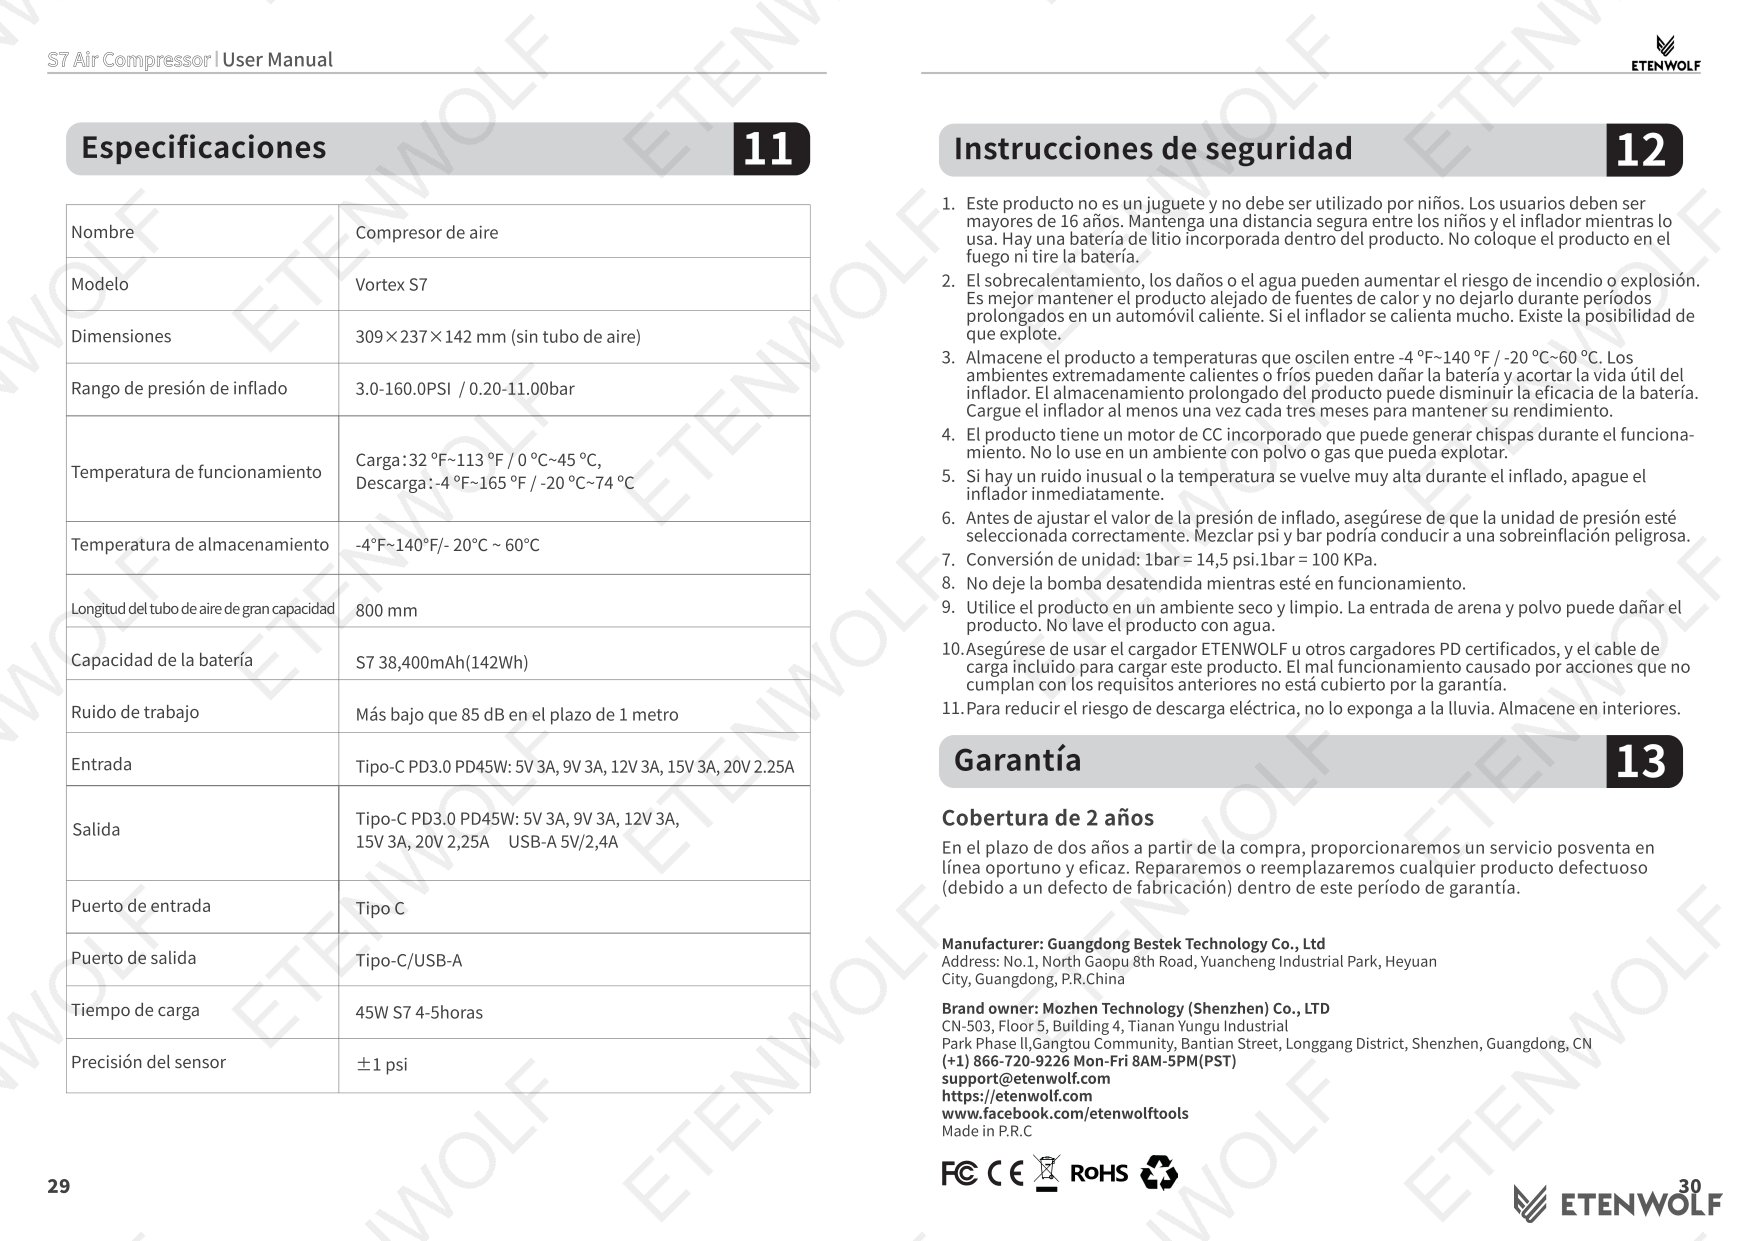
For product support, users may contact ETENWOLF at (+1) 866-720-9226, Monday through Friday, 8AM–5PM PST, or by email at [email protected]. Extended warranty registration is available at https://etenwolf.com.
Product Information
The ETENWOLF Vortex S7 is a compact, multi-mode portable air compressor designed for inflating a wide variety of tires and inflatables. It is engineered for versatility during outdoor travel, camping, and roadside use. The unit features a built-in battery with power bank output capability, an integrated LED work light with four modes, and a precision pressure adjustment knob for a smooth user experience.
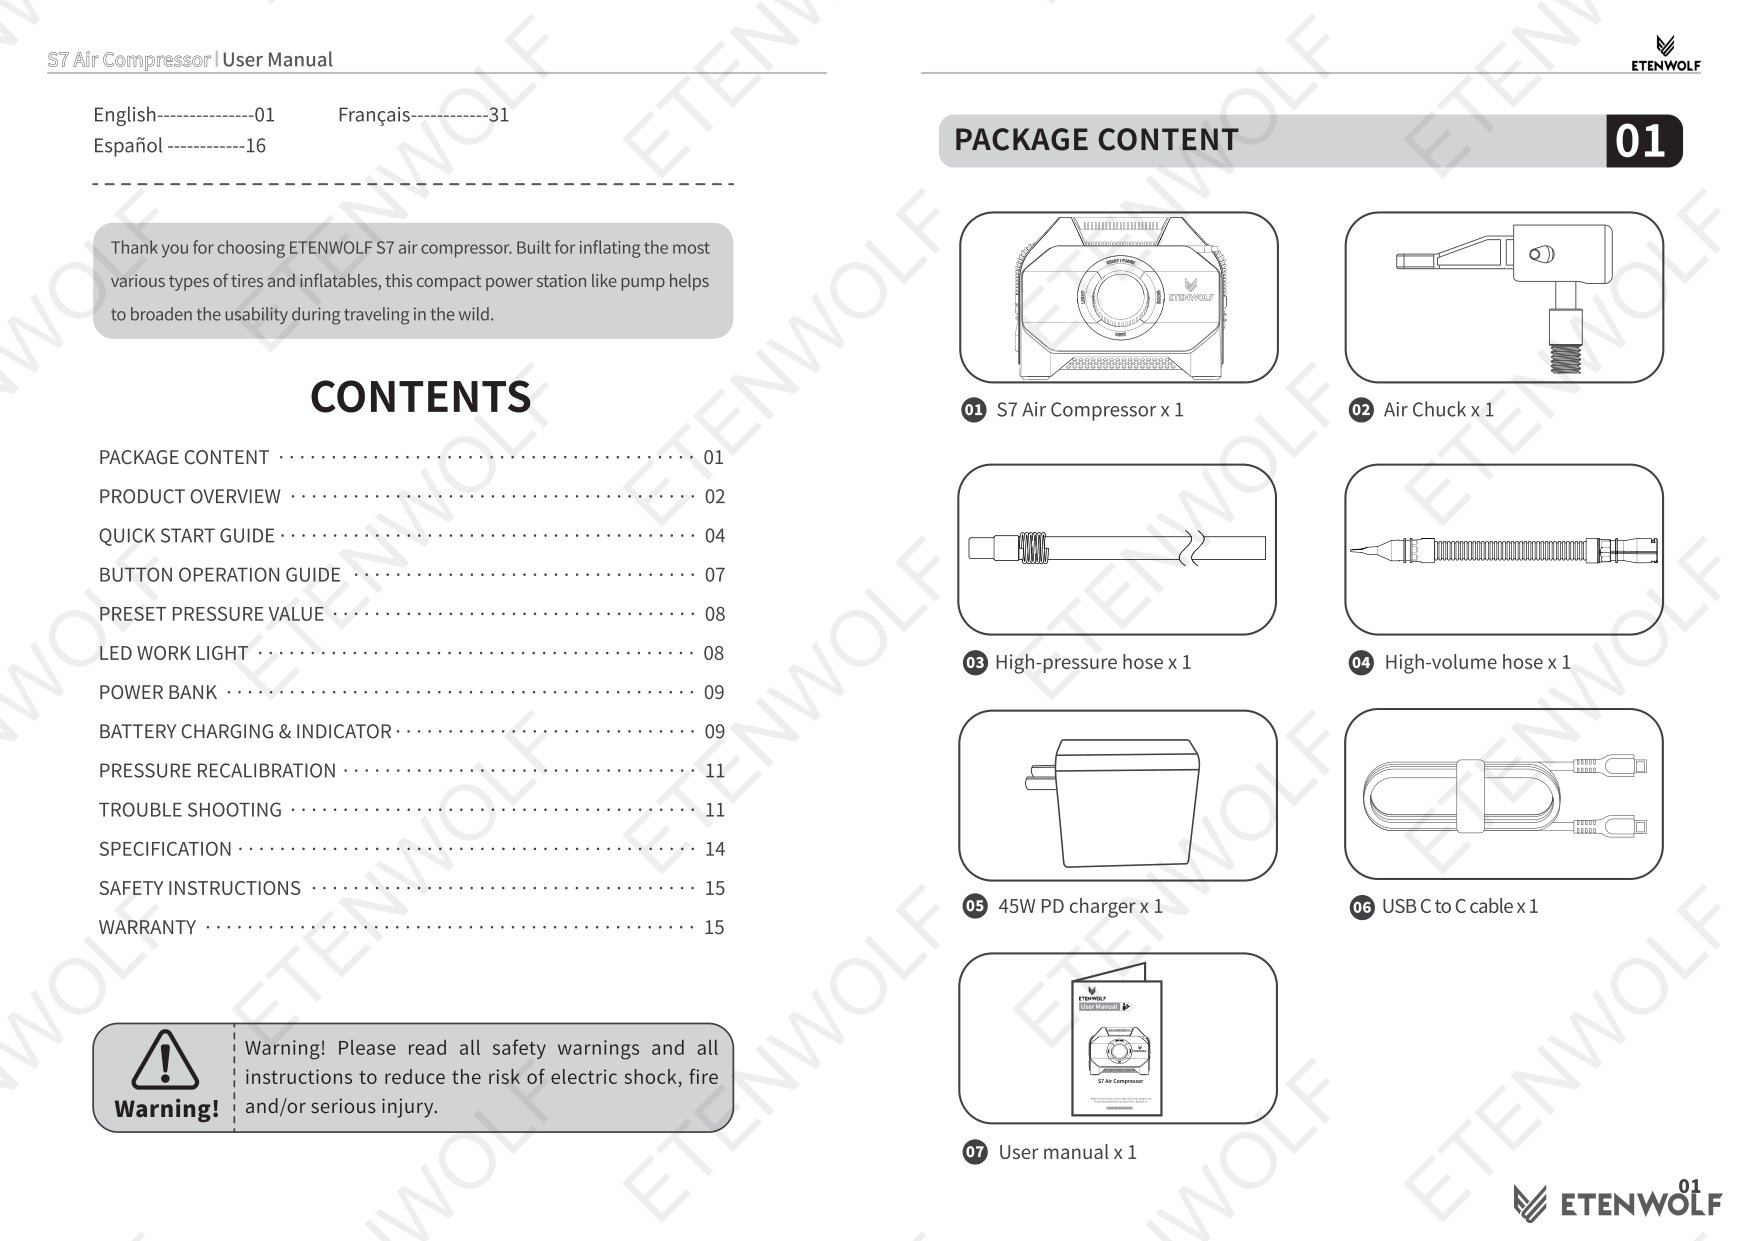
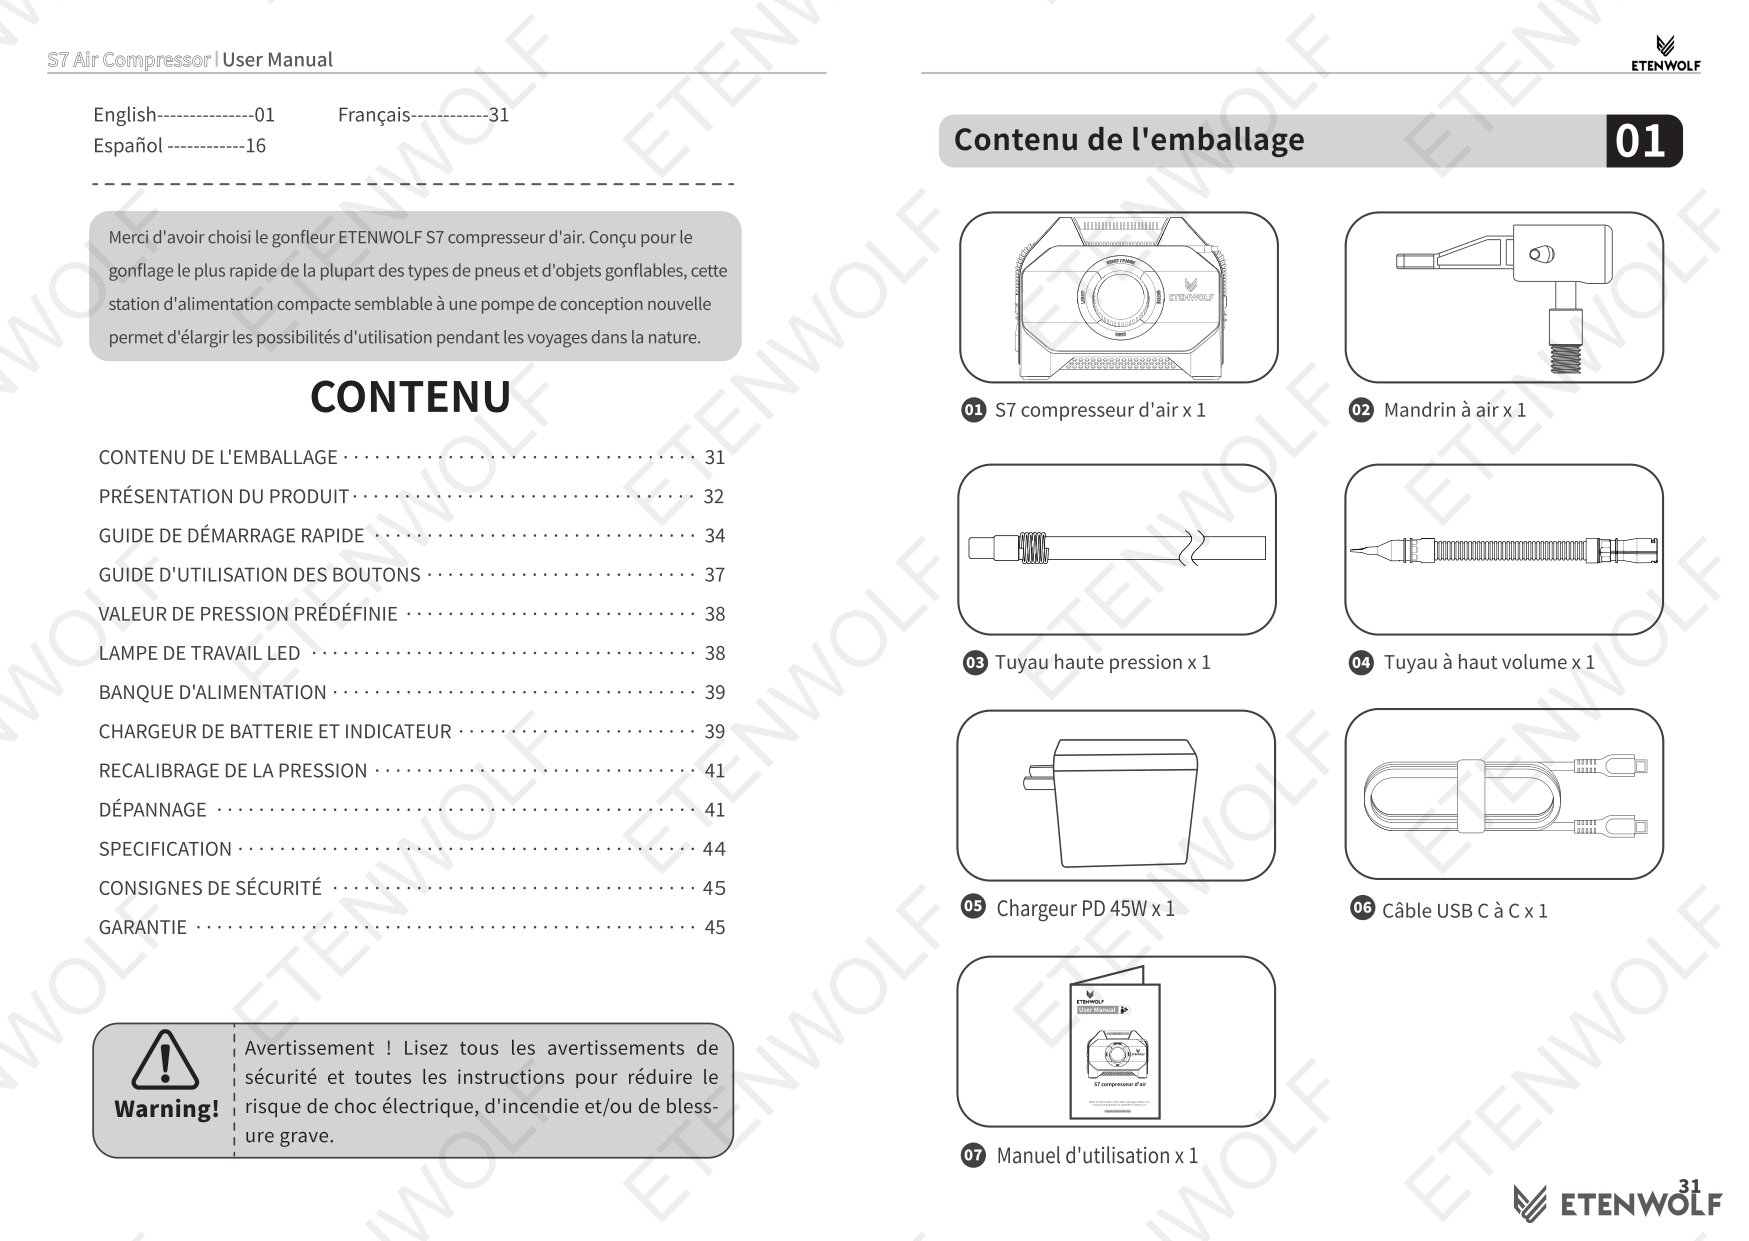
Package Contents
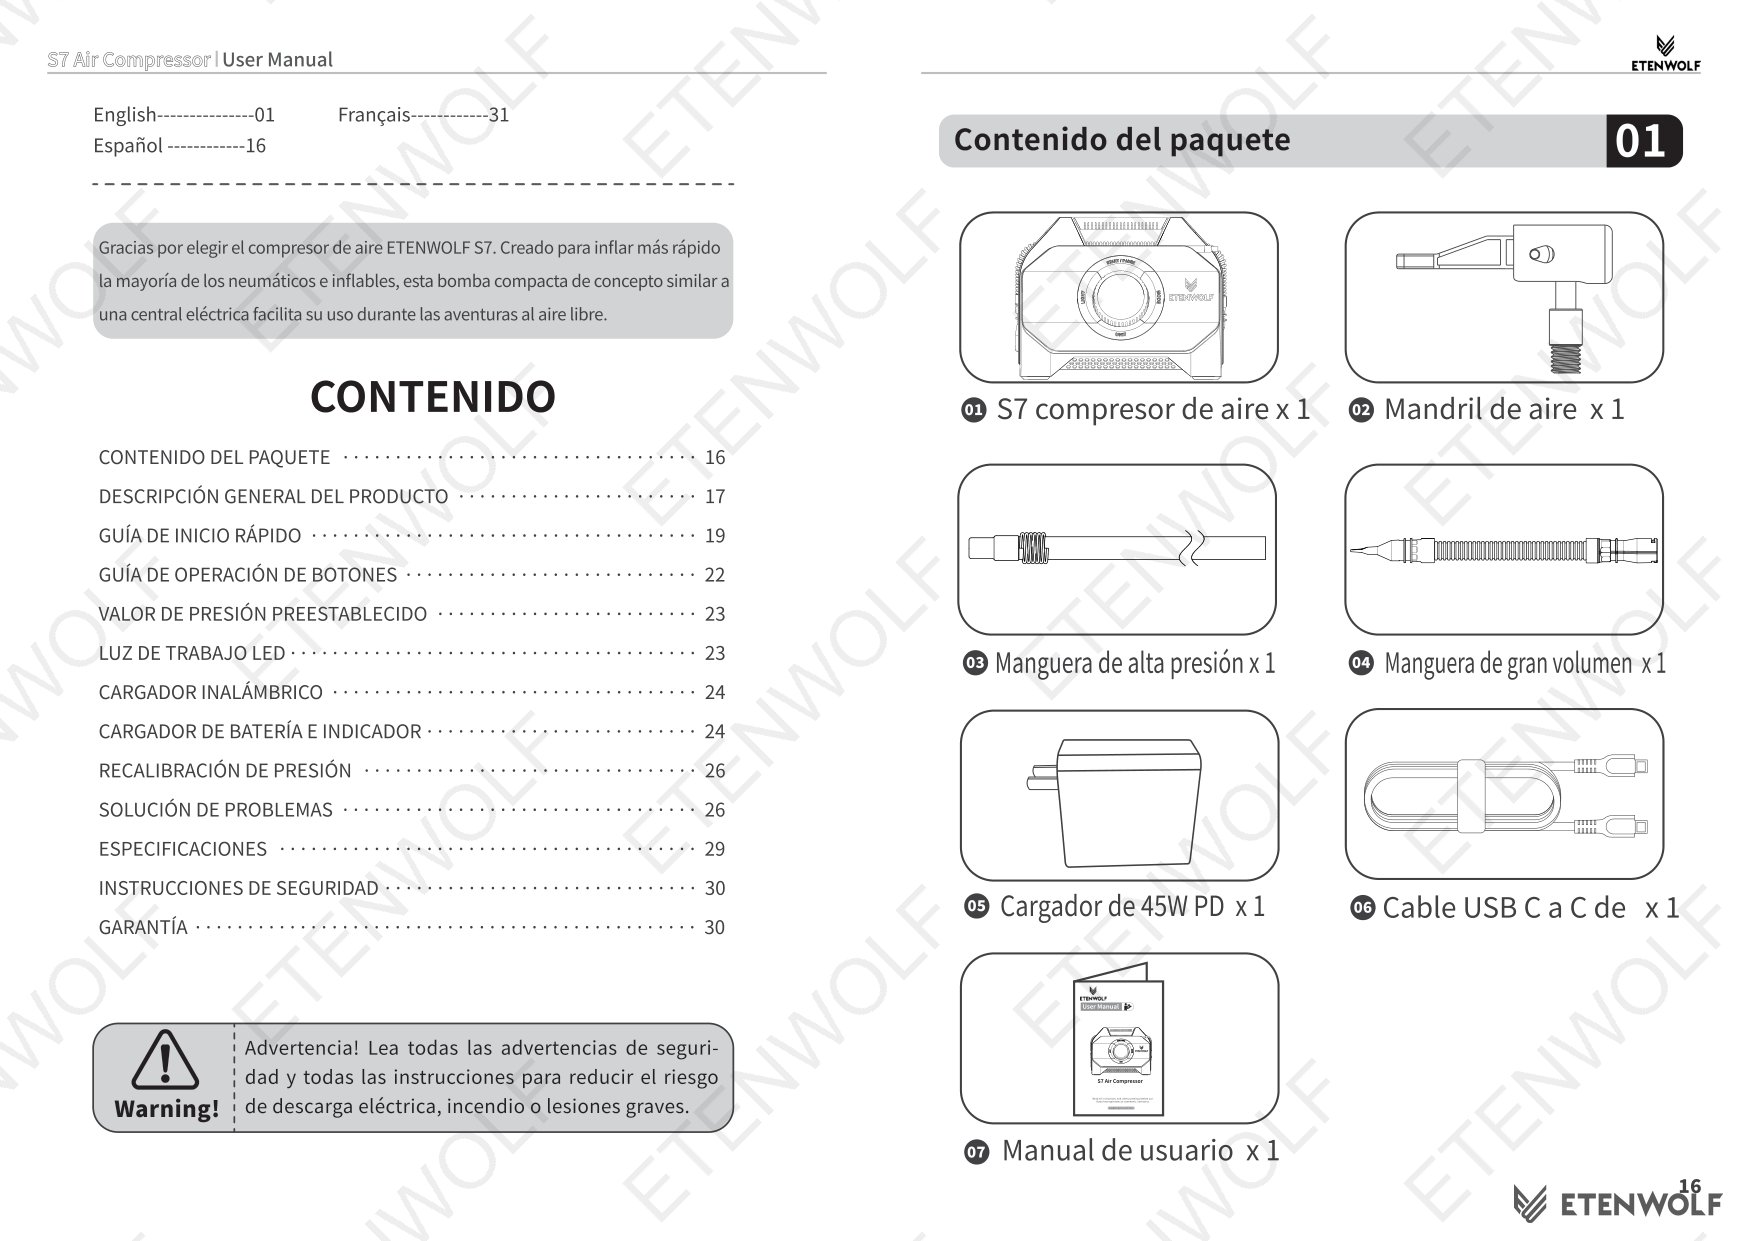
- S7 Air Compressor x 1
- High-pressure hose x 1
- High-volume hose x 1
- 45W PD charger x 1
- USB-C to C cable x 1
- Air Chuck x 1
- User manual x 1
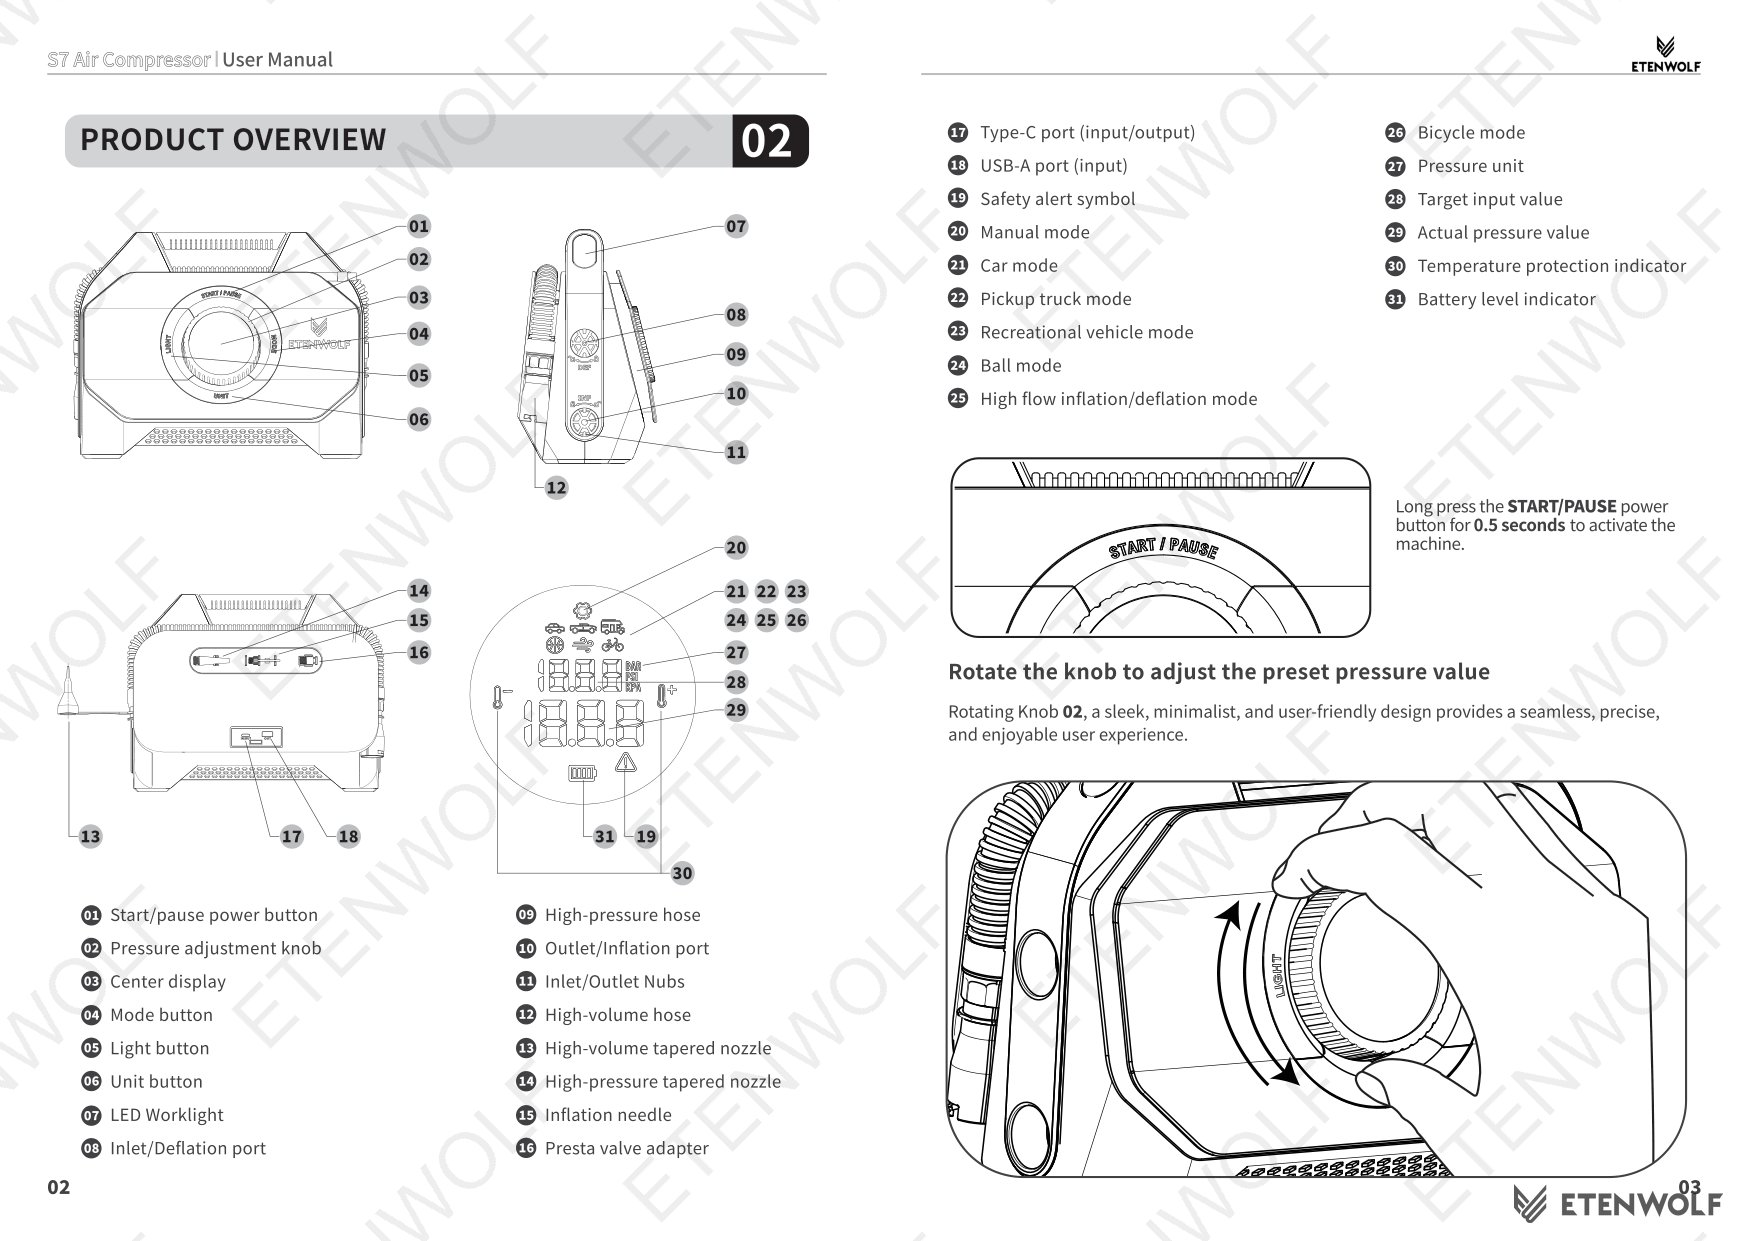
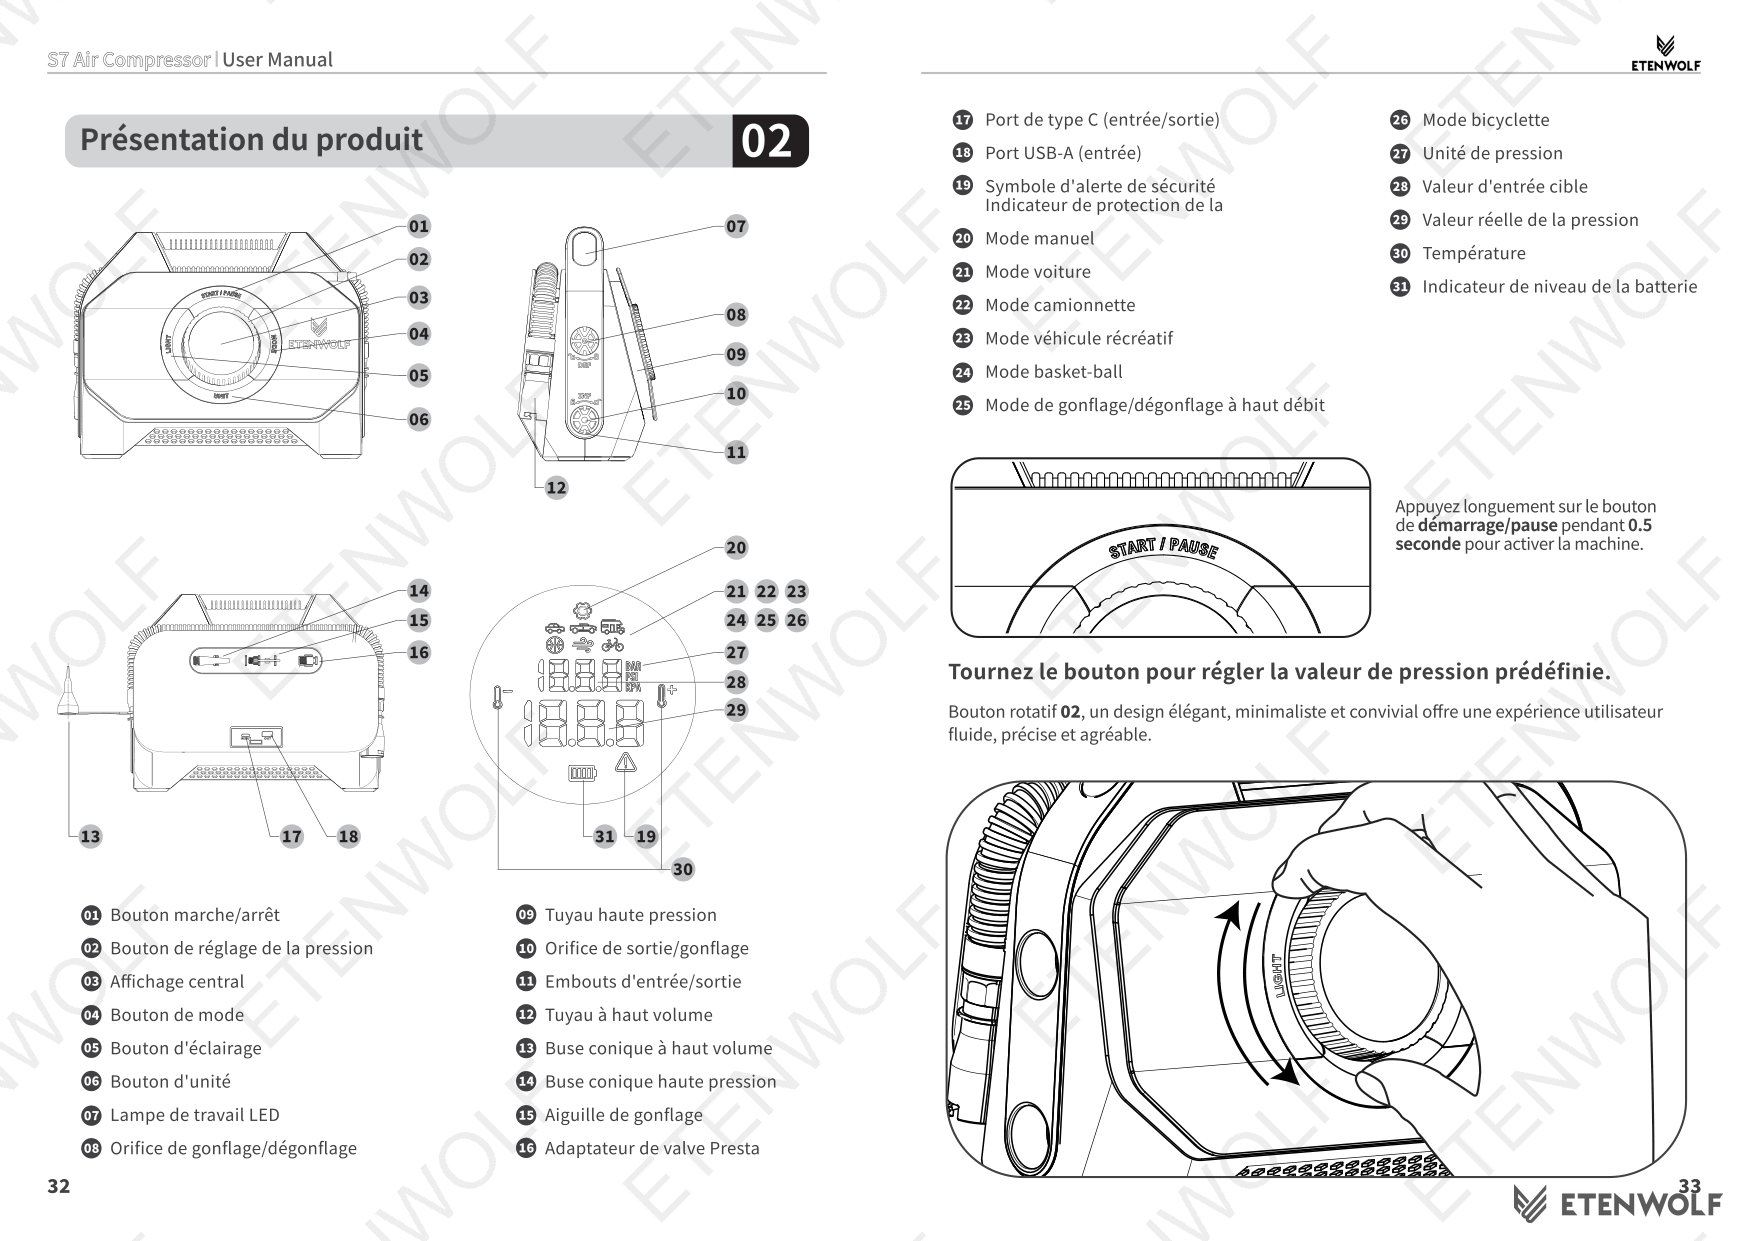
Key Components
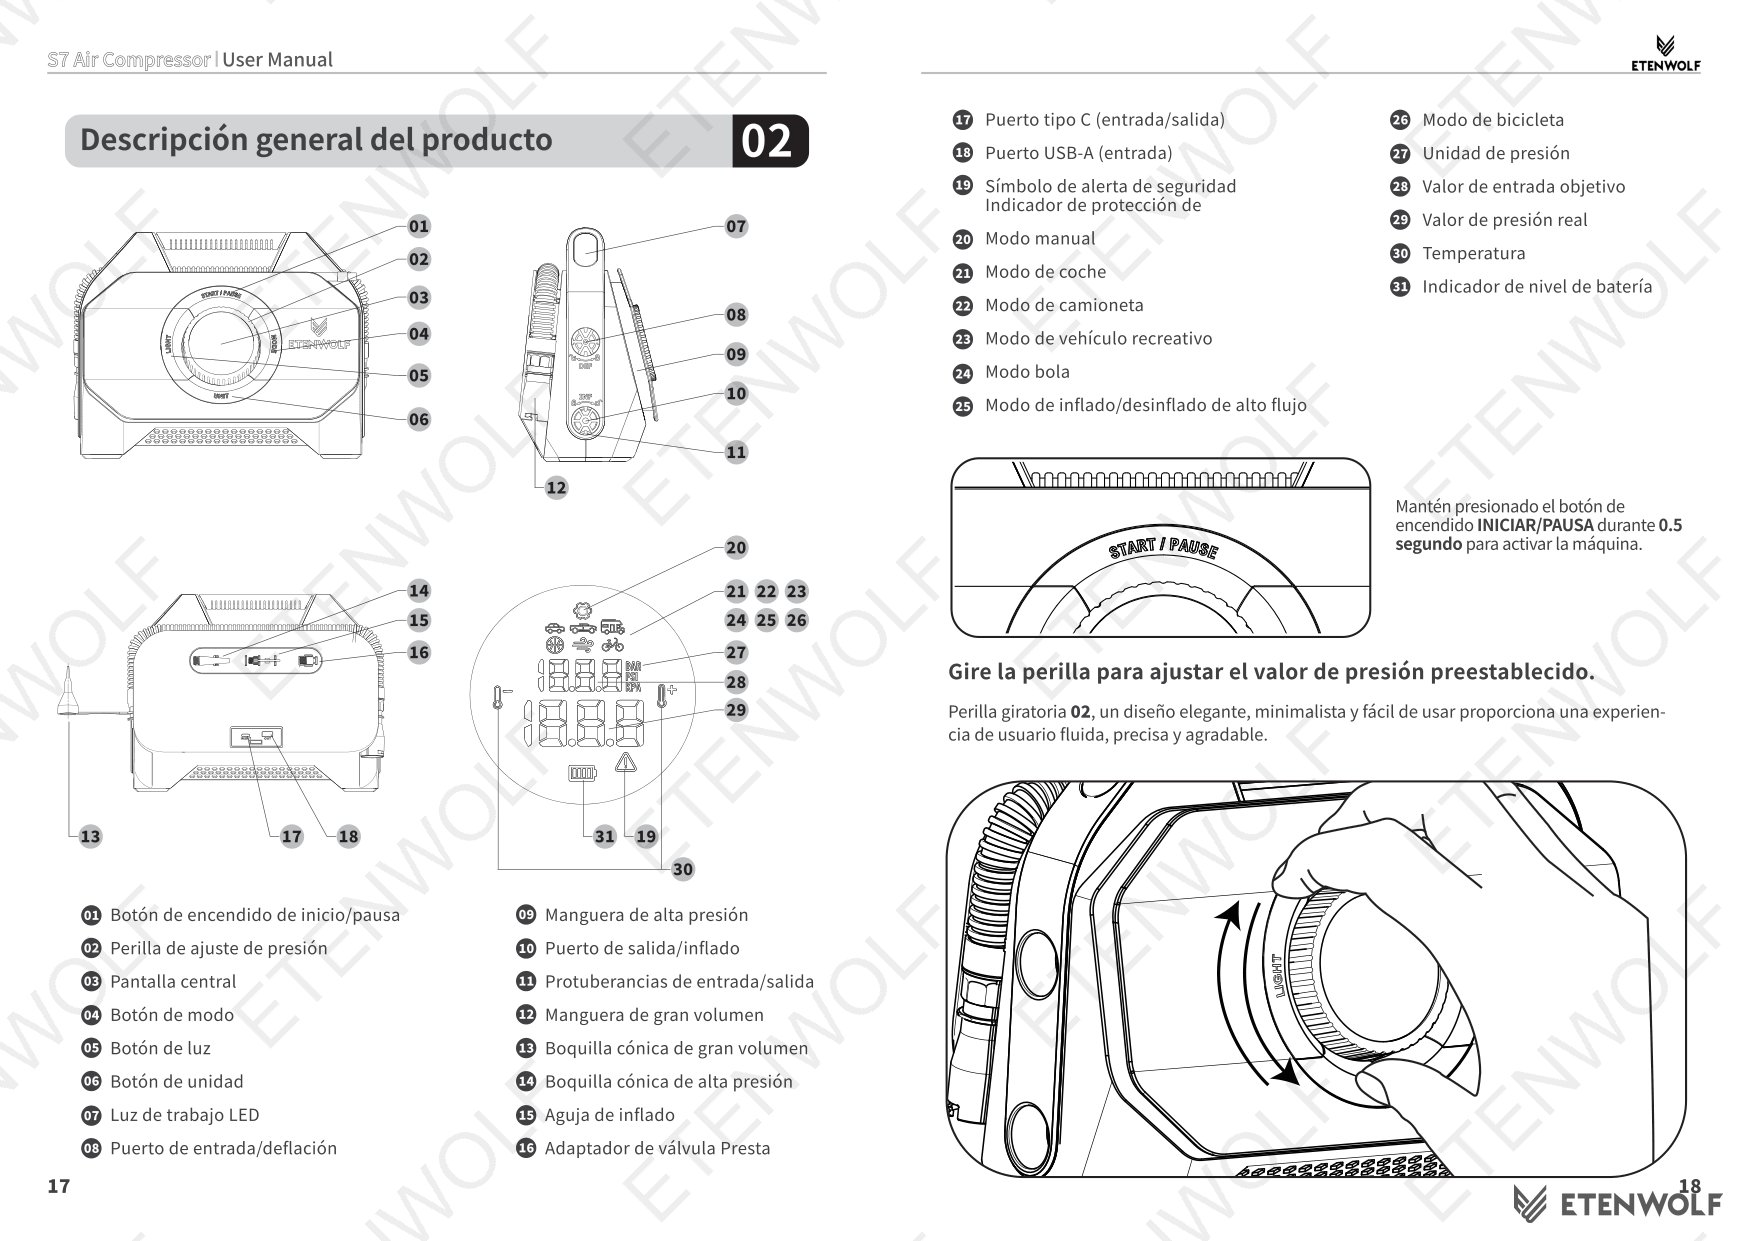
- 01 – Start/Pause power button
- 02 – Pressure adjustment knob (rotary, clockwise to increase / counter-clockwise to decrease)
- 03 – Center display (shows target and actual pressure values)
- 04 – Mode button
- 05 – Light button
- 06 – Unit button (PSI / kPa / Bar)
- 07 – LED Work light (side-mounted on handle)
- 08 – Inlet/Deflation port
- 09 – High-pressure hose
- 10 – Outlet/Inflation port
- 11 – Inlet/Outlet nubs
- 12 – High-volume hose
- 13 – High-volume tapered nozzle
- 14 – High-pressure tapered nozzle
- 15 – Inflation needle
- 16 – Presta valve adapter
- 17 – Type-C port (input/output)
- 18 – USB-A port (input)
Key Details
Inflation Modes and Preset Pressure Ranges
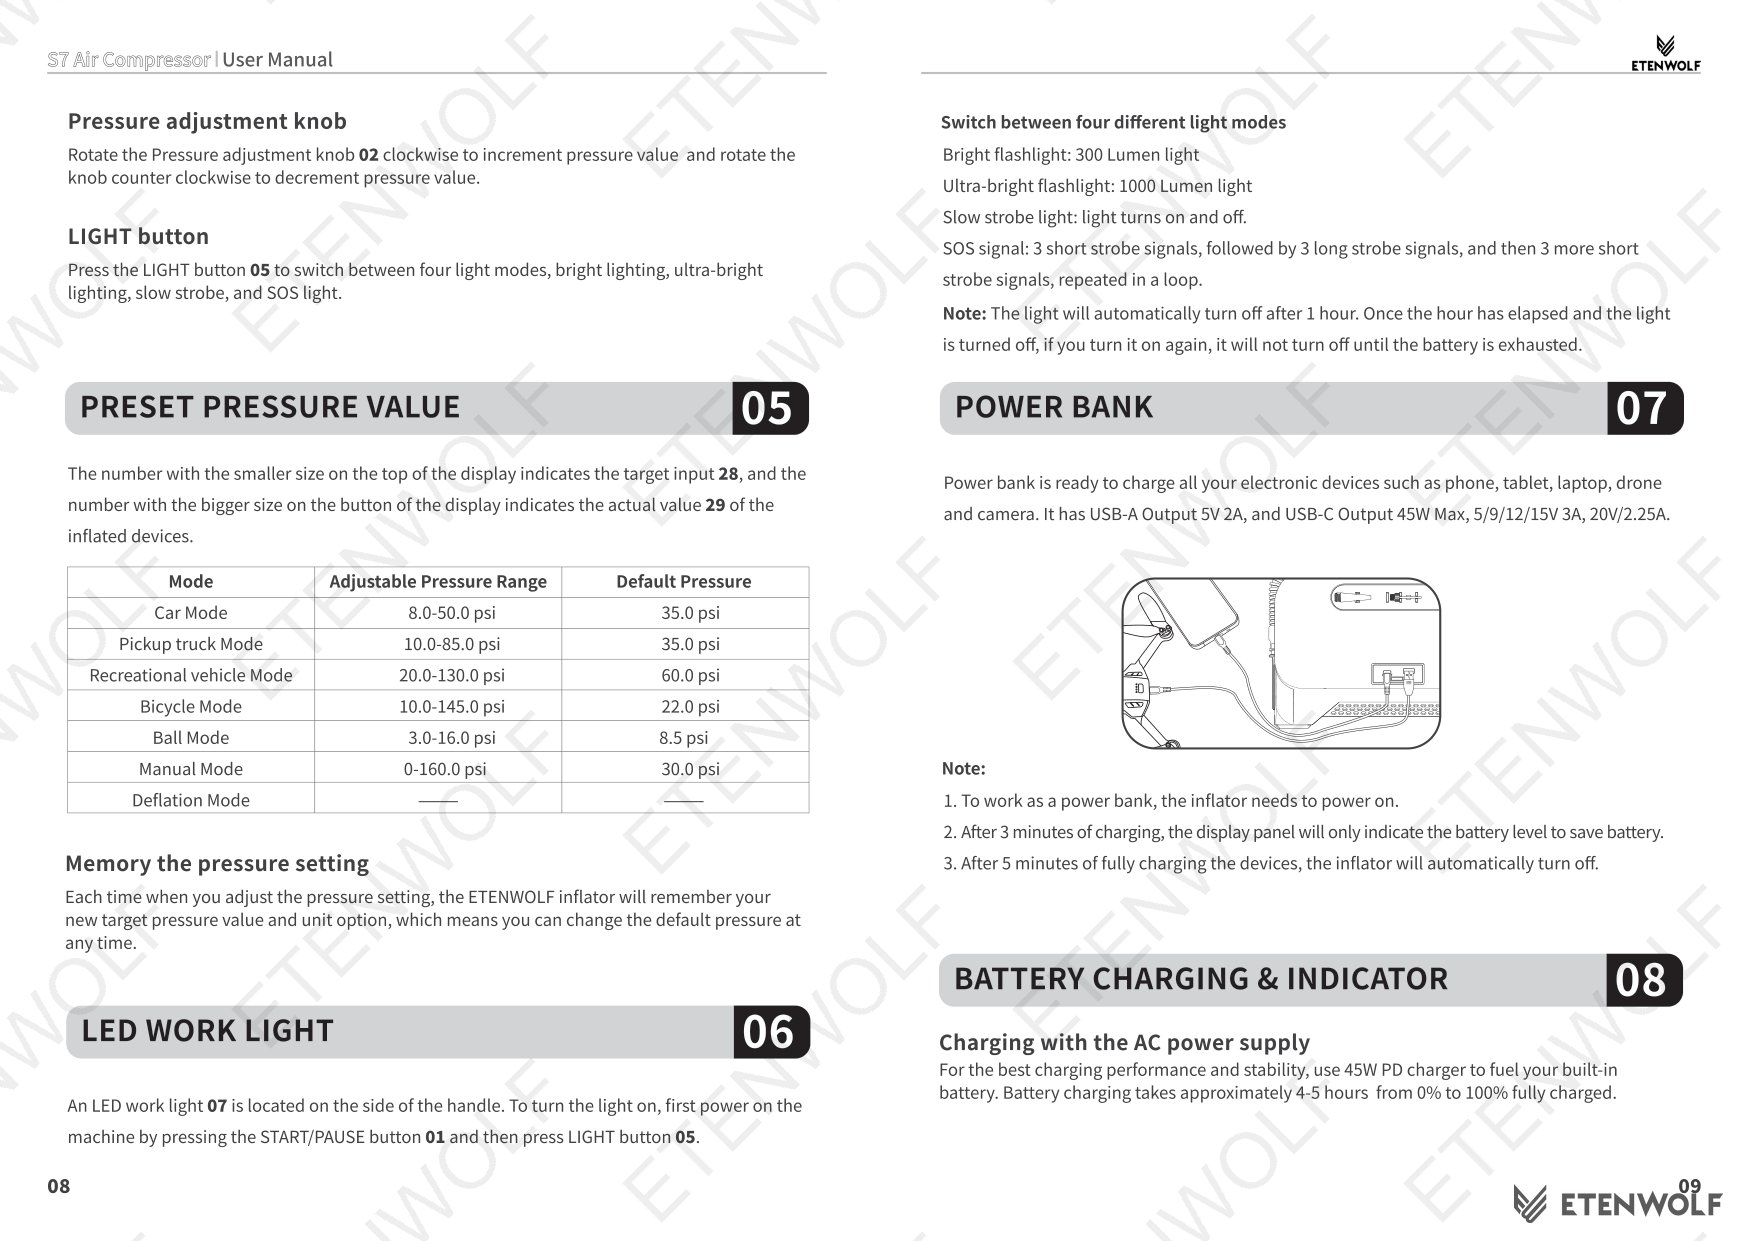
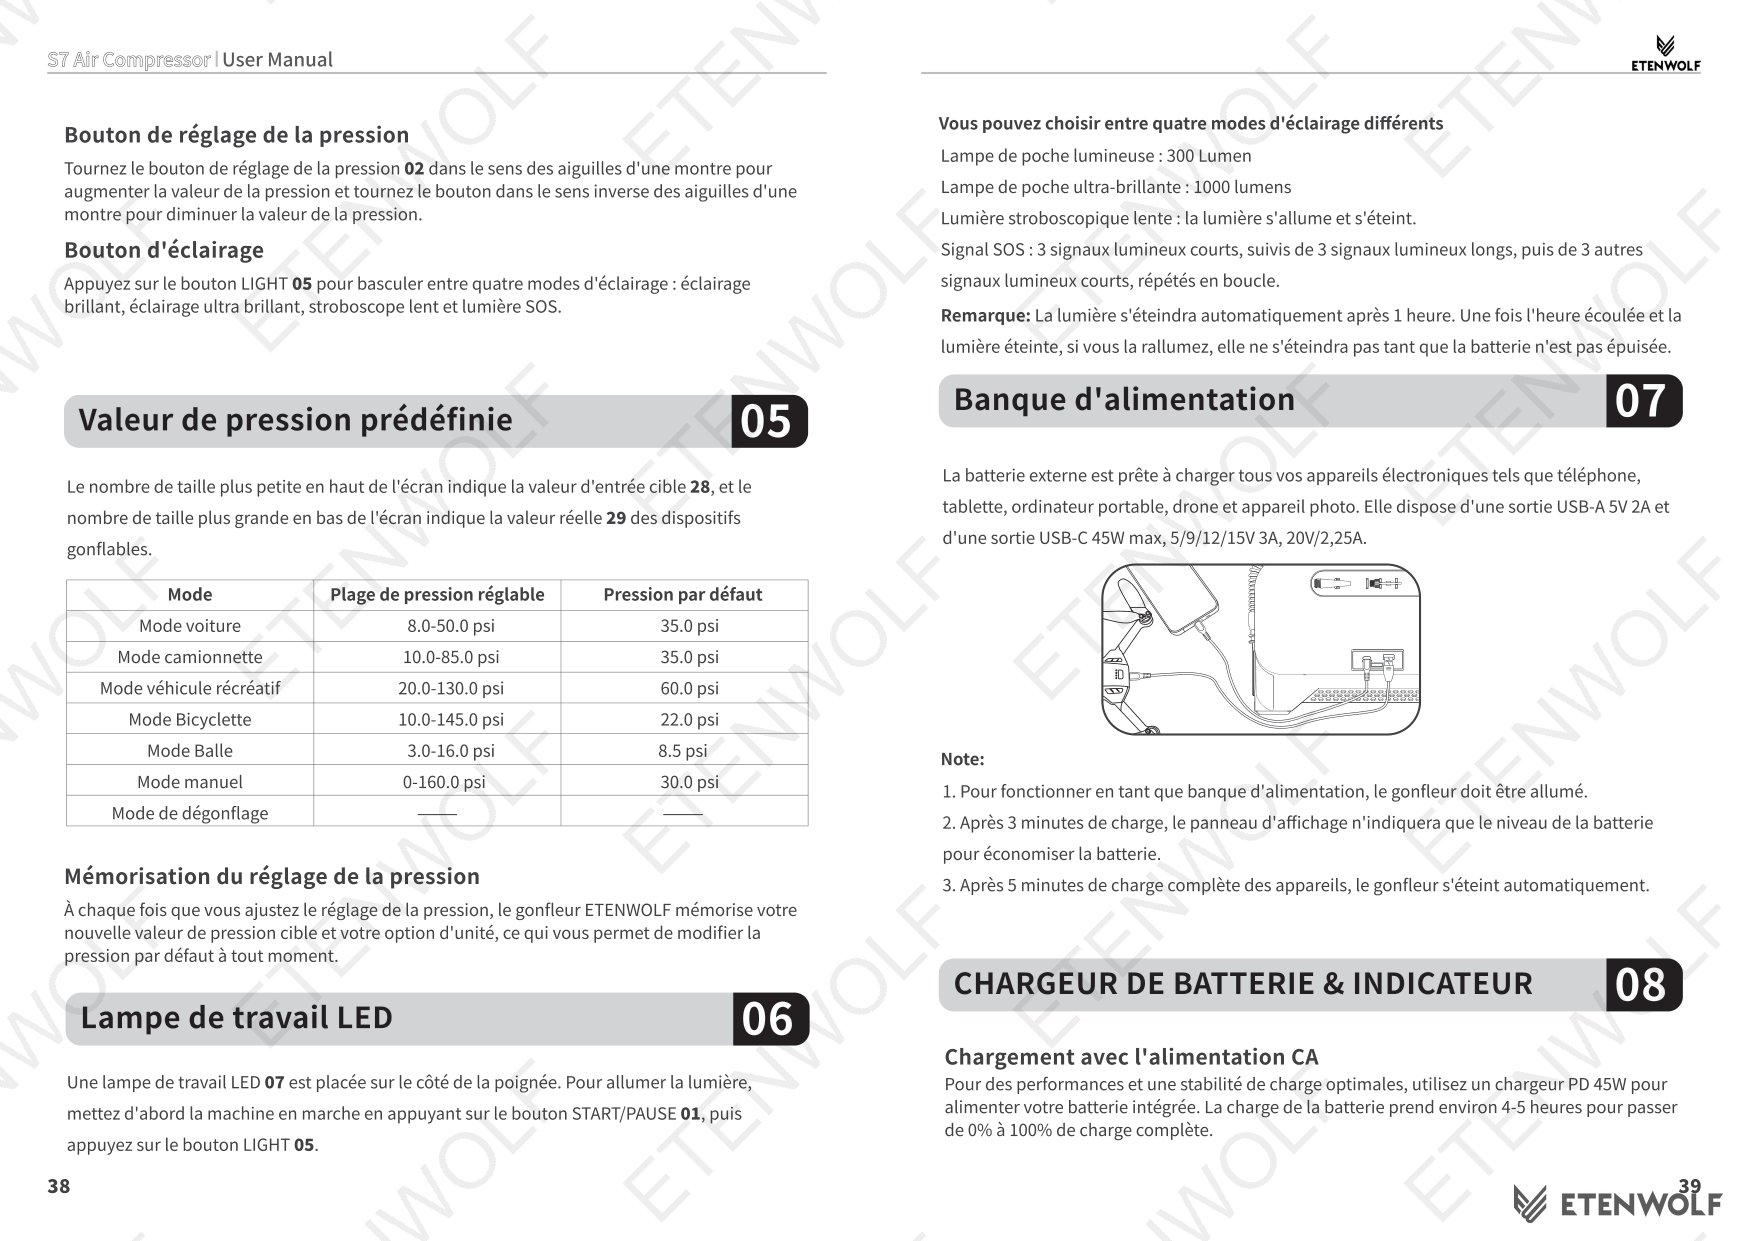
| Mode | Adjustable Pressure Range | Default Pressure |
|---|---|---|
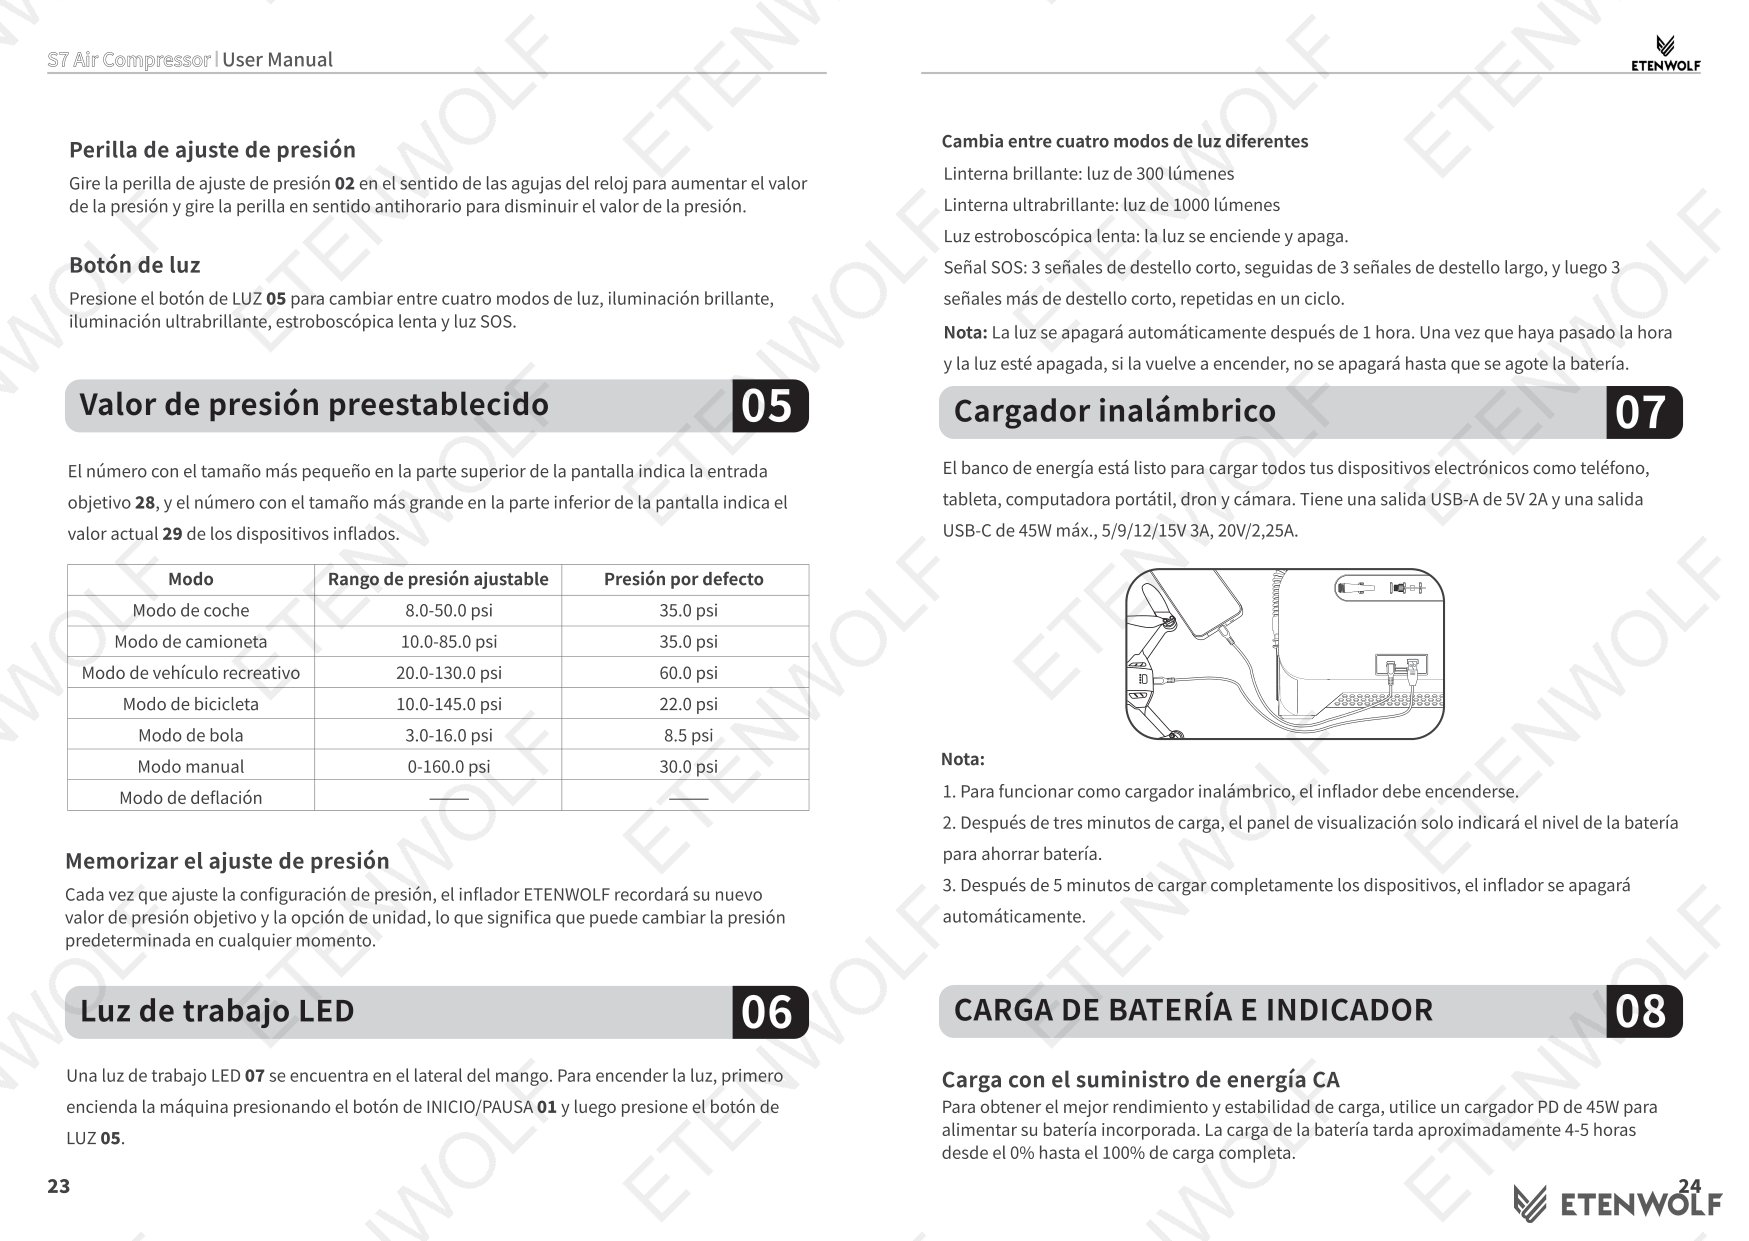
| Car Mode | 8.0 – 50.0 psi | 35.0 psi |
| Pickup Truck Mode | 10.0 – 85.0 psi | 35.0 psi |
| Recreational Vehicle Mode | 20.0 – 130.0 psi | 60.0 psi |
| Bicycle Mode | 10.0 – 145.0 psi | 22.0 psi |
| Ball Mode | 3.0 – 16.0 psi | 8.5 psi |
| Manual Mode | 0 – 160.0 psi | 30.0 psi |
| Deflation Mode | — | — |
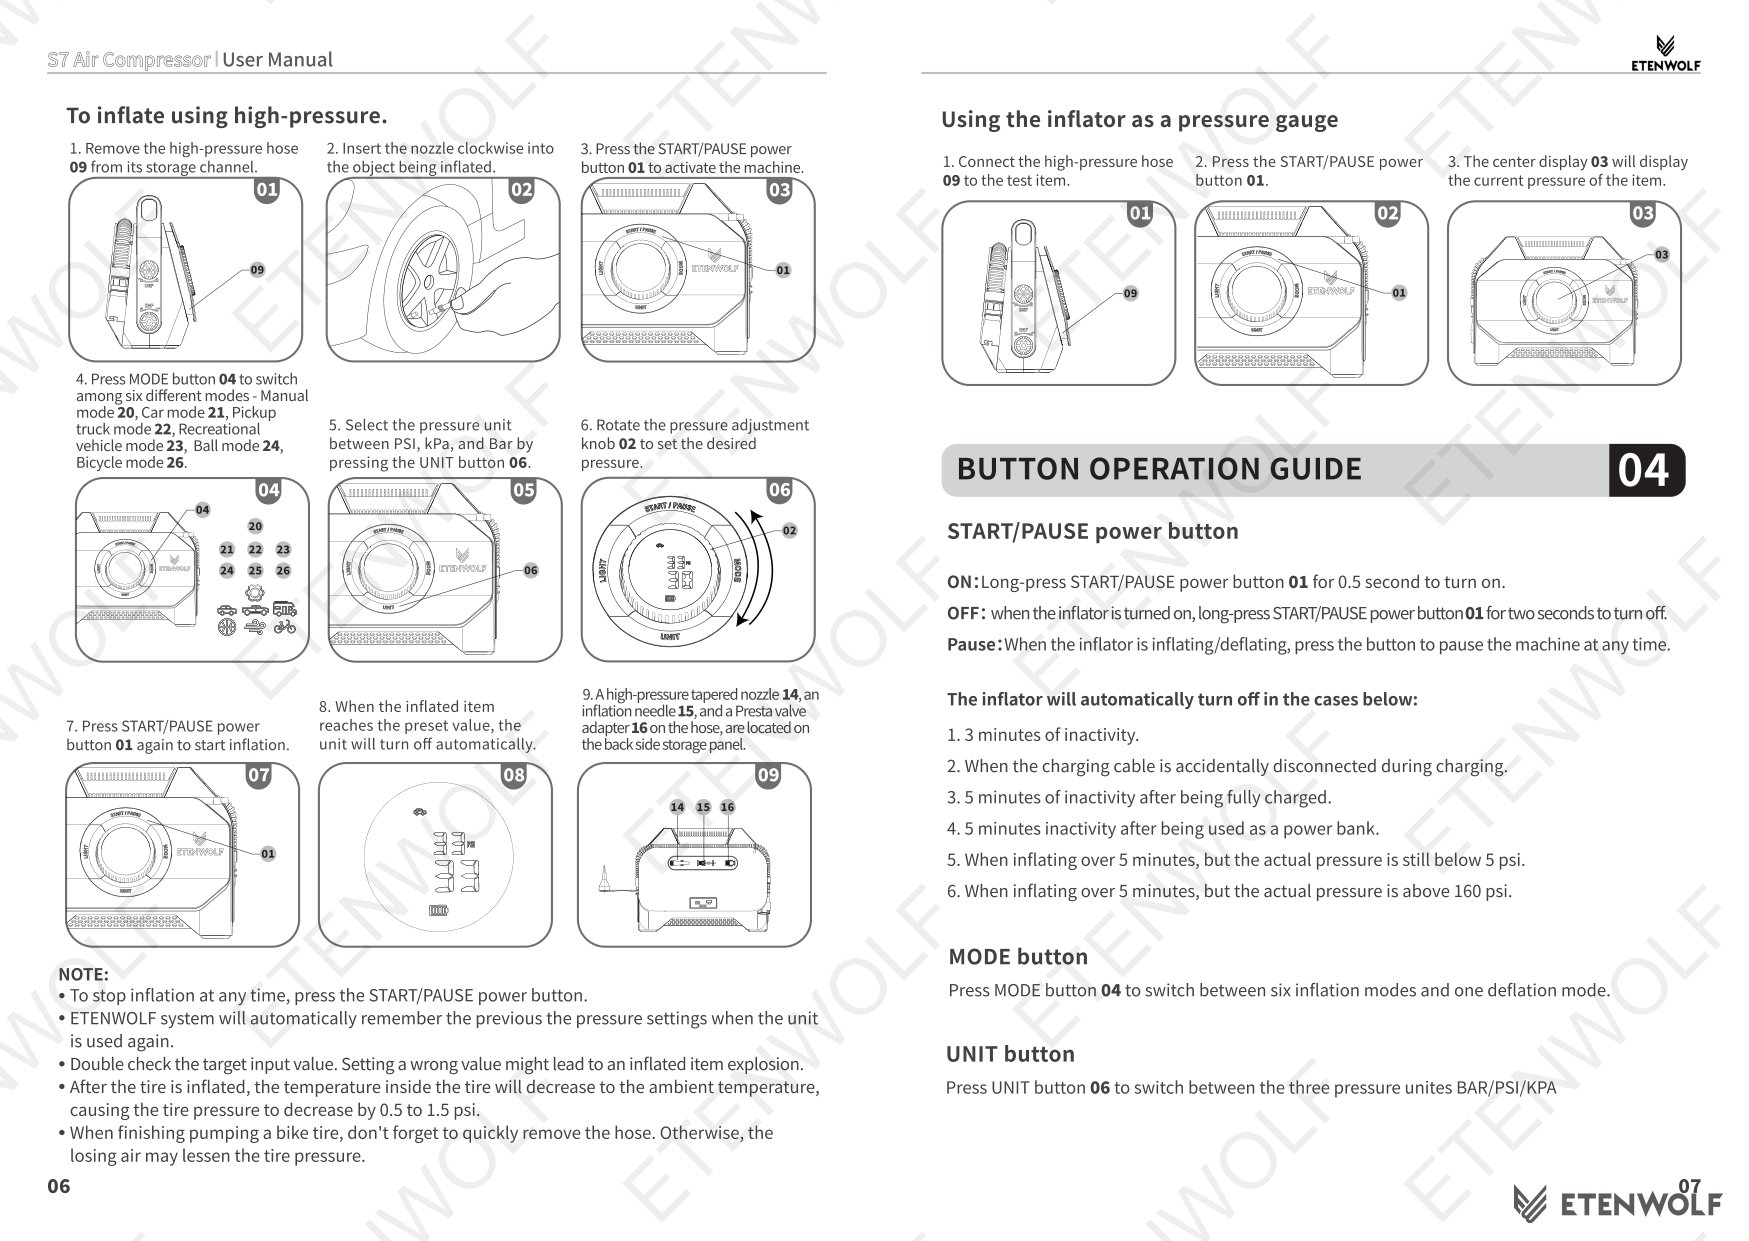
Button Operation Summary
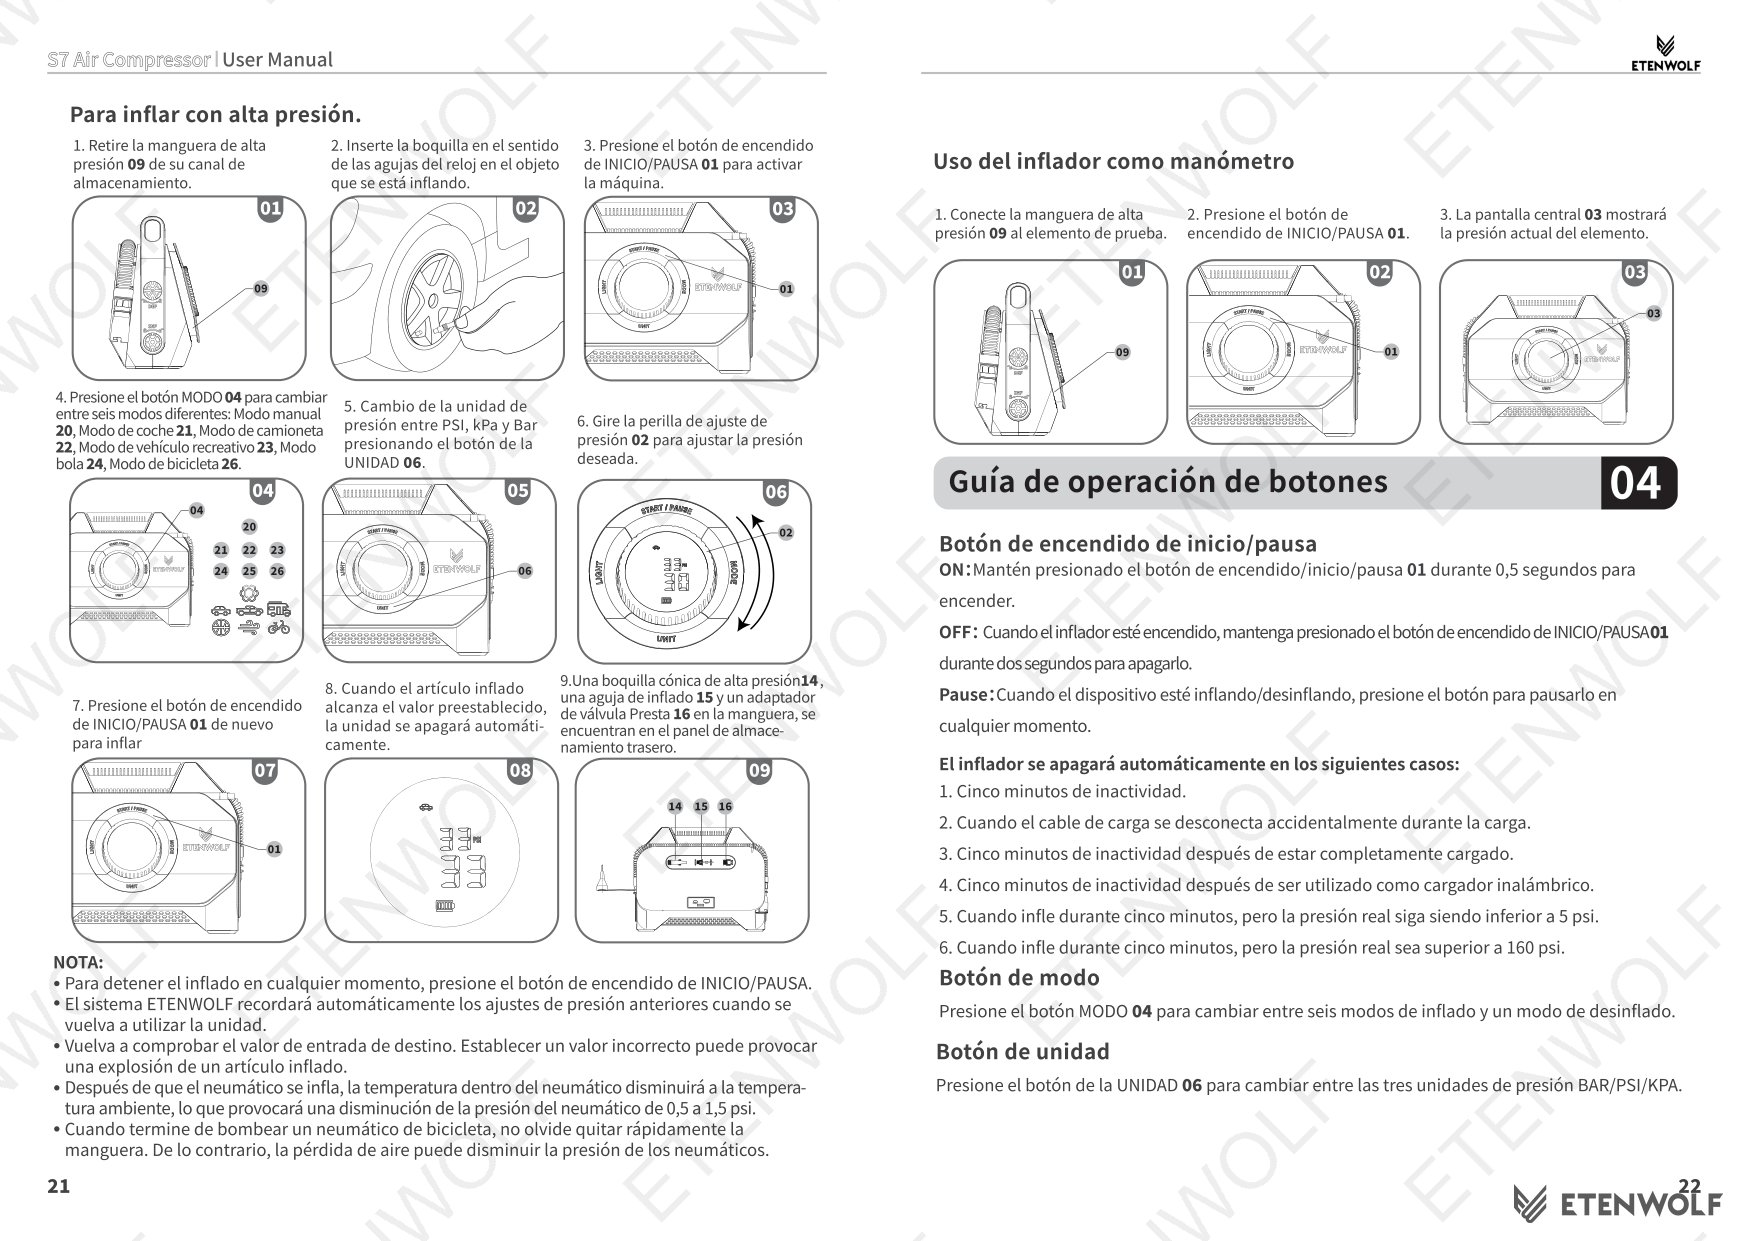
- Power ON: Long-press the Start/Pause button (01) for 0.5 seconds.
- Power OFF: When the unit is on, long-press the Start/Pause button for 2 seconds.
- Pause: Short-press the Start/Pause button during inflation or deflation at any time.
- Mode selection: Press the Mode button (04) to cycle through six inflation modes and one deflation mode.
- Unit selection: Press the Unit button (06) to cycle through BAR, PSI, and KPA.
- Pressure adjustment: Rotate knob (02) clockwise to increase, counter-clockwise to decrease.
- Light control: Press the Light button (05) to cycle through four modes — bright, ultra-bright, slow strobe, and SOS.
Automatic Shut-Off Conditions
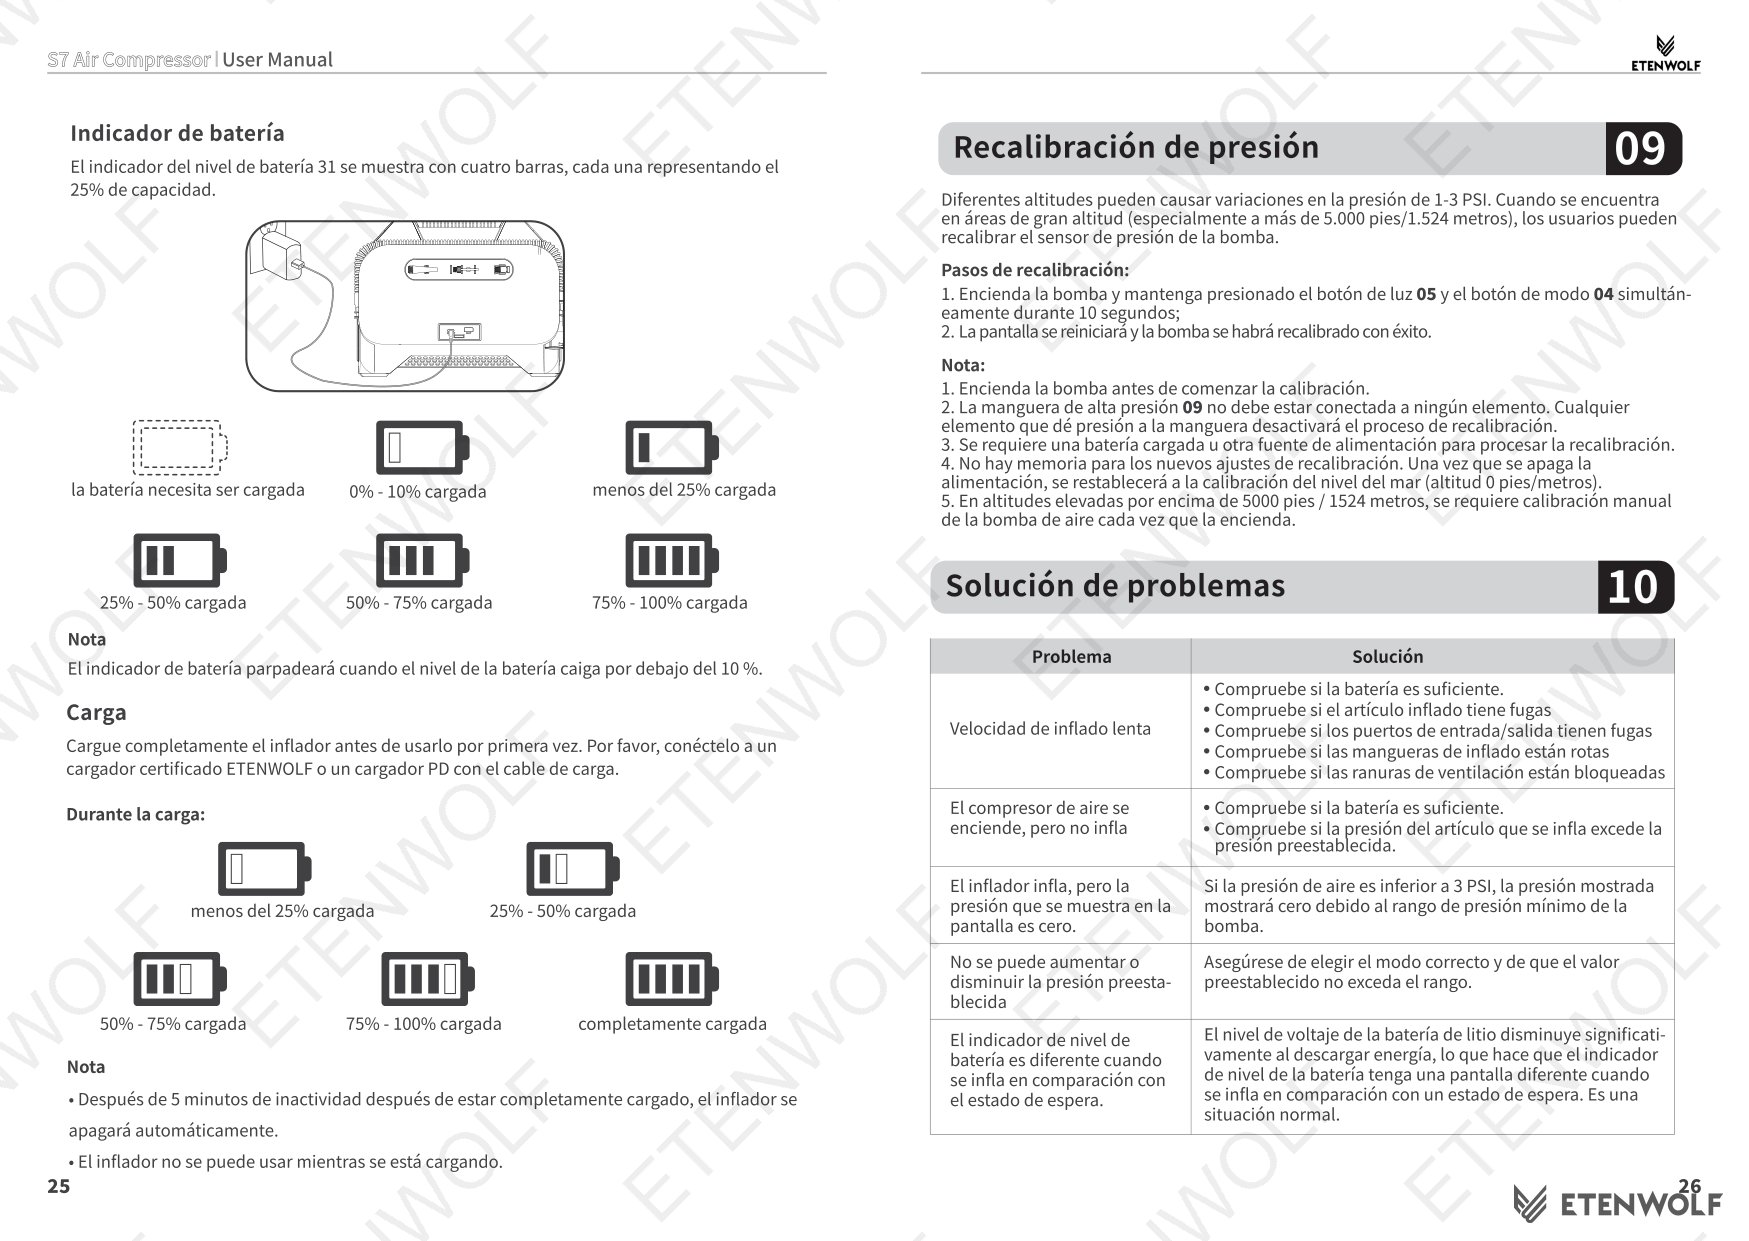
- 3 minutes of inactivity.
- Charging cable is accidentally disconnected during charging.
- 5 minutes of inactivity after being fully charged.
- 5 minutes of inactivity after being used as a power bank.
- Inflating for over 5 minutes with actual pressure still below 5 psi.
- Inflating for over 5 minutes with actual pressure above 160 psi.
Pressure Memory Function
The ETENWOLF Vortex S7 automatically saves the most recent target pressure value and selected pressure unit after each adjustment. The saved settings are restored the next time the unit is powered on, eliminating the need to re-enter values between sessions.
Using the Unit as a Pressure Gauge
Connect the high-pressure hose (09) to the item to be tested, then press the Start/Pause button (01). The center display (03) will show the current pressure of the item without initiating active inflation.
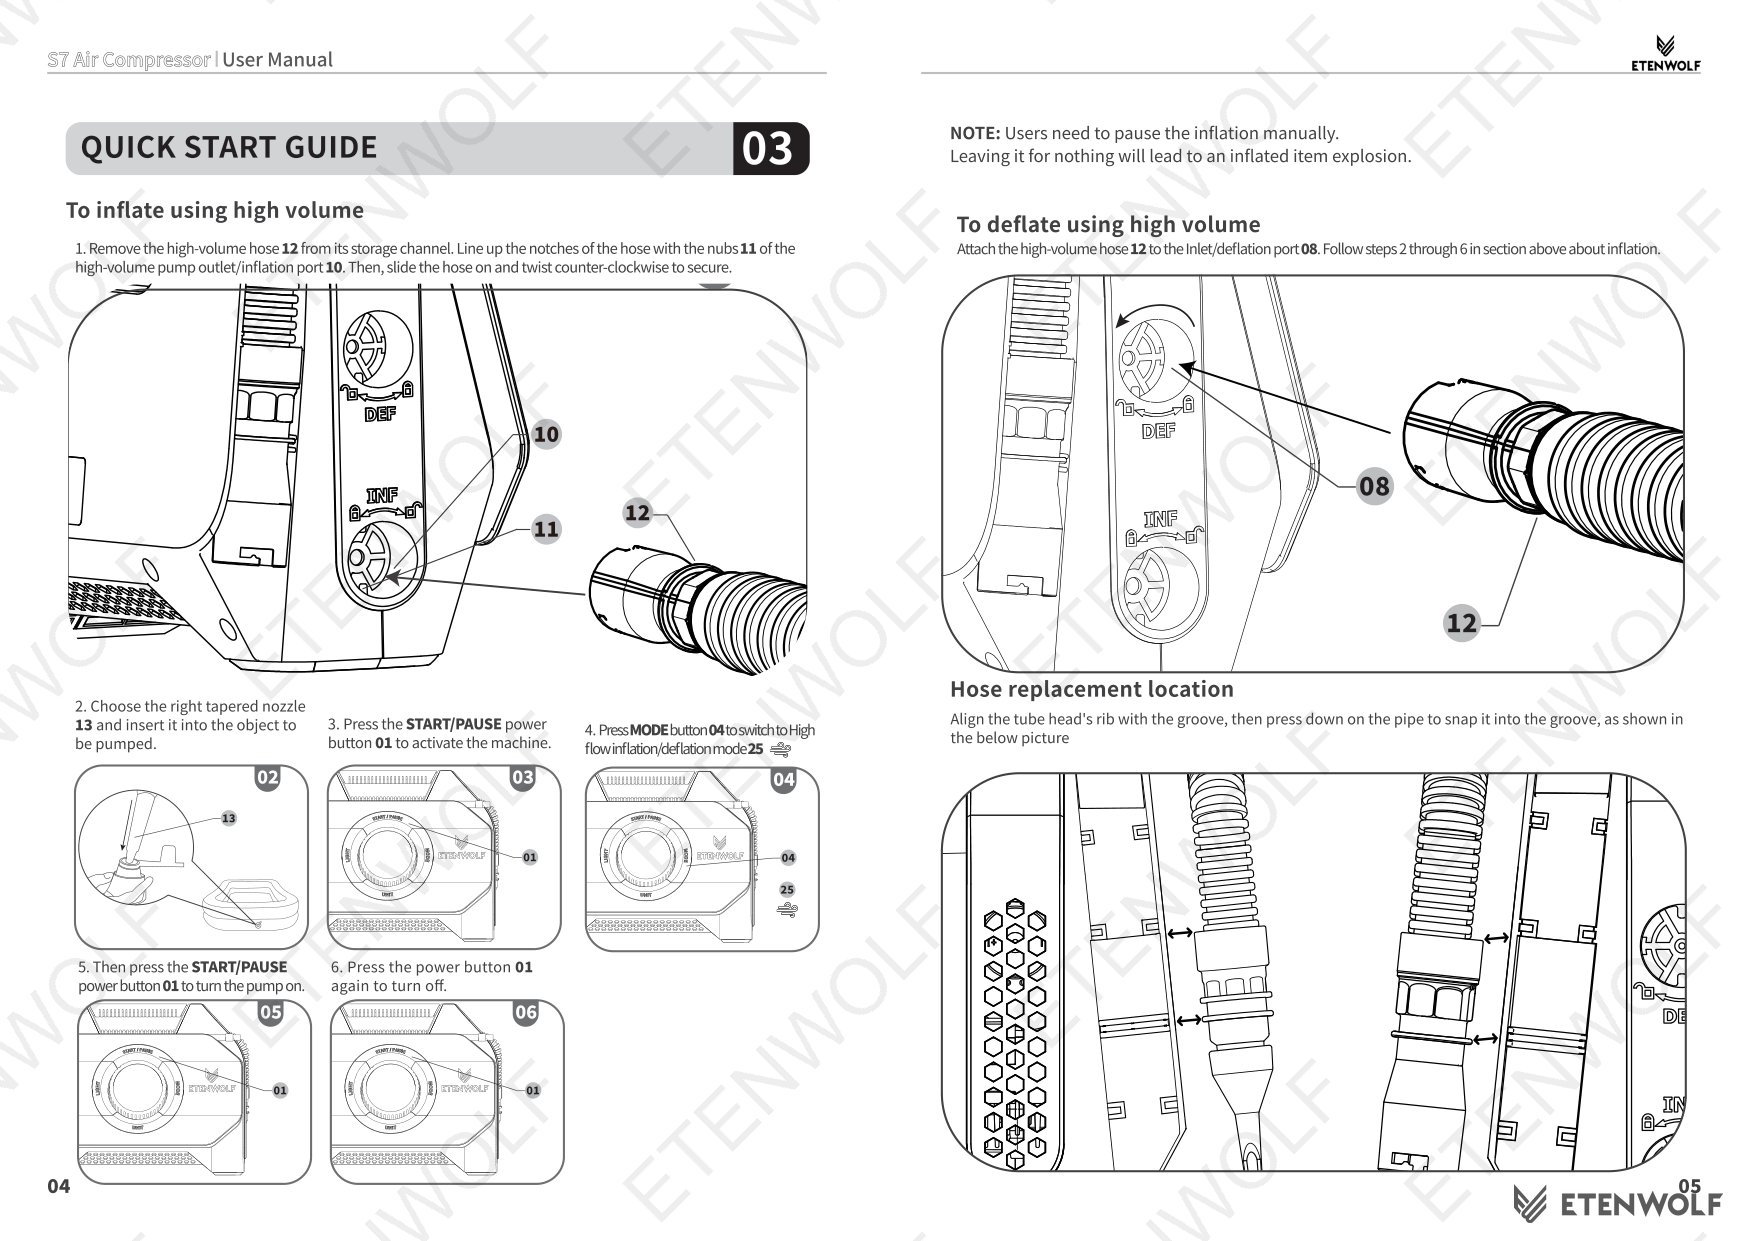
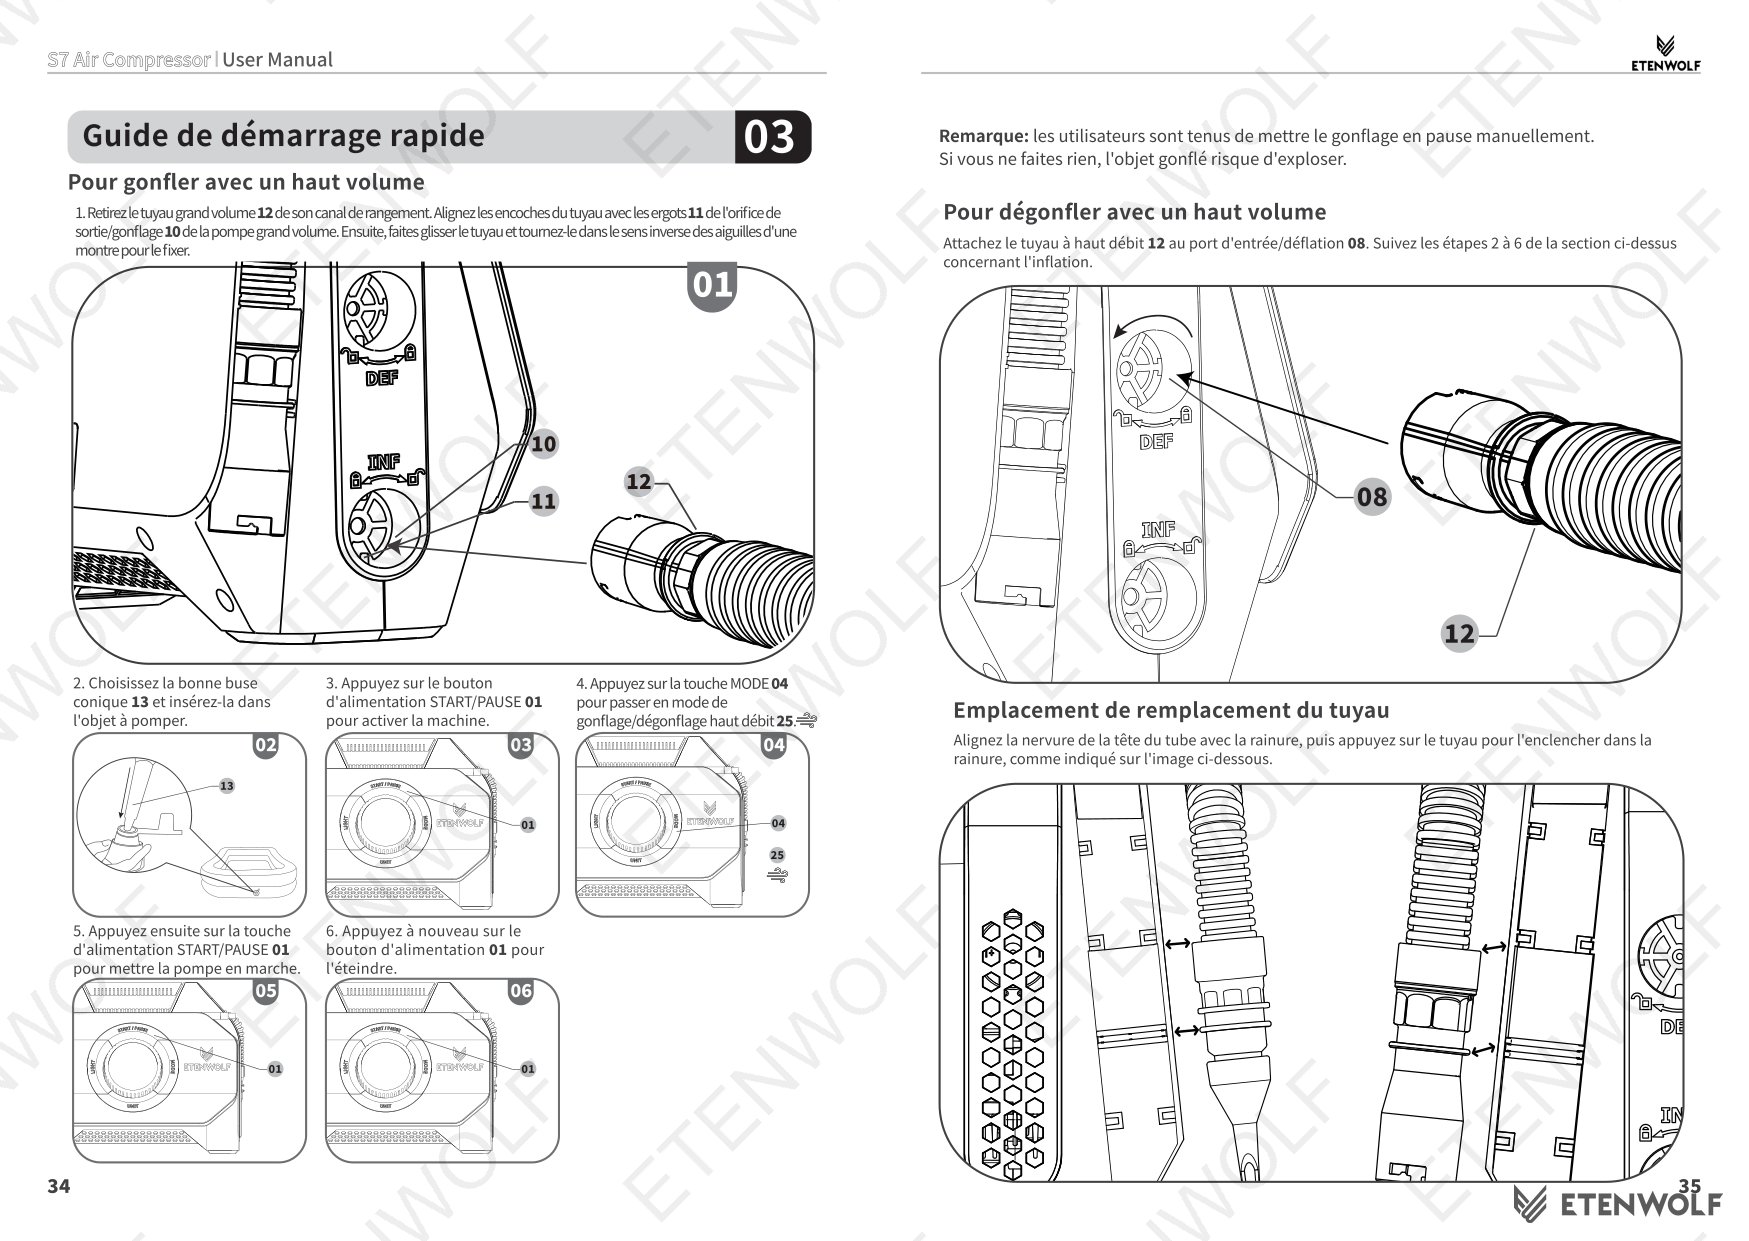
High-Volume Inflation Quick Start
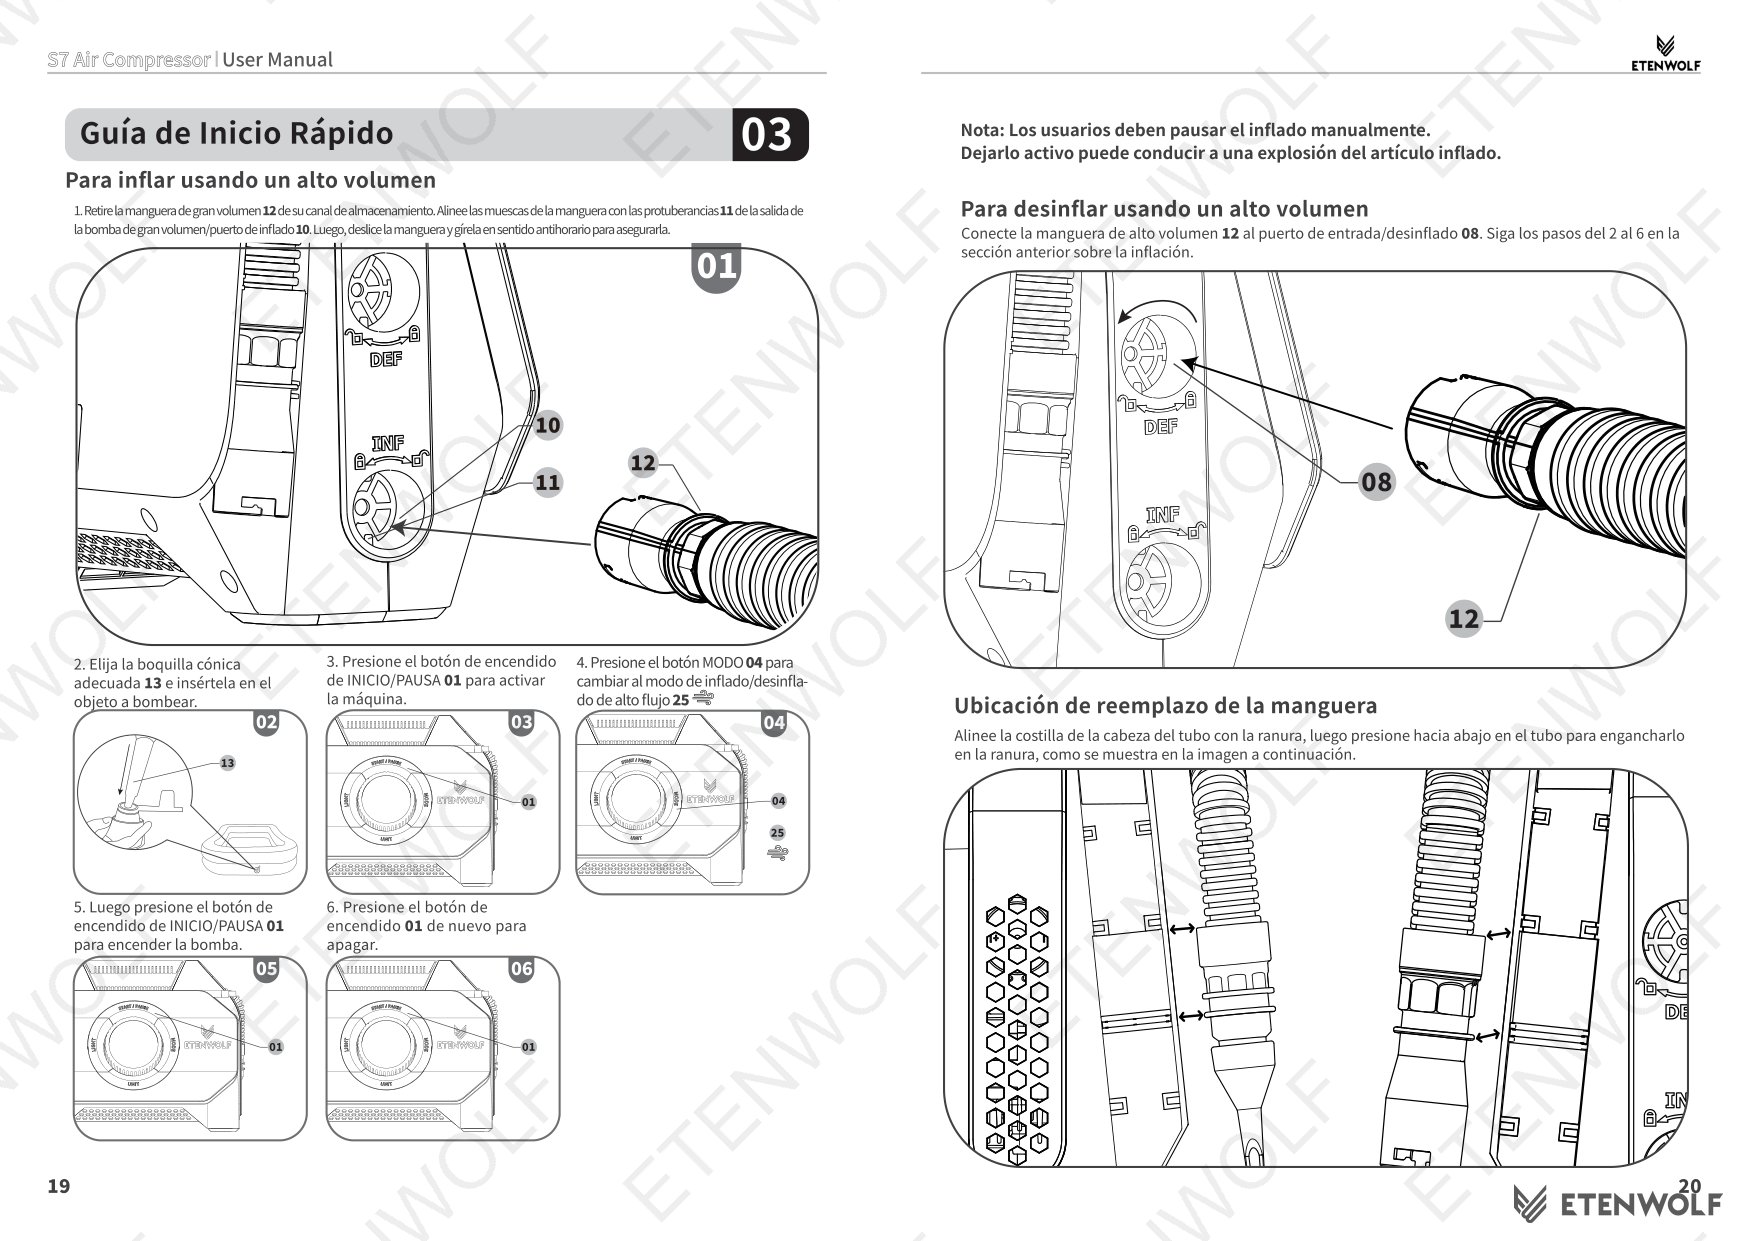
- Remove the high-volume hose (12) from its storage channel. Align the notches with the nubs (11) on the outlet/inflation port (10), slide on, and twist counter-clockwise to secure.
- Select the correct tapered nozzle (13) and insert it into the item to be inflated.
- Press Start/Pause (01) to power on the unit.
- Press Mode (04) to select High Flow Inflation/Deflation mode (25).
- Press Start/Pause (01) again to begin inflation.
- Press Start/Pause (01) again to stop when finished.
Note: Users must pause inflation manually in high-volume mode. Leaving the unit running unattended may cause the inflated item to burst.
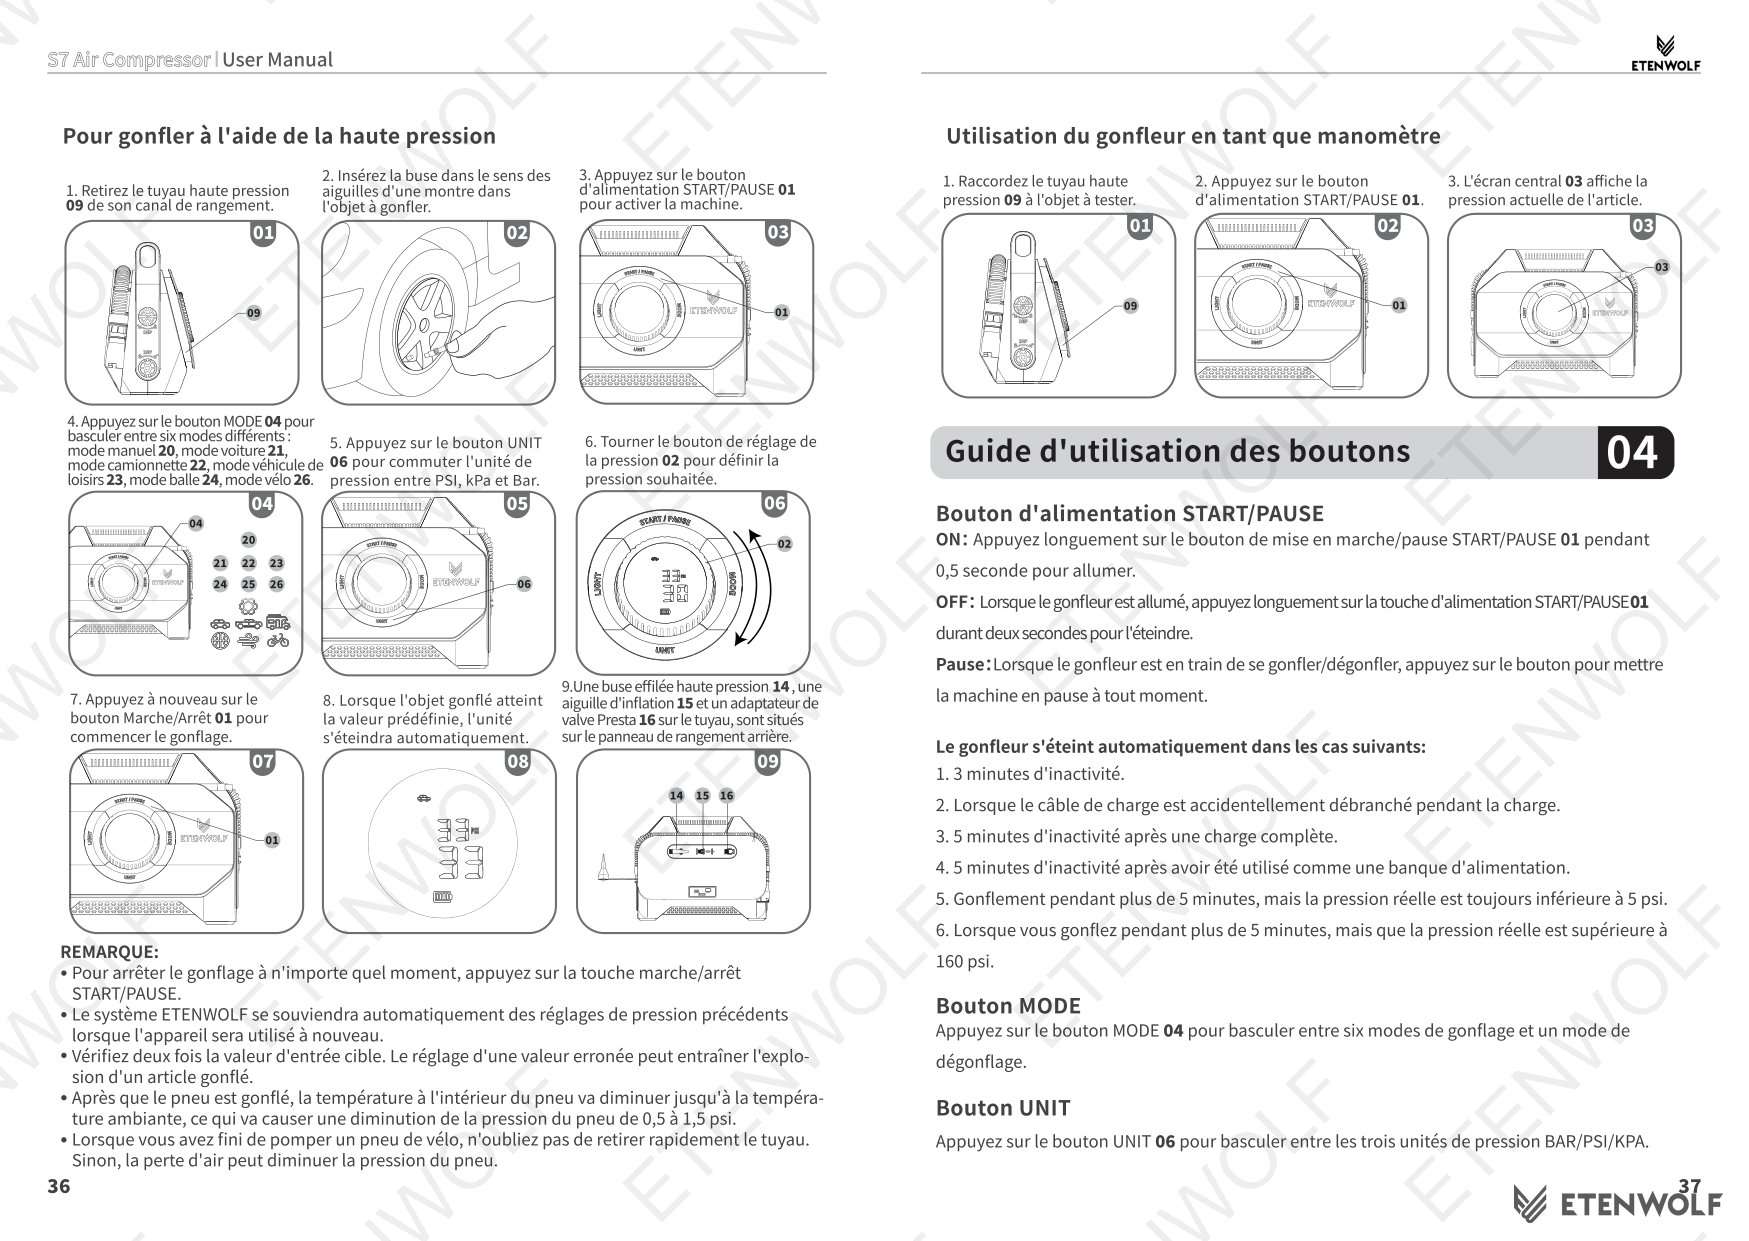
High-Pressure Inflation Quick Start
- Remove the high-pressure hose (09) from its storage channel.
- Insert the nozzle clockwise into the valve of the item being inflated.
- Press Start/Pause (01) to power on the unit.
- Press Mode (04) to select the appropriate mode (Car, Pickup Truck, RV, Ball, Bicycle, or Manual).
- Press Unit (06) to select PSI, kPa, or Bar.
- Rotate the pressure adjustment knob (02) to set the desired target pressure.
- Press Start/Pause (01) to begin inflation. The unit will shut off automatically when the target pressure is reached.
Additional notes:
- After a tire is inflated, the temperature inside the tire will decrease to ambient temperature, which may cause tire pressure to drop by 0.5 to 1.5 psi.
- When finishing a bicycle tire, remove the hose promptly to prevent air loss from lowering the tire pressure.
- The high-pressure tapered nozzle (14), inflation needle (15), and Presta valve adapter (16) are stored on the back-side storage panel of the unit.
Standards & Compliance
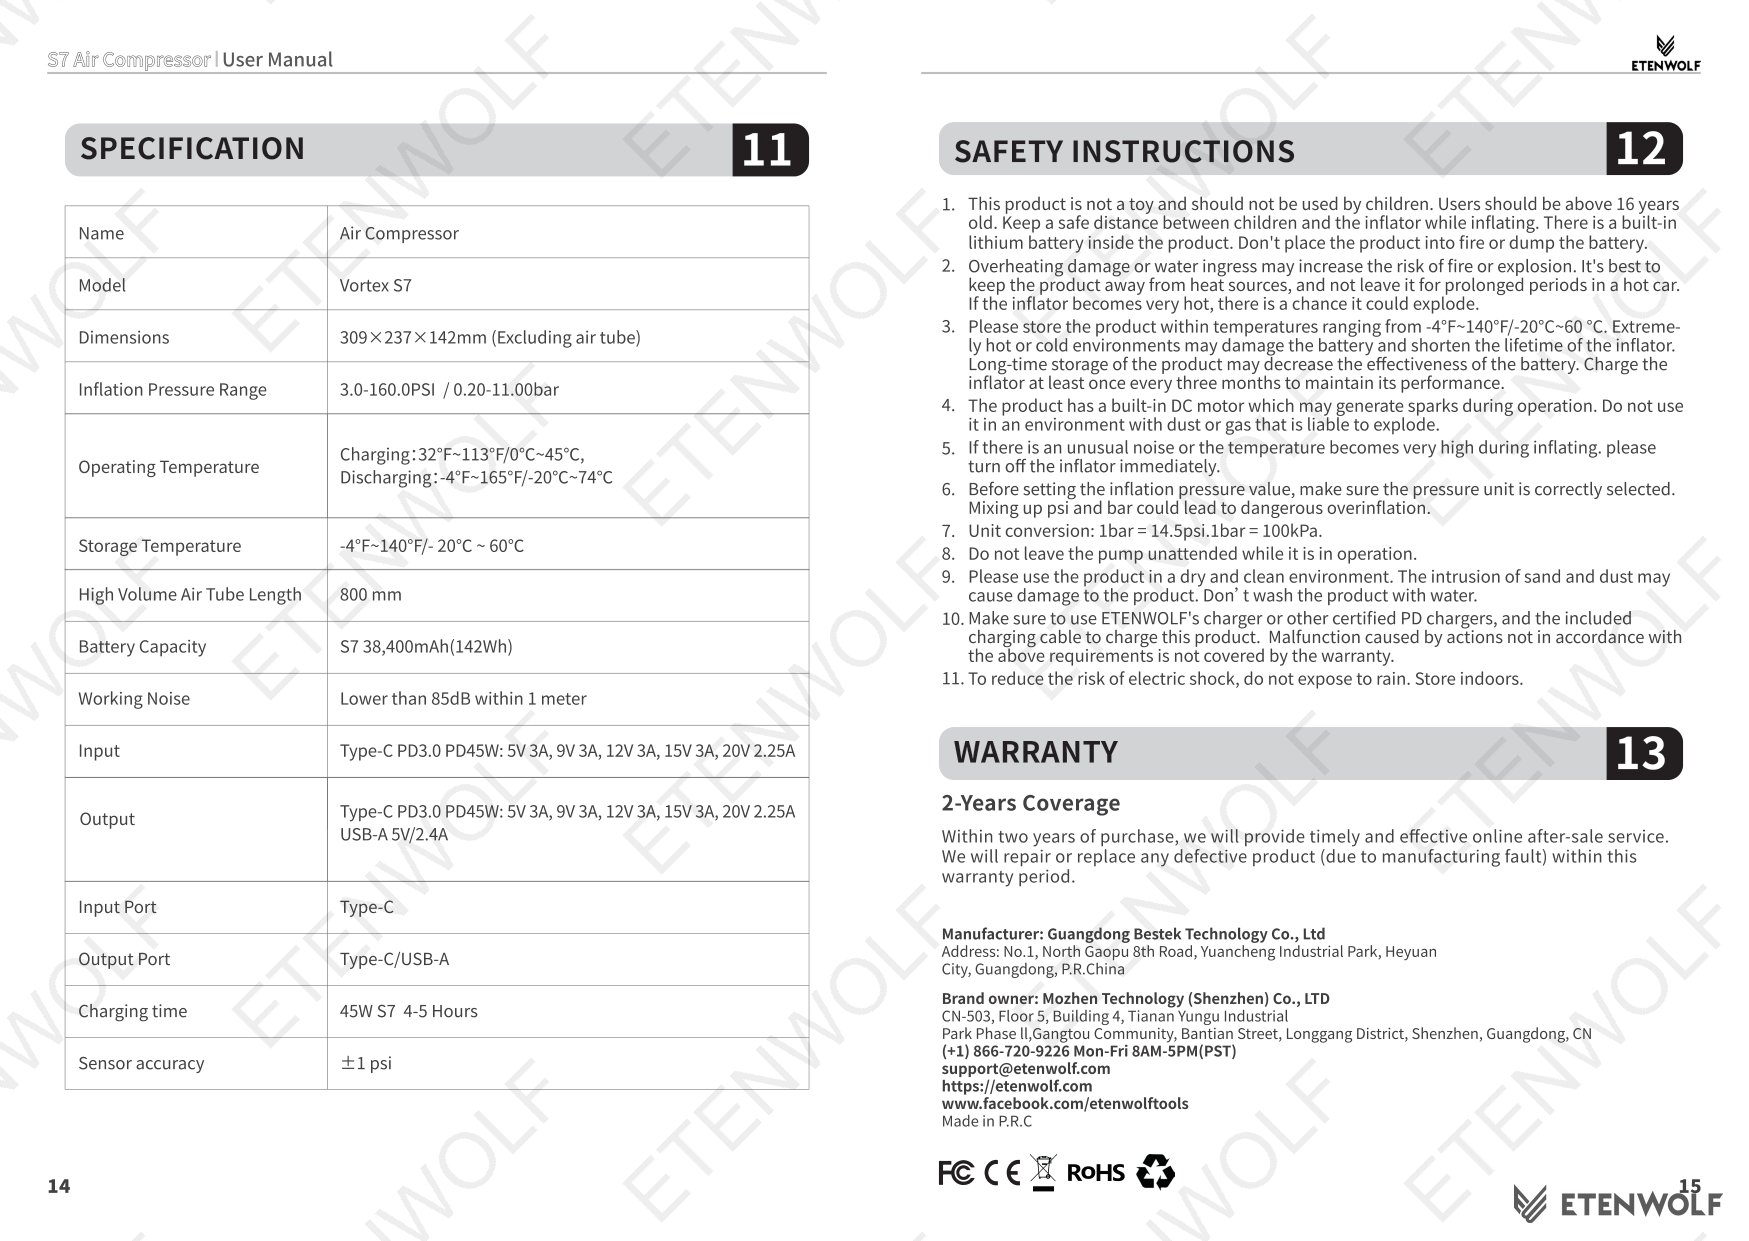
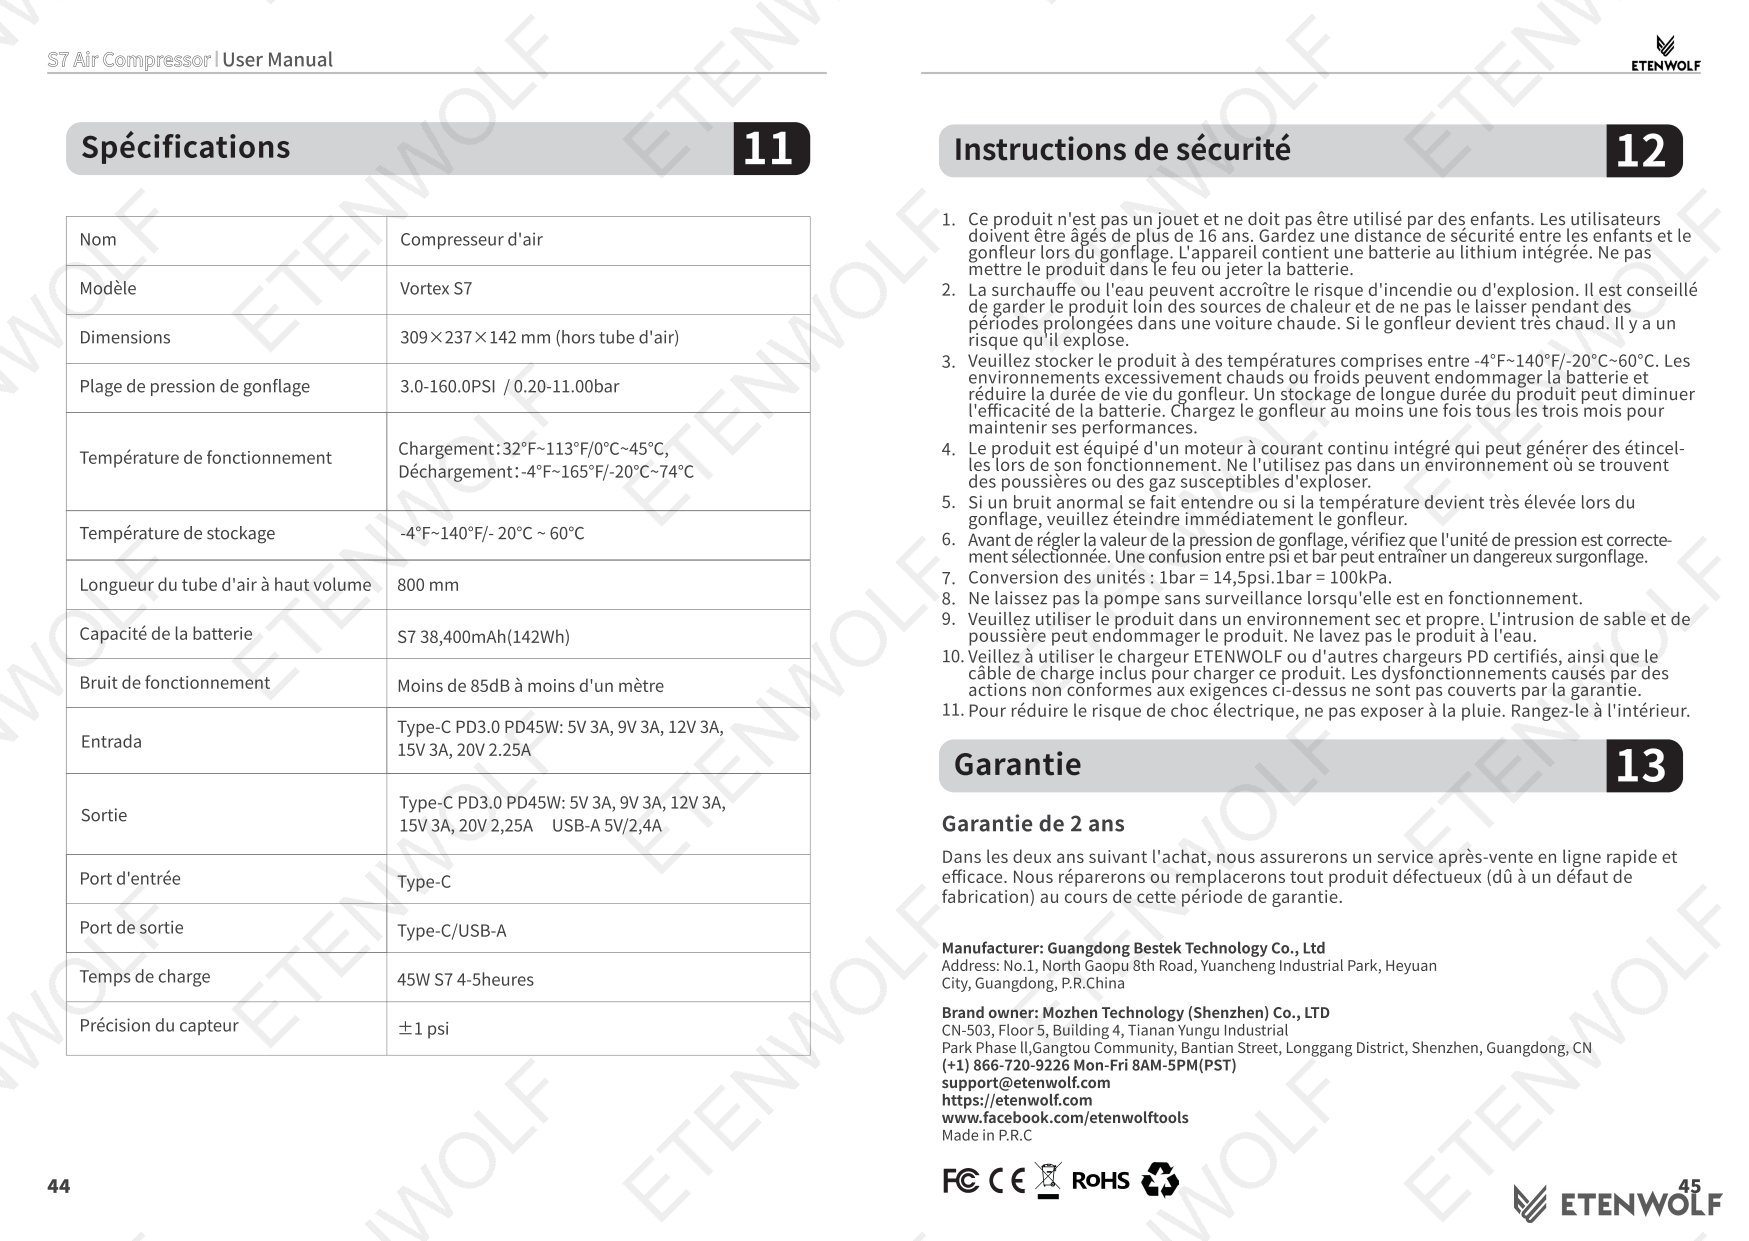
The ETENWOLF Vortex S7 is a consumer product designed and manufactured in compliance with applicable electrical safety and product safety standards. The 45W PD charger included in the package is rated to charge the unit’s built-in battery. Users should only use the supplied charger and cables to ensure safe operation and to maintain compliance with the unit’s electrical ratings.
The product incorporates the following compliance-relevant design features:
- Automatic shut-off protection to prevent over-pressurization above 160 psi.
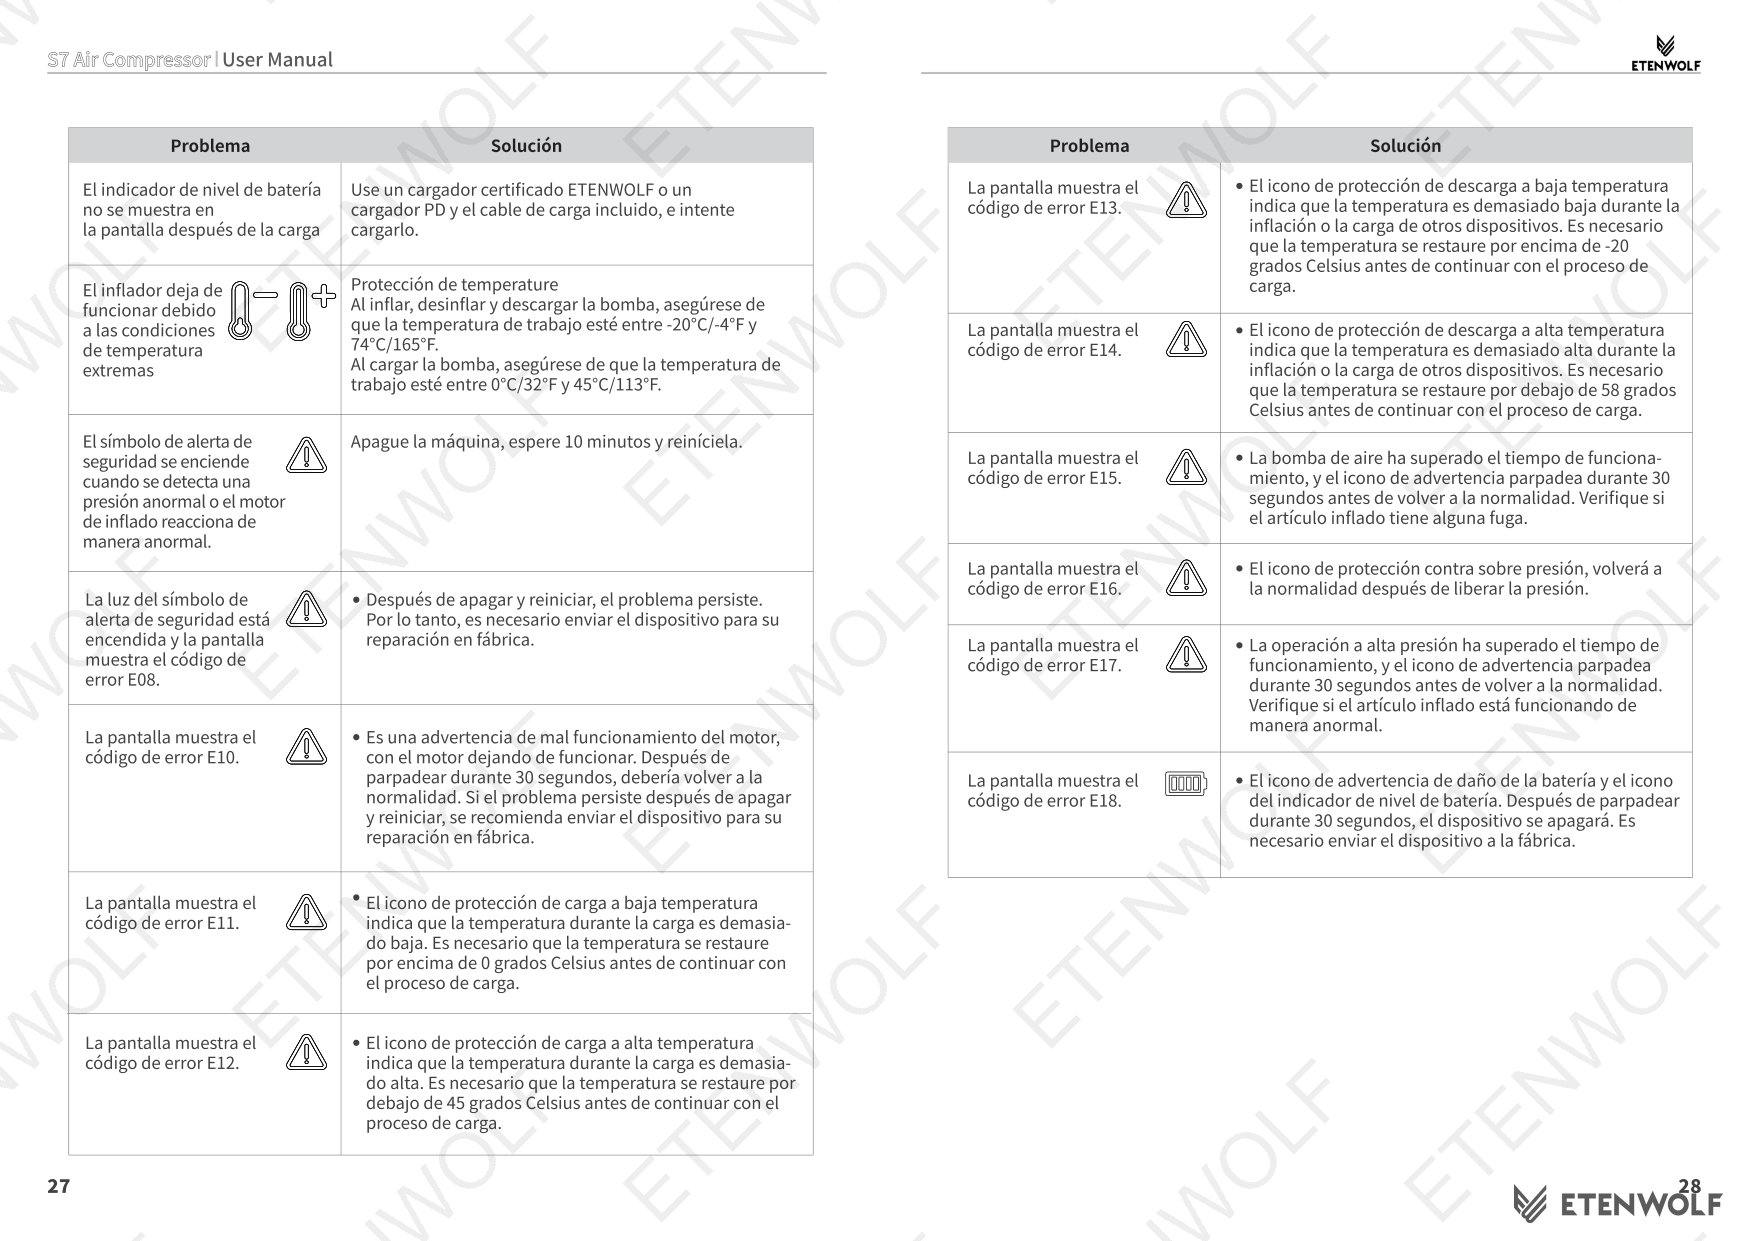
- Thermal protection indicator on the display to alert users to high-temperature conditions.
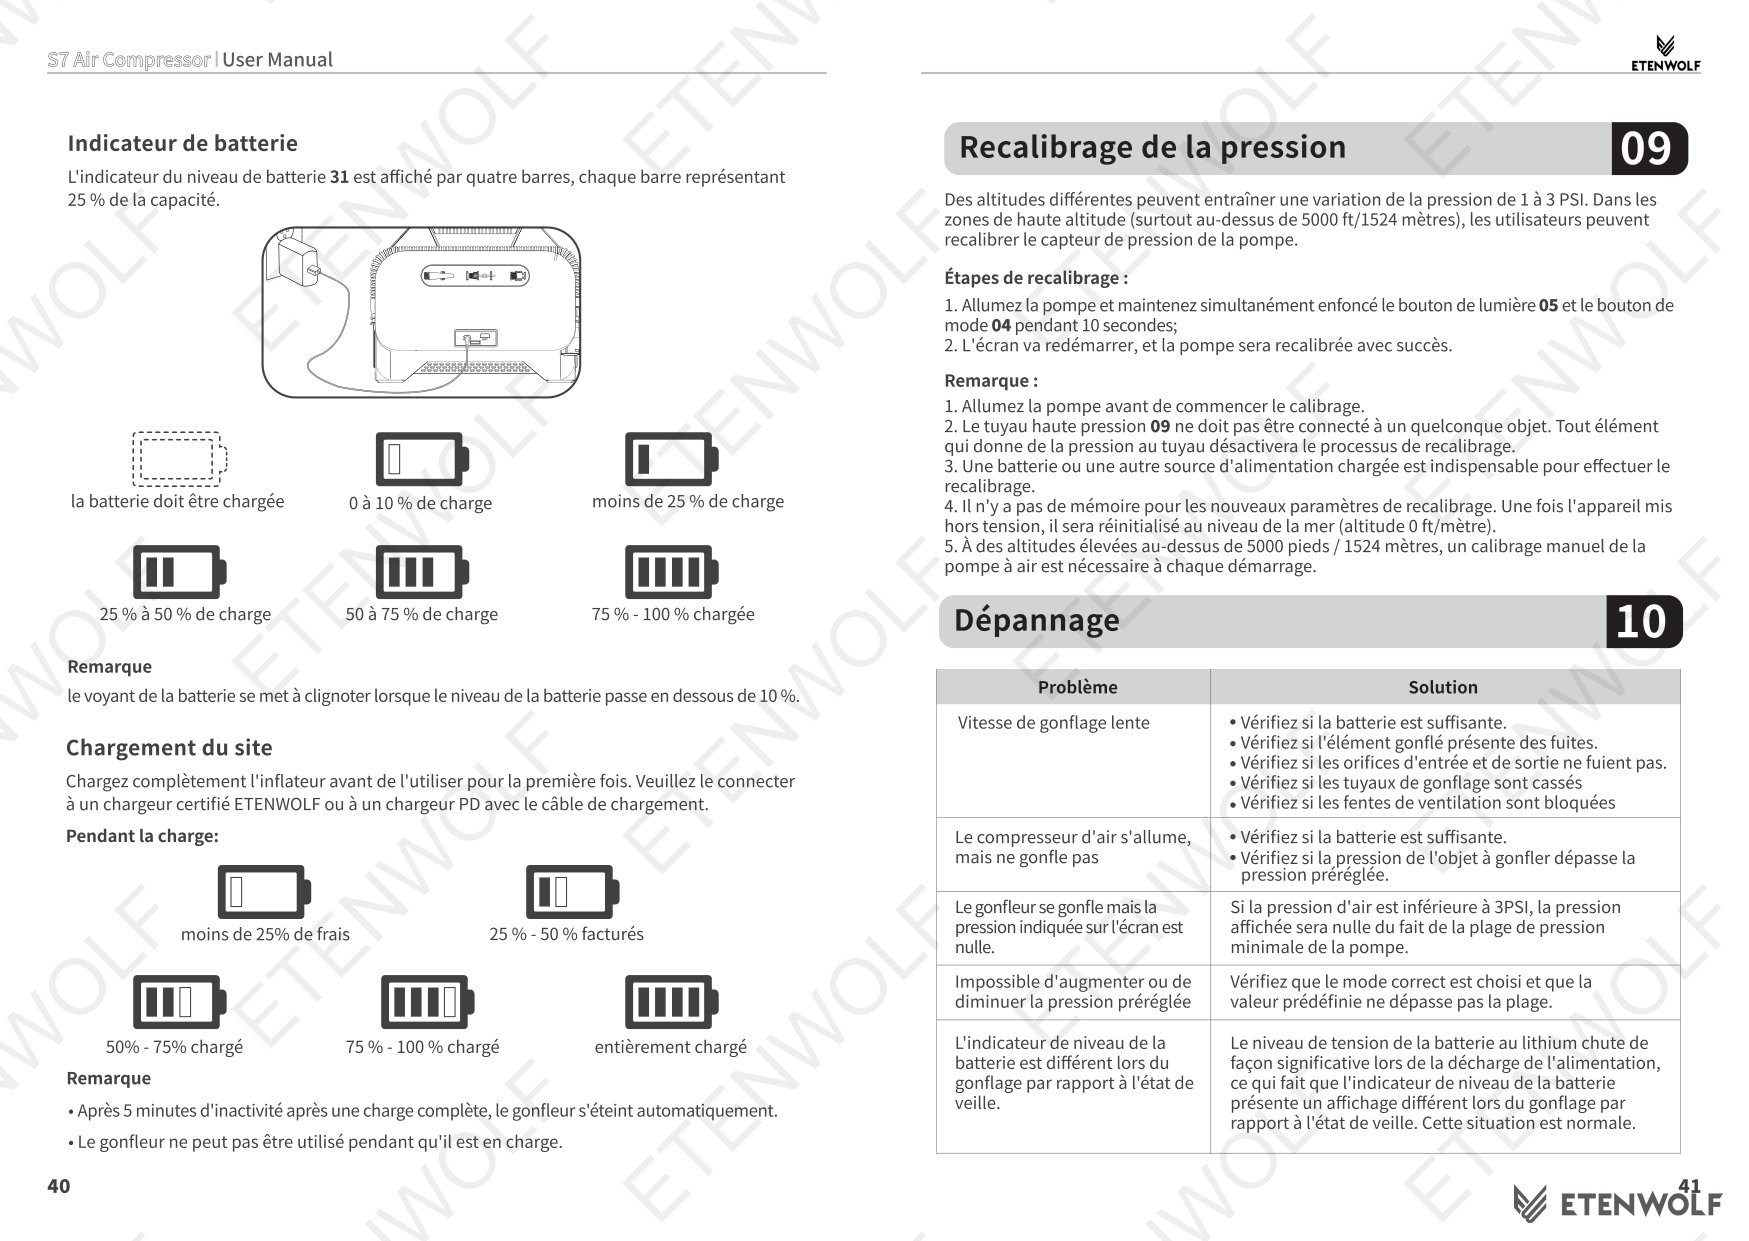
- Battery level indicator to prevent operation at critically low charge levels.
- Low-pressure auto-shutoff (below 5 psi after 5 minutes) to detect hose connection failures.
For information on applicable electrical safety standards such as those published by IEC, or chemical compliance frameworks including REACH and RoHS, refer to the product’s certification documentation. This user manual (V2.1) does not reproduce the full compliance certificate portfolio; separate compliance certificates should be consulted for detailed test results and applicable standard numbers.
Validity & Certification Body
This user manual, version V2.1, was released on October 13, 2025, as reflected in the document filename S7_manual_EN_20251013.pdf. It is issued directly by ETENWOLF as the product manufacturer and brand owner.
The manual is valid for all units of the ETENWOLF Vortex S7 Series air compressor shipped with or after this document version. Users should verify that their unit’s hardware revision corresponds to this manual version. Earlier hardware revisions may differ in button layout or feature availability.
ETENWOLF provides a standard warranty with the option to register for a 1-year extended warranty at https://etenwolf.com. The extended warranty registration must be completed after purchase to be valid. For warranty claims or product support, contact ETENWOLF customer service:
- Phone: (+1) 866-720-9226, Monday–Friday, 8AM–5PM PST
- Email: [email protected]
Frequently Asked Questions
- Q: Does the ETENWOLF Vortex S7 stop automatically when the tire reaches the target pressure?
- A: Yes, when using any of the six high-pressure inflation modes (Car, Pickup Truck, Recreational Vehicle, Bicycle, Ball, or Manual), the unit will automatically shut off once the actual tire pressure reaches the preset target value. In high-volume mode, however, users must stop inflation manually by pressing the Start/Pause button, as there is no automatic shutoff in that mode.
- Q: Can I use the Vortex S7 to charge my phone or other devices?
- A: Yes. The Vortex S7 includes a power bank function via the Type-C port (input/output) and USB-A port. After using the unit as a power bank, it will automatically shut off after 5 minutes of inactivity to conserve battery.
- Q: Why does my tire pressure read lower after inflation than the target I set?
- A: This is normal. When a tire is inflated, the air inside is warm. As it cools to ambient temperature, the pressure drops by approximately 0.5 to 1.5 psi. For accurate results, check the tire pressure again after the tire has cooled. This behavior is noted in the official Vortex S7 user manual.
- Q: How do I recalibrate the pressure reading on the Vortex S7?
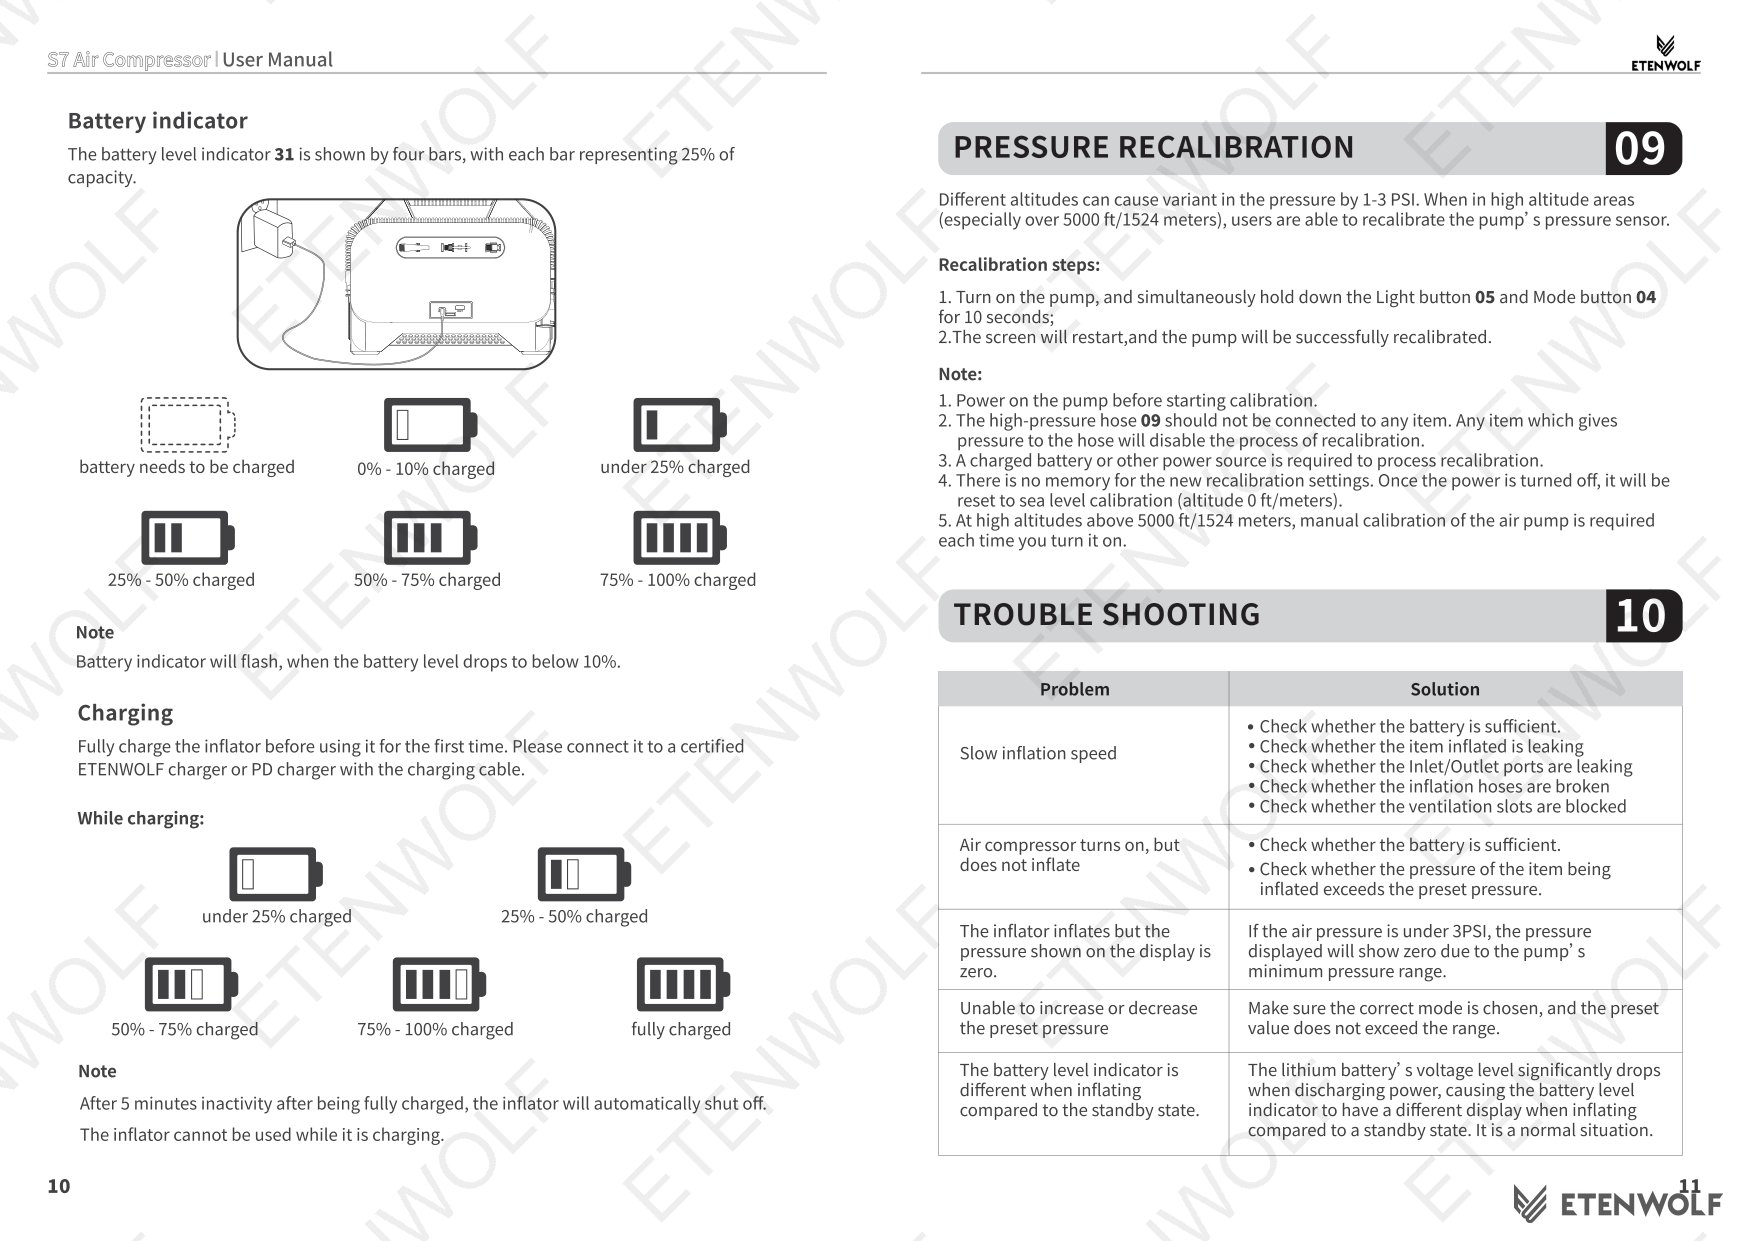
- A: The Vortex S7 includes a pressure recalibration function. Refer to the Pressure Recalibration section of the user manual (page 11 in the original document) for the step-by-step procedure. If the display shows inaccurate readings compared to a known reference gauge, recalibration should be performed before further use.
Related Documents
The following document types are relevant to the ETENWOLF Vortex S7 air compressor and may be consulted alongside this user manual for a complete compliance and product picture:
- CE Declaration of Conformity – Confirms conformity with applicable EU directives for electrical equipment and electromagnetic compatibility.
- FCC ID Certification – Required for any wireless or electronic emission components operating in the United States market, per FCC regulations.
- UN 38.3 Battery Test Report – Documents the lithium battery safety test results required for transport compliance under UN 38.3 standards.
- RoHS Compliance Certificate – Confirms restriction of hazardous substances in the product’s materials per RoHS directive requirements.
- REACH Compliance Statement – Confirms that materials in the product meet REACH chemical safety requirements.
- KC Certification – Required for products sold in the South Korean market, covering electrical safety and EMC.
- Product Safety Data Sheet (SDS) – Provides handling, storage, and hazard information for the built-in lithium battery.
Document Pages